How to Enable Night Mode on Windows and Mac without Any Software
Did you know that you can reduce the amount of eye strain caused due to long hours spent before your PC by 90 percent? No! You don’t have to reduce the number of hours you spend on your computer. In fact, that is far from being a practical solution as most professions revolve around PCs. This makes it even more challenging for the makers of Windows and Mac, to meet customer expectations. Microsoft and Apple, the two largest tech giants are fully aware of the fact that the present-day users are glued to their computers for long hours.
Now that strains the eyes, especially when you use your computer to read e-books or to research, late at night. So, to resolve this issue and to deliver better user experience, these Tech Giants have designed a creative solution — the night mode. If you are wondering how to enable night mode on Windows and Mac without any software, then hang around. We’ve got it all covered up for you, but before we get started with the ‘How-to’, let us take a quick peep into the need for and the benefits of activating the night mode.
Why Should You Activate the Night Mode?
All of us have experienced several awesome features rolled out by Mac and Windows, which are indeed irreplaceable. For instance, the Device Manager by Windows is complete, and no average user may want to replace it with third-party software. However, there is one outstanding, yet underrated feature offered by both Mac and Windows — the night mode.
Due to a rapid surge in the number of users using their computers to read e-books or to research online for long hours, there was a sheer need to introduce the night mode or the dark mode. This mode minimizes the strain on your eyes, which is caused due to the harmful blue light emitted from the computer screen.
As a matter of fact, most people aren’t even aware that they can enable the night mode on their laptops, just the way they do it on their mobile phones. However, if you use a desktop, then we’d like to clarify that the night mode is probably not going to be as beneficial to you, as it would be to someone using a Windows laptop or Macbook. If you are wondering how to activate this on your computer, then hang around and we’ll help you figure that out
Benefits of using the Night Mode
The most common concerns that most PC users encounter is lower back pain and eye strain. While backache is something that can be dealt with, by correcting your posture and having appropriate back support, your eyes continue to suffer.
That’s because when you use a digital gadget for a longer time, then that gradually hampers your vision. So, you’ve got to have certain measures in place, which ensure that your eyes are taken care of. The easiest one is to use the night mode, which lessens the brightness and contrast of your screen. Let us now list out some of the benefits of using the night mode.
- By activating the night mode, you can read for a longer duration without straining your eyes. This works great for students who use e-books or for professionals involved in jobs that require a great deal of research.
- You save energy by making use of the night mode as it reduces the brightness levels, which in turn reduces the energy consumption.
- Ideal for those who live in shared accommodation as using your PC in the night mode does not emit as much light as it otherwise would, and disturb those around you.
However, for certain professionals like those involved in graphics editing, this may not work very well. That’s primarily due to the potential differences in the color display when the night mode is activated, but for most, it works just fine. Although there are several apps available to enable the night mode, you may want to stay away from using them, in order to avoid security concerns. A good example of such third-party software is F.lux, which lets you set the brightness according to your timezone, however, it’s a third-party software.
How to enable night mode on Windows and Mac Without any third-party software
The most effective way to ensure better security is by avoiding third-party software, so how would you like it if you can enable the night mode without any third-party software on your Windows and Mac? This will indeed solve the problem for you as you don’t need to install any third-party software, which may cause security concerns. So let us now figure out how you can enable night mode on Windows and Mac.
Enable night mode on Windows 7 without any third-party software — Method 1
Windows 7 and the later versions have a rather underrated feature — called the Magnifier. This feature was initially designed for those who are visually impaired. However, if you use it as we recommend, then it may help prevent loss of vision.
The Magnifier tool gives you the color inversion option, which also lets you set the night mode. Let us now figure out how you can do this.
To start using the Magnifier, click on the ‘Start’ button. Then, type ‘Magnifier’ in the search bar and then click on it.
For those using Windows 8 and Windows 8.1, simply press Win + X and type Magnifier and then click on the icon, to open the tool.

By default, the zoom level is +250%. To zoom out, just click on the minus (-) button until you’ve reached 100%.
After that, click on the settings button or the gear button, and tick the checkbox next to ‘Turn on color inversion’ option and click OK and you are done.
Enable night mode on Windows 10 without any third-party software — Method 2
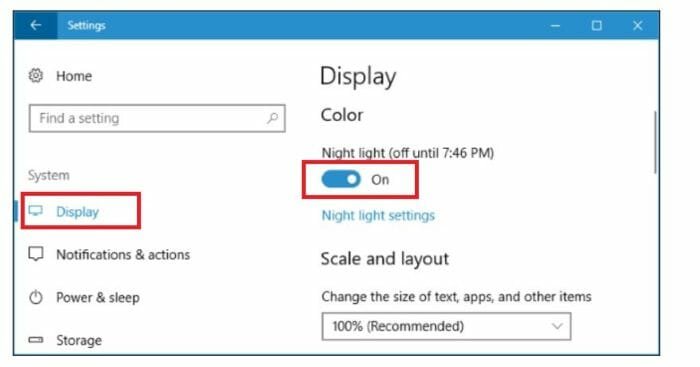
If you have an updated Windows 10 version in your PC, then enabling the night mode becomes as easy as toggling a button.
To do this, simply click on Settings.
Then click on System, and from the list under it, click on ‘Display’.
Finally, turn on the toggle button under ‘Color’.

As you can now see, you have enabled the night mode. This would then be set according to the timezone that you are located in.
Enable night mode on Windows 10 without any third-party software — Method 3
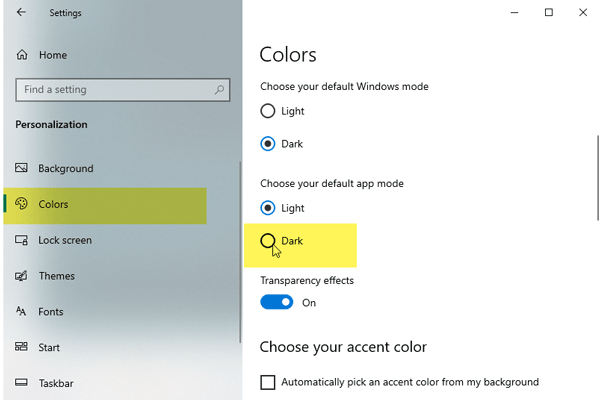
There is another method for Windows 10 users that you can use to enable night mode without any software. Microsoft included such a feature in the Windows 10 only. However, before following this guide, make sure that you are using the latest release of Windows 10. If so, you can start following the steps mentioned below.
At first, you need to open the Windows Settings on your computer. Although there are several methods to do that, you can press Win+I to open it. After that, go to Personalization > Colors. On the right-hand side, you can find an option called “Choose your default app mode.” By default, it should be set to “Light.”

However, you need to select the Dark option. Immediately, your Settings app should turn into the dark. Similarly, all the apps use the system default settings in the “theme” or “mode” section, which would be turned into the dark.
How to enable night mode on Mac?
If you are a Mac user, you might have observed that Apple has redesigned Mac’s user interface. The latest version of OS X, better known as OS X Yosemite comes with a totally redesigned FLAT UI, which is pretty gorgeous. Also, you can partially enable the night mode on 10.10 Yosemite without using any third-party software.
To do this, open your Stock Settings app and navigate to the General tab.
Just tick on the checkbox next to ‘Use dark menu bar and Dock’ and that’s it.

As mentioned above, this will partially enable the dark mode or the night mode on your PC. As a result, you’ll be able to see the black and white color scheme on your dock and menu bar. If you are not satisfied with this partial fix, then the only other option is to opt for third-party software. You can read here about Nocturne and install it if you wish to. However, before you try this out, update your OS X to OS X Yosemite. Else, you won’t be able to access this feature and enable night mode in your Mac PC.
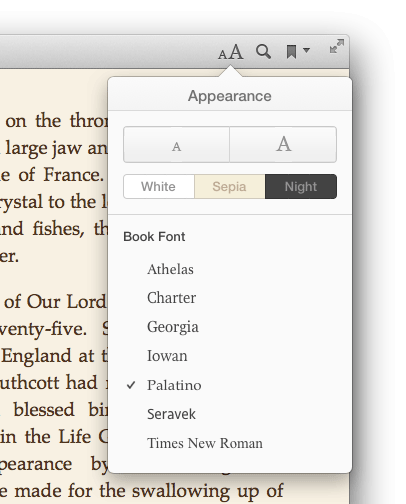
Alternatively, if you use iBook, here’s a quick workaround to enable the Night mode on iBook. All you need to do is click on the font settings button and select ‘Night’.

With that, we have covered some of the best methods to enable night mode in your Windows and Mac PC, without any software. Although installing third-party software is easier, but the risks that come with it are almost unavoidable. So if you shop online and make use of your financial details on your PC, then you may want to stick to the abovementioned methods.
Thanks for the tip. Really helps working at night :)
The stupidest suggestion I ever came across. Makes all negative has nothing to do with easing your eyes, high contrast eye piercing light with images in negatives.
My suggestion to you is that when next time you have the urge to feel smart and do something for the world, DON’T!! And stop smoking that weird stuff that gives you this megalomania.
That is not “night mode” at all! It is just negative colors. A real night mode only affects text and background, but leaves images untouched.
Further problem: you have to activate the magnifier manually every damn’ time you turn on the computer! Also, it opens one more window.
Sorry, but your article is no help.