How to Verify Your Website on Pinterest
Have you verified your website on Pinterest yet? In October 2012, Pinterest launched a new feature called website verification. With this feature, you can verify that you’re the owner of your website or blog. Doing this will display a checkmark next to your domain in search results (on Pinterest) and on your profile.
Having a verified website on Pinterest is much like having a verified account on Twitter. It makes things official and shows other users that you’ve taken the time to take the necessary steps of verifying your website; it really does make a difference.
If you’re feeling a bit confused about the verification process, I’m going to walk you through the steps of using both the HTML verification file method, as well as the meta tag method. Let’s get started.
Getting Started
1. Sign into your Pinterest account and go to Settings, which can be accessed from the dropdown menu at the top right of the page with your name on it.

2. Scroll down the Settings page until you see the field for your website. You should see a “Verify Website” button next to the field; click on this button to start the verification process.

3. You can choose to verify your website using one of two methods:
- Uploading a file to your Web server via FTP; this is not the best option for beginners.
- Adding a meta tag to the <head> section of your index file; this is the quickest and easiest method, especially if you’re using WordPress.
Upload a File via FTP
1. If you choose to upload the HTML verification file to your Web server, be sure that you know your FTP user account login; you’ll need this for whatever FTP client you choose to use.
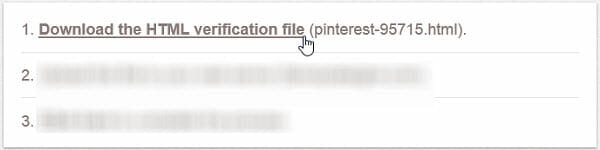
2. Download the HTML verification file from Pinterest and save it to your computer.
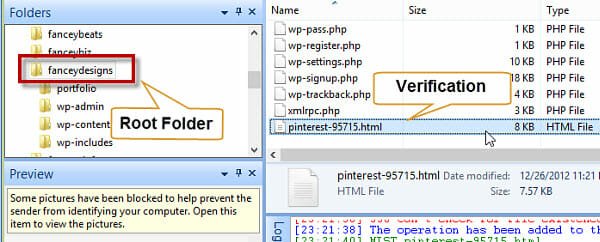
3. Open your FTP client and upload the file to the root folder of your website. Once uploaded, you can view the file to verify that it is indeed on your Web service. The URL should look something like – http://yourwebsite.com/pinterest-12345.html.
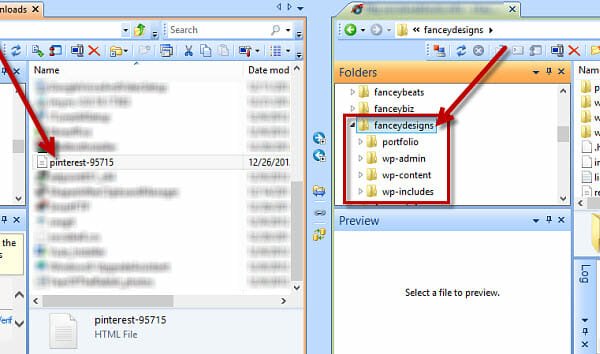
SmartFTP for Windows pictured above and below.
4. From our FTP client, you should also be able to see that the file is indeed on your Web server and within the root folder.
5. Now go back to Pinterest and click on the “click here” link to complete the process. If all goes well, you’ll see the following message, “We successfully verified your website! Go to your profile.”

Add a Meta Tag
1. If you decide to add the meta tag, it can be a pretty quick and easy process. If you’re using WordPress, you won’t have to use an FTP client at all. However, if you have a website without any type of internal HTML editor (like WordPress), then you’ll have to use an FTP client for this method as well.
2. Go to your FTP client and open the index.html or index.php file. Make sure you see the header inside of the file; it should start with the <head> tag and end with the </head> tag. If it’s not here, you may have your own header.html or header.php file (this is how most WordPress themes work).
3. If you’re using WordPress, go to your dashboard and under the Appearance menu click on the Editor submenu. This will open up HTML editor for your current theme. More than likely you have a header.php file containing your header, but you can check the index.php file just in case.
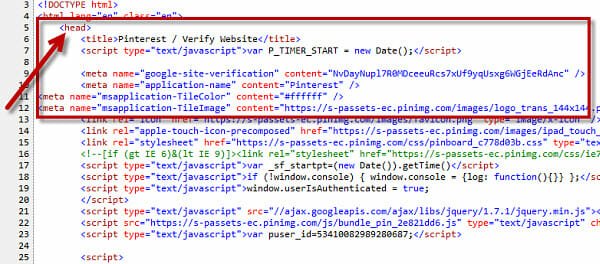
4. Once you’ve found the header for your website or blog, it’s just a matter of copying the meta tag from Pinterest and pasting it between the <head></head> tags.

5. The best place to add the meta tag is right below your other meta tags (charset, title, description, keywords, etc). Just create an empty line within the code and paste in the meta tag.
6. Now go back to Pinterest and click on the “click here” link to complete the process. If all goes well, you’ll see the following message, “We successfully verified your website! Go to your profile.”
After Verification
1. Go to your Pinterest profile and you should see your website listed, along with a checkmark.

2. You’re all done.
Final Thoughts
As you can see, verifying your website on Pinterest also means more exposure since it will show up on your profile and in Pinterest search results. The somewhat complex process is well worth the end result.
Note: While I only mention WordPress in this tutorial, you can also easily verify your websites that are using other popular platforms. If you want to verify your Blogger blog, Tumblr Blog, Shopify store, or any other online store, Pinterest has created support pages just for you. Be sure to check them out.