How To Record High Definition Screencasts With Camtasia Studio
If you want to show a visual demonstration of your computer screen, you will need a good screencast software to record a video of your computer and then upload it to video sharing websites like YouTube.
Since I write a technology blog on computer tips and tricks, often I have to record screencasts for my blog posts so that readers can easily understand the steps behind a tutorial. When the recording is complete, I use YouTube to host the videos.
The HD screencasts for YouTube must be in the widescreen format (1280 X 720) for better video quality.
There are a good number of web based tools e.g Screenr, Wetoku, Screen Toaster for HD screen recording but I highly recommend using Techsmith’s Camtasia studio 6 for two reasons.
Advantages of Camtasia Studio Over Web Based Screen Recording Tools
First, you can save the project file in your computer and apply more effects at a later time, if required. Second, you can add audio tracks, video transitions, text and callout effects, zoom and PAN and do much more which is not available with web based screen recording tools.
Camtasia studio is available for both Windows and MAC and you can download a trial version of the program to get started. The trial version is completely free for the first 30 days so you can try the tool before deciding to buy it.
How to Record a High Definition Screencast With Camtasia Studio
1. After you have successfully installed Camtasia studio, go to the Camtasia recorder settings from Tools > Camtasia recorder and select the recording dimensions as 1280 X 720.

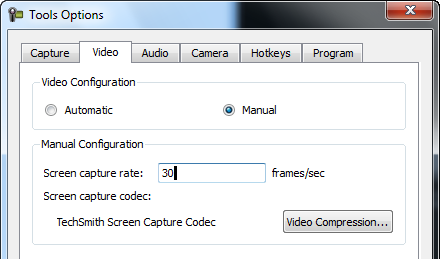
2. From the Camtasia recorder window, click Tools > Options and switch to the video tab. Choose the mode as manual and set the frame rate to 30 frames per second (30 fps).
3. If you would also use voice narration with your screen recording, go to the Audio tab and select the audio format as PCM. Next, click the attributes dropdown and select 44.100Khz, 16 bit stereo – 172 Kb/sec as the audio attribute.

It’s recommended to save the setting as a template, this will be handy when you would want to create more screencasts later.
4. The settings part is over, now record the screencast as you want. Do not make the video recording very long ( e.g 30 minutes or more) because this will affect the video rendering quality.
If you must have to record something of a longer duration, it’s recommended to shoot the screencasts separately and then join them using any other video editing tool.
5. Once the recording is complete, save the file as .camrec and open it with Camtasia studio for further editing. You will be asked to choose the project settings and the output format of the video to be produced.
Choose “HD” as the project option and uncheck the selection “Apply Smartfocus” – you can always apply custom effects in the next step.

6. Now you can add more effects, e.g insert text, callouts, zoom, pan or add video transitions. When you are done customizing the video recording, it’s time to render the video to a High definition (HD) format.
7. Click File and choose “Produce Video as” and then pick the HD format. Click “Finish” and Camtasia will start rendering your video recording to an MP4 file.
Uploading Your HD Screencast to YouTube
Now that your HD screencast is ready, head over to YouTube, sign in with your account and upload the video. It may take some time to upload – this depends on the size of the screencast.
For normal screencasts that are 10-15 minutes long, it should take anywhere between 10-25 minutes, this depends on how fast is your internet connection. When the upload is complete, you will see a new “HD” icon in your “My Videos” page.

That’s it, you have just learned how to create an HD screencast with Camtasia studio and upload it to a video sharing website like YouTube.
Example: On our YouTube channel, we have uploaded some HD videos created with Camtasia studio.
How to Embed the HD Screencast in your Website or Blog post
Once the video has been uploaded to your YouTube account, you may like to embed it in your website. Use the following code, replace XXXXXX with the video ID:
</param><embed src=”http://www.youtube.com/v/XXXXXX&hl=en_US&fs=1?rel=0&hd=1″ type=”application/x-shockwave-flash” allowscriptaccess=”always” allowfullscreen=”true” width=”642″ height=”386″></embed></object>
Here is an example video in high definition, recorded using Camtasia Studio 6.
What screen recording tools do you use to create screencasts for YouTube? Please share your ideas in the comments.
This is awesome! Great find. Famous as Camtasia, it’s really a wonderful screen recorder with comprehensive functionality. But it may be too expensive for some users. I’m currently using Acethinker Online Screen Recorder, this tool also performs great in recording screen. And it’s totally free.