How to Set Private Network in Windows 10
By default, Windows counts all the networks as Public, which is not safe for any PC unless or until your administrator has told you to do so or restricted by the office’s network admin. if you are familiar with these terms (Private Network and Public Network), you may know what they do. But, if you don’t know, let me explain.
Public Network: Whenever, you will connect your computer to a network like Ethernet or Wi-Fi, your PC will ask you to share that device with others on the same network. If you click on YES, your PC will be set to Public. Therefore, your PC will be visible by any other device that is connected to the same network.
Private Network: It does the opposite thing of Public network. If you click on NO on the confirmation dialogue after connecting to a new network, your PC will be set to Private. File sharing, printing etc. will be blocked by your Firewall.
Windows is smart enough and thus, Firewall will be set up according to the option you will choose. Once you choose an option, it would be quite difficult for you to change the settings – if you don’t know about them. But, this is obviously possible and not much time consuming too.
Set Private Network in Windows 10

Here are some different methods to set private network in Windows 10. Although, some procedures are mainly for Windows 10 but rest of them can be used on Windows 7 / 8 / 8.1 as well.
1] PowerShell
The PowerShell method is simply awesome and it takes only couple of seconds to get things done. At first, open Windows PowerShell with admin privilege. Then enter the following command,
Get-NetConnectionProfile
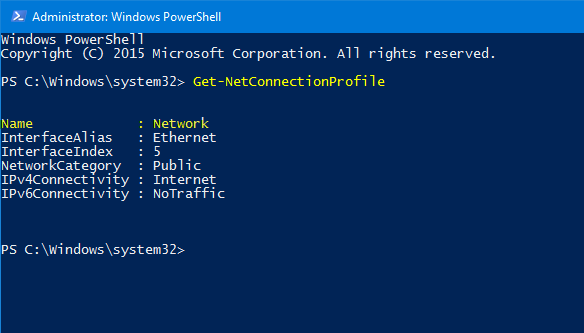
It will let you show the network name and network category (Public/Private). Now, enter the following command,
Set-NetConnectionProfile -Name network_name -NetworkCategory Private
Note: Change the network_name with your actual network name.
In case, if you want to make the network public, just change the last word of the aforementioned command. In other words, use Public instead of Private.
2] Local Security Policy
This is quite good but it takes more time than PowerShell. In fact, all the other methods are about to take more time than the first method. Anyway, you should know that Local Security Policy is an in-built tool of Windows that takes care of various security related stuffs. It manages everything like local security, network security and all. Therefore, you can make use of this built-in tool to set private network in Windows 10.
At first, press Win + R and type secpol.msc and hit enter. Here you will get a folder named Network List Manager Policies. Click on this.
Now, you will get another option called Network. After opening this, you can find this window,
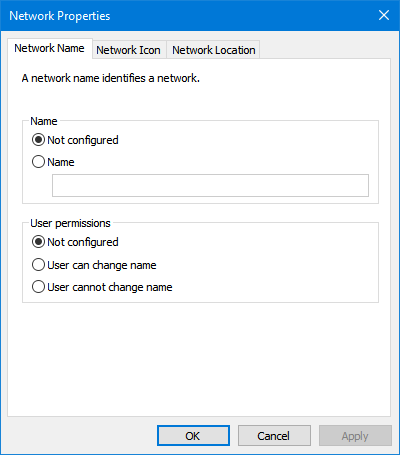
Now, switch to Network Location. By default, it should be set to either Not Configured or Public. Just select Private and click on Apple/OK.
That’s it.
3] Registry Editor
Registry Editor is yet another useful tool for Windows that will let you change network settings. Before using this tool, make sure you have created a backup of Registry editor and created a system restore point. If anything goes wrong, you can easily get back to your old Windows within minutes using these things.
Now, open Registry Editor. For that, press Win + R, type regedit and hit enter. Therefore, you will have to click on YES on UAC popup. After that, navigate through the following path,
HKEY_LOCAL_MACHINE\SOFTWARE\Microsoft\Windows NT\CurrentVersion\NetworkList\Profiles
Here you will find some keys with a large number of digits. If you have already connected your PC to 4 different networks, you will get 4 different keys. That means, the more network you have connected to, the more keys you will get. Therefore, just click on each key and find out that you want to set to Private. You can find the network name on your right side after clicking on those folders. Here, you can also find Category.
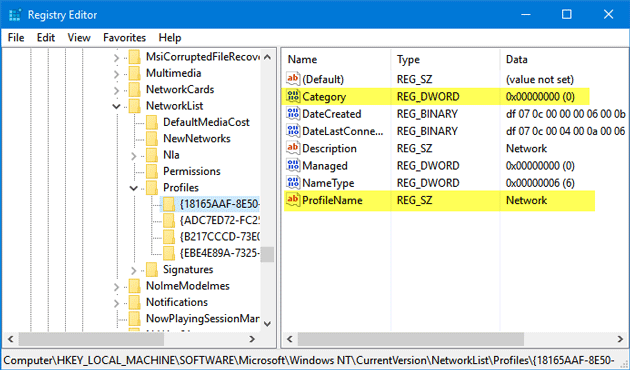
Just double click on the category and set the value to 1. Then, save your changes.
Public Network: 0
Private Network: 1
Domain Network: 2
This is as simple as that.
So, these are the three methods to set private network in Windows 10.