Save And Restore Your Work In Virtual Box Using Snapshots
Virtual Box is a great tool that comes handy when you have a little guy in you that loves to tinker around with new Operating Systems, or even if you do your work around in it. But believe me Virtual Box is way more than just installing Operating systems. It packs a bunch of features that help a lot of people around the world to carry out their tasks and test their products on different platforms.
So what if something goes wrong with your operating system while you are testing some new features on it? Will you have to install the operating system in the virtual environment all over again? Although the process of installation on Virtual Box is not much of a hassle, but it can be really time consuming in some cases. You do not wnat to get stuck in such situations. Right?
There is a very useful and clean feature that Virtual Box have built in, that not all of us are aware of. This feature is called ‘Snapshots’. What this features does is that it creates a snapshot of your operating system at a particular time, and if by any chance, anything goes wrong while your testing, you can just roll back to that snapshot and start using the operating system just like nothing happened. Snapshot can be explained as saving the state of your operating system, like making a copy of it.
Well that seems pretty easy. Isn’t it? I bet that is. So all we have to do now is just create a snapshot of the operating system we are working on, before we do any testing. And if anything goes wrong at all, we can just revert back to previous state of the operating system. But now the question is, how can we do that? We are getting right on it.
How to save a Snapshot?
While the process in overall a very easy, we will still guide you through it in detail. All you need is a working operating system inside your virtual machine.
Now the first thing you need to do is start up your virtual machine in the virtual box, and click on the menu item. From the menu, click the option Take Snapshot.

In the next step, you need to enter the name and any description you like for the snapshot. The description can contain additional details about the snapshot like when and why it was created, or the state of the operating system when the snapshot was created.

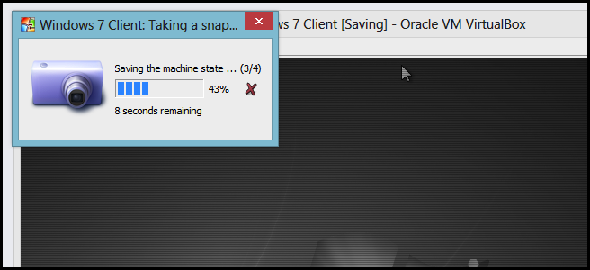
Then, the virtual box will dim out the virtual machine for a small moment while the snapshot of your machine is created and saved.
This was all that you need to do in order to take a snapshot in Virtual Box. Simple Right?. Now let us see how you can recover your state with this saved snapshot.
Reverting to a Snapshot
So now that we have a snapshot of our machine, and that we have messed up. We need to revert back to the snapshot, to save a hell lot of time, boggling around installing new OS in the virtual machine. So for that very purpose, shut down the virtual machine if it is already running. Since reverting to the snapshot requires the virtual machine to be switched off.
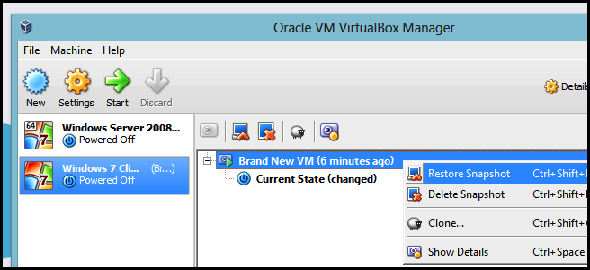
Now on the virtual machines list, select your virtual machine and go over to the snapshots view. Here you will see the list of all the snapshots of your virtual machine that you have created till date. Select the snapshot to which you want to revert to, right click on it and click the Restore Snapshot option from the context menu.
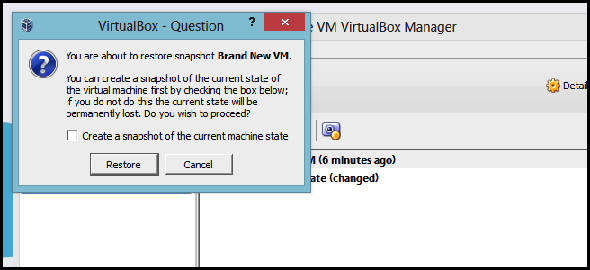
Now when you do this, remember to uncheck the the option to create a snapshot of the current state of the machine, since your current state of the machine is broken.
You will then see that the current state of the machine will become the same as of the snapshot you chose to restore.

Now power on your virtual machine and then you will see that the machine has started to restore itself.
Now you can start working on your machine from where you left in the snapshot and save hours of work you had to do in case snapshot feature was not available in Virtual Box. This feature is also available on other virtualisation softwares but may be present with a different name, but they all serve the same purpose. So make sure to take full advantage of them.
Make sure to check the rest of out library that consists some amazing tips & tricks, and How-To guides. Thank You.