How to Apply Local Group Policy Changes to Particular User
If you ate using Windows, you may have already seen that Windows has a tool called Local Group Policy Editor. There is a very low chance that you have not introduced to this fantastic tool of Windows as it is available for Windows Pro, Enterprise and Ultimate editions of various versions of Windows. Local Group Policy is a built-in tool of Windows, which can be used by anybody who is currently using Windows OS. There is no such security to use it on your Windows computer. Although, it makes problems due to wrong settings but it is not as sensitive as Registry Editor is.
By default, there are only two options. First, Computer Configuration, which lets you apply tweaks on overall computer. Second, Use Configuration, which lets you apply tweaks to the current user.
Now, please consider the following situation. Let’s assume that you have 3 users in your computer, who uses your PC and you are the administrator. Now, you want to apply certain things to a specific user instead of whole computer using “Computer Configuration” settings. Obviously, you can open that particular account and make all the changes through Local Group Policy Editor but it will take much time to switch accounts. On the other hand, you cannot make changes through “User Configuration” as it will apply everything on your current account.
If you really want to apple Local Group Policy change to a particular user of Windows, here is a solution. You do not have to install any third party software or have any expert knowledge as this is very simple, which can be done using built-in tool of Windows.
Apply Local Group Policy Changes to Particular User
There is a built-in tool of Windows called Microsoft Management Console, which will let you create a virtual Group Policy Editor to make all the changes to a specific Windows user. Like said before, you do not have to install any third party software to get things done.
At first, you have to open Microsoft Management Console. There are two ways to open it in your Windows. You can either search for mmc.exe in your Taskbar search box or you can use the same command in Run prompt. After that, you can find UAC where you have to click on Yes.
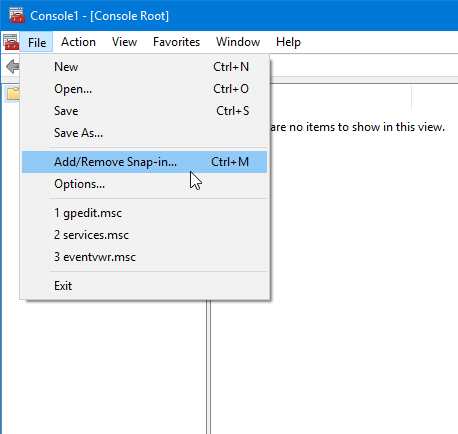
After that, go to File >> Add/Remove Snap-in

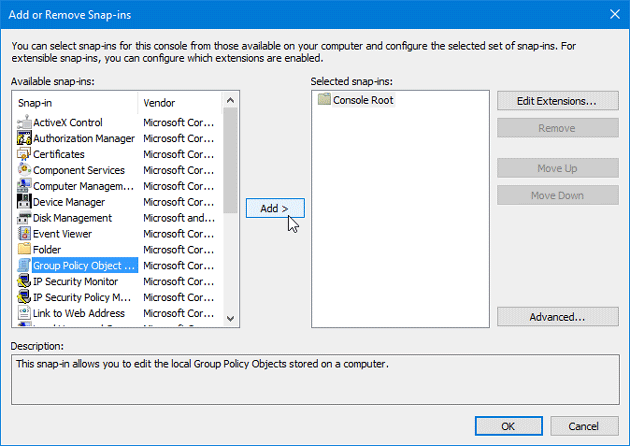
Alternatively, you can press Ctrl + M together. Now, select Group Policy Object Editor from your left hand side and hit the Add button.

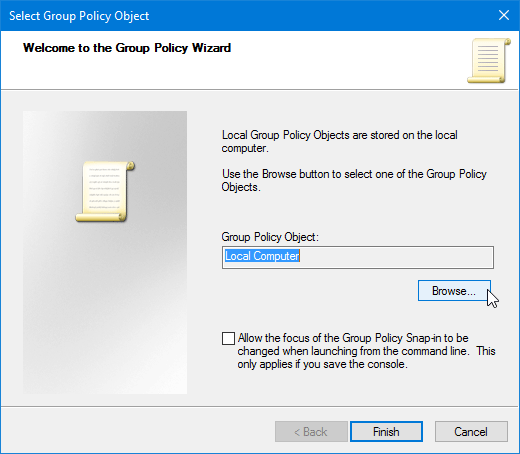
On the next window, you can find a Browse button. You have to click on this.

Following that, you will get all the users on your screen. Select either a particular user or you can also choose Non-Administrators.

After that, hit the OK button. Therefore, click on File >> Save as. Now, you have to choose a path where you want to save it. Select that and enter a name so that you can recognize it quickly. After saving that, you can open it in order to make change to that selected user.
That’s it. Hope this tiny trick would be helpful for you.