How To Edit And Create Videos With Windows 10 Photos App
Windows 10 comes with tons of inbuilt apps, and the Photos app is one of them. Microsoft replaced traditional Windows Photo Viewer with the Photos app in Windows 10. The replacement was smooth and the app super awesome. That is the reason, why people like it so much. No matter whether you open an image or create an album – everything is possible with the help of Photos app for Windows 10. If you are a new YouTuber and you want to create some awesome videos but you do not have a good budget to opt for Final Cut Pro or Adobe Premiere Pro, you can certainly opt for Windows 10 Photos app. Obviously, you should have a Windows computer. If you are interested, you can check out this article, which contains some of the basic guides to edit and create videos with Windows 10 Photos app.
Features of Windows 10 Photos App for Video Editing
There are mainly two options that you get while trying to make a video and they are Automatic Video and Custom Video. However, in this article, we will focus on Custom Video, which is much more advanced than Automatic Video. With the help of Automatic Video option, you will be able to create a video in automation. In other words, the Photos app will do everything on behalf of you. You do not need to do anything. That means you have to go with preset effects, and texts. However, if you choose the Custom Video option, you will have full control over your video. You can edit every single frame of your video with proper effects, text, etc.
Talking about specific features, you can find these options in the Custom Video mode.
- Trim: This is the most basic feature of any standard video editor. No matter whether you choose Adobe Premiere Pro or the Photos app, you can find this option. In case you don’t know, it helps you cut the video so that you can get rid of unnecessary parts.
- Resize: It is another basic feature that helps users remove black bars.
- Filters: Almost nobody likes the color of raw video footage. It doesn’t matter which camera you use; you can certainly make some tweaks and turn the footage into a better one. With the help of Filters, you can adjust the color saturation. The only problem is you cannot change it frame-wise. If you select a filter, it will be applied on every frame fo your video.
- Text: Many times we need to add some texts in our videos so that we can demonstrate something. Also, many people use the Text option to make the video title. If you want to add a video title or an outro, you can use this feature. This is possible to change text font, color, background color, etc.
- Motion: If you want to flash something on your video dynamically, you can use Motion feature. It will let you add text, image, etc. on your video so that you can show a message in a moving box.
- 3D effects: This is the most advanced feature of Windows 10 Photos apps. It allows users to add 3D graphics in the video. From various objects to toys to text – everything is available in this section. However, not all things are available by default. You can download some 3D graphics from the corresponding Library. Adding 3D graphics or object makes your video more professional.
- Auto Save: If you use the Photos app to edit a video and you are worried about the saving, you should not be since Photos app saves all the changes automatically. If you are editing a video that is placed on your computer, you can find all the changes in the video automatically. However, if you want to share a video with someone or you are working on a video as a team, you can save the video in the cloud aka OneDrive.
How to Get Started with Windows 10 Photos App?
This is very easy to use and not much time consuming as well. The best thing is you do not need to download any third-party software since Photos is an inbuilt app, which is available in Windows 10. However, all the aforementioned features are available in the latest version of Windows 10. Therefore, you should use the latest version of Windows 10 build to find these options.
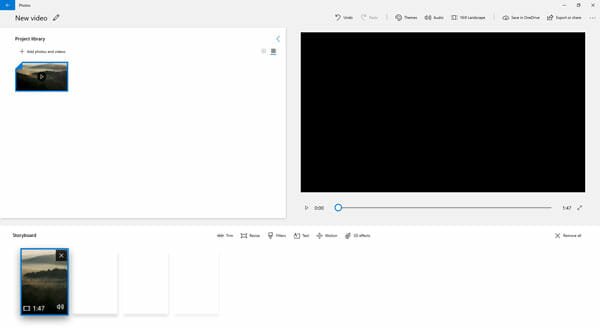
To get started with the Windows 10 Photos app, you need to open it first. After opening, click the Create > Custom video option.

Now you can choose the name of your video. It is not the video title. It is just for saving finding the file on your computer. If you do not want to add a name, you can simply click the Skip button. After that, click the Add button under Project library section and select an option between From this PC and From my collection. If you previously edited a video, select the second option. Otherwise, choose the first option and open the video that you want to edit.
After adding the video to the Project library, you need to add it to the timeline. For that, use the drag & drop method to do it.
Now you can find all the options like Trim, Resize, Filters, text, Motion, etc. If you want to add a text, play the video and move the cursor where you want to place the text. After that, click the Text button and make all the necessary changes.
Just like that, you can add motion, 3D effects, filters, etc. As mentioned earlier, you do not have to save the video manually. However, if you want to upload the video to the cloud aka OneDrive, you can click the cloud storage icon visible on the top-right corner of the Photos app.
Final Word
Considering everything, the Windows 10 Photos app is pretty good as a free solution. You can start learning video editing with this tool. A tool like Premiere Pro, or Final Cut Pro, etc. gives you more control, but the Photos app is handy when you need basic editing, or you do not have any knowledge on video editing.