How to Manually Update Moto G 2nd Generation to Android Lollipop
Motorola has revamped their entire marketing strategy with some mobiles such as Moto E, Moto G and Moto X. among these three mobiles, you can find Moto G 1st Generation and 2nd Generation. On the other hand, they have also launched Moto X 1st Generation as well as 2nd Generation. Obviously, the 2nd prototype is quite better than initial release.

For instance, the initial version of Moto G has 5 megapixel camera whereas 2nd Generation of Moto G comes with 8 megapixel camera. The 2nd Generation also has some other improvements like 16GB of internal storage along with microSD card support, 2 megapixel front facing camera, Java Support and more others. One of the main difference between 1st Generation and 2nd Generation of Moto G is the 2nd Generation has 5-inch IPS display and 1st Generation has 4.5-inch HD display.
Anyway, both devices come with Android 4.4 KitKat. But, you know that Google has launched Android Lollipop along with two new Nexus devices just few months back and that update is for all over the world. Although, most of the companies have not started rolling out this update for their older Android mobiles but Motorola has started rolling it out for their latest mobiles. That simply means you will get it on your Moto G 1st Generation, Moto G 2nd Generation and both versions of Moto X.
You should already get the update notification on your mobile. If you have been notified, you can simply go to system update section and update your Moto G 2nd Generation to Android Lollipop. However, if you do not have the update notification, here is a solution that will assist you to manually update your Moto G 2nd Generation to Android Lollipop within next 15 minutes. The entire method is very simple and you do not have to be an expert to install the system update.
But, before doing anything, you should check the following requirements;
- Model: Moto G 2nd Generation XT1068 Dual SIM
- System: 21.11.23.titan_retaildsds.retaildsdsall.en.03
- Build Number: KXB21.85-23
- Battery: At least 60%
How to manually update Moto G 2nd Generation to Android Lollipop?
This is however very simple. At first, download the OTA update of Lollipop (378 MB). Then, transfer it to your internal storage.
After that, go to your device’s System Update section. For that, navigate to Settings >> About Phone >> Software Updates
Then, tap on Check Now. Your phone will show your an update notification on your screen.
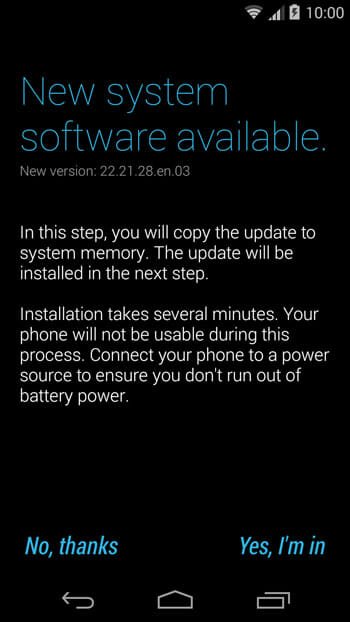
Tap on YES, I’m in. after that, you will get a screen something like the following picture;
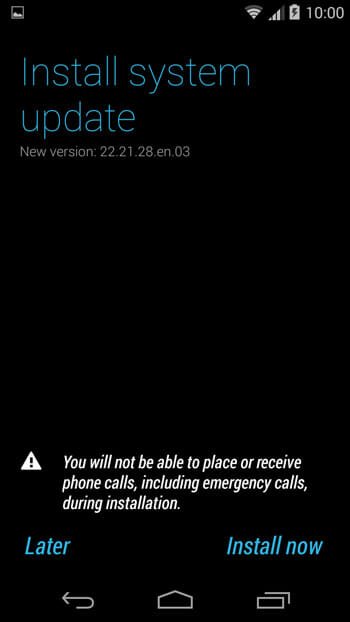
Tap on Install Now. Just after that, your device should restart. Sit back and wait for at least 5 minutes when the OTA update would be installed in your device. After completing the update, it will restart once again. After that, you will get a screen something like the following picture;
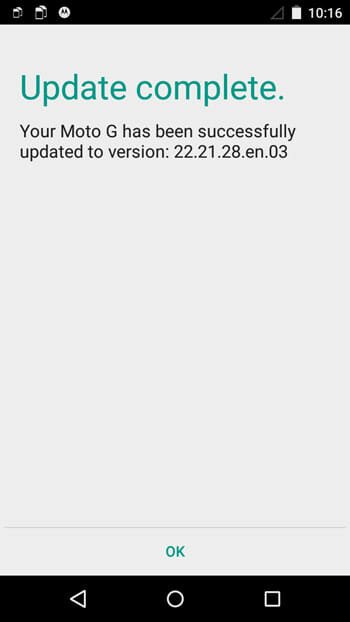
It indicates that you have installed the Android Lollipop update successfully.
That’s all! Now, you can enjoy all the awesome features of Android Lollipop.
Important things:
- Don’t try to execute same tutorial on other system variation. We are not liable for any damage. Try it at your own risk.
- Your warranty will not be void since this is an official update.
- You do not have to unlock bootloader.
Do let us know if you have any question.