Author: Sudip Majhi

  • How To Disable Chrome Incognito Mode On Windows And Mac

    If you are giving away your computer to your kid and you do not want him/her to access any website in the incognito mode, you should turn it off. This article shows how to disable Chrome incognito mode on Windows and Mac so that your kids cannot access that mode in any way.  You may not have to use any third-party tool since in-built options can do more than that.

    What Happens When You Disable Google Chrome Incognito Mode

    It is straightforward to disable the Incognito mode of Google Chrome on Windows and Mac computer. However, you should know the things that you should happen when you disable it on your computer.

    • The Ctrl+Shift+N shortcut will not work anymore, which opens the new incognito window in Google Chrome browser. Similarly, if you are using a Mac computer, the Cmd+Shift+N command will not work as well.
    • You cannot find the “New incognito window” option when you click the three-dotted button or the menu button of Google Chrome.
    • You cannot open a link in incognito mode from the right-click context menu from any website.

    If you are fine these conditions, you can keep following our guides to get it done. The best part about this tutorial is that you do not have to download any third-party software since in-built utilities can do the job without any problem. No matter whether you are using a Windows or Mac computer, you can get it done using Terminal and Registry Editor. Both are already available in the respective operating system.

    Before getting started on a Windows computer, you should know that you can perform this guide on Windows 7 and all the later versions, including Windows 10. The second most important thing is that you should create a backup of Registry files and a System Restore point so that you can stay in the safe side if anything goes south.

    How To Disable Chrome Incognito Mode On Windows

    To disable Chrome incognito mode on Windows, follow these steps-

    1. Open Registry Editor on Windows PC.
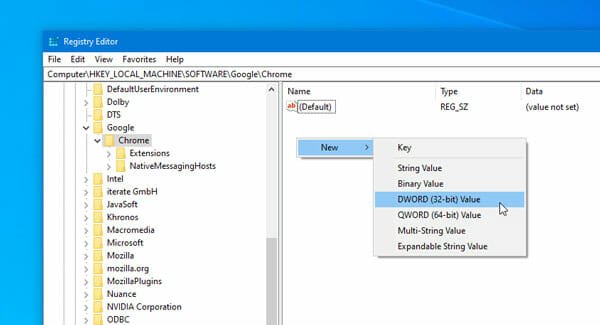
    2. Navigate to the Google Chrome folder.
    3. Create a DWORD 32-bit value.
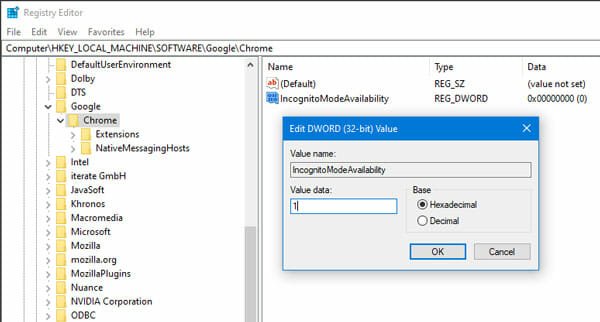
    4. Name it as IncognitoModeAvailability.
    5. Set the value as 1.
    6. Restart your computer.

    To know more about these steps, you should keep reading.

    As mentioned earlier, you need to use Registry Editor on your Windows computer to get the job done. Therefore, open up the Registry Editor first. There are several methods to do that. First, you can search for the “regedit” in the Taskbar search box and click on the corresponding result. Second, you can press Win+R buttons together, type “regedit” and hit the Enter button. After opening the Registry Editor on your Windows PC, you need to navigate to this path-

    HKEY_LOCAL_MACHINE\SOFTWARE\Policies\Google\Chrome

    However, if you are using Windows 10, you need to follow this path-

    HKEY_LOCAL_MACHINE\SOFTWARE\Google\Chrome

    In the Chrome folder, you must create a new DWORD (32-bit) value. For that, right-click on a space, and select New > DWORD (32-bit) Value options respectively.

    How To Disable Chrome Incognito Mode On Windows

    Following that, name it as IncognitoModeAvailability. Make sure that you do not mess with the name because it is quite sensitive. Therefore, double-click on this key to set the value. You need to set the value as “1”.

    How To Disable Chrome Incognito Mode On Windows

    That’s it! Now you need to restart your computer. Now, if you want to revert all the changes to the default, you need to navigate to the same path as earlier and delete the IncognitoModeAvailability key from your Registry Editor.

    As Mac doesn’t have Registry Editor, you can use the Terminal to execute a simple command to do the same job.

    How To Disable Chrome Incognito Mode On Mac

    To disable Chrome incognito mode on Mac, follow these steps-

    1. Open Terminal on your computer.
    2. Enter this command: defaults write com.google.chrome IncognitoModeAvailability -integer 1
    3. Restart your computer.

    At first, you need to open the Terminal. For that, you can take the help of Spotlight search. That said, press the Cmd+Space buttons together and search for Terminal. After opening it on your computer, type the following command and hit the Enter buttons-

    defaults write com.google.chrome IncognitoModeAvailability -integer 1

    After that, restart your computer. Now, you cannot find the incognito mode option in the Google Chrome browser.

    To revert the change, you need to enter this command-

    defaults write com.google.chrome IncognitoModeAvailability -integer 0

    that’s it! It is as simple as said. We hope you will like this guide.

  • How To Watch Netflix With Friends From Remote Distance

    Let’s assume that you live in the USA, and your friend’s house is in the UK, but you want to watch the same movie on Netflix together. At such a moment, you can use these tips and tricks to watch Netflix with friends from a remote distance. No matter where your friend lives, you can watch any show or movie on Netflix with the help of these techniques.

    Netflix Party

    How To Watch Netflix With Friends From Remote Distance

    Netflix Party is one of the best options that you can find on the internet. No matter whether you want to watch a movie with one or multiple friends, you can do that with the help of this service. Netflix Party is a Google Chrome extension that you can download for free. For obvious reasons, you should have a valid Netflix subscription, and please note that the mobile-only plan doesn’t work with this extension. That is because you need to play the show or movie on your computer, and the mobile-only plan does not allow users to do that.

    Netflix Party doesn’t have many options, and therefore, it is straightforward to deal with it. No matter whether you are about to use it for the very first time or not, you can get started with Netflix Party very quickly, even without a manual. However, we have enlisted some steps that might be helpful for you to start using this Google Chrome extension on your computer. For your information, you can install this extension in Microsoft Edge Chromium as well, and it is possible to get the same on Mac and Linux too apart from Windows.

    At first, visit the Chrome Web Store to download this extension in your browser and install it accordingly. After that, log into your Netflix account and play a movie or episode of a web series. Following that, you need to click the Netflix Party icon in your browser and click the Start Party button.

    Then, it will generate a link that you need to share with your friends. As mentioned earlier, you can watch any Netflix show with as many friends as you want. Therefore, you need to send the link to all of them so that they can start viewing without any problem. Once you are done with the show, you can disconnect the extension so that the streaming gets stopped immediately. Download

    Kast

    How To Watch Netflix With Friends From Remote Distance

    Although Kast is not the same as Netflix Party, it does the job well. It doesn’t matter which device or operating system you are using; you can use Kast on your mobile as well as the computer. If you are using an Android mobile, make sure that it is running Android 7.0 or later version. On the other hand, it is mandatory to have iOS 13.0 or later versions to download it from the official repository. That said, you can use Kast to watch Netflix with friends from a remote distance, even when you are using a mobile or iPad.

    Talking about the workflow of Kast, you can share your screen, and your friend can join the streaming and watch movies along with you. The best thing is that you can chat with them and send text or voice messages in real-time. Therefore, no matter whether you are playing games or watching movies, you can use this utility to make it more interesting with friends or anybody else. The user interface of Kast is neat and clean as a screen sharing application. You can find many options on the main screen, but all of them are well organized. Therefore, you should not have any problem using this app even for the very first time.

    As this app is available for mobile, you can have the mobile-only subscription of Netflix. It costs very less, and it doesn’t allow users to watch on more than one screen. However, if you use Kast on your mobile, it is possible to watch the same movie with friends or anybody else with ease. Download

    Scener Virtual Movie Theater

    How To Watch Netflix With Friends From Remote Distance

    If you like the idea of Netflix Party, but you do not want to use that specific Chrome extension, you can check out this tool called Scener Virtual Movie Theater. It does everything just like Netflix Party, and it is more lightweight than that. In simple words, you can find several excellent functionalities as well as better performance from this extension called Scener Virtual Movie Theater. The user interface of this extension is uncluttered so that users do not get any problem while they are in a hurry.

    No matter whether you want to watch a movie or web series or documentary, you can use this Google Chrome extension to share that with friends who are sitting miles away. Talking about the specific functionalities, you can find these in this extension-

    • You can synchronize Netflix to watch with any other person at the same time.
    • You can send text, voice, and video messages in real-time.
    • This extension supports any operating system as long as you have Google Chrome or the Chromium-based Microsoft Edge browser.

    If you like, you can download Scener Virtual Movie Theater from here.

    Watch2Gether

    How To Watch Netflix With Friends From Remote Distance

    You can create a private or public room with the help of Watch3Gether so that you can share the content of Netflix with friends and watch with them in real-time. Although it is trickier than other tools, you won’t find many problems to set things up. The primary steps are these-

    • You need to install the extension in your Google Chrome browser.
    • Create a room with Watch3Gether.
    • Play a Netflix show to add it to the room.
    • Share the room with your friends.
    • Allow them to join the room.
    • Play the content as per your requirements.

    It is as simple as said. If you like the workflow and features, you can download it from here.

    These are some of the best solutions to watch Netflix with friends from a remote distance. Considering everything, it seems that the Netflix Party is the best and easiest to use solution for you.

  • Best Apps To Hide Photos And Videos On Android

    Many people have countless private or confidential images and videos in their mobiles. If you have something like that and you want to hide them so that your kid or anybody else could not find them, this article will be helpful for you. As you are using an Android mobile, it is very easy for you to hide any picture or video clip within moments. Here are some of the best apps to hide photos and videos on Android. Most of the apps are available for free, but you might need to spend some money to get rid of ads and unlock all the functionalities.

    Before getting started with some third-party apps, you should know that your mobile may have an in-built photo hide functionality. Although it is not available in all the mobiles, most of the Samsung, Xiaomi, OnePlus, and Realme phones have some options. However, your Samsung phone should be running OneUI. If you are still not very convinced, you can check out these following apps to hide photos and videos on Android mobile.

    Best Apps To Hide Photos And Videos On Android

    1] Keepsafe Photo Vault

    Best Apps To Hide Photos And Videos On Android

    Keepsafe Photo Vault is one of the best apps that you can download to hide and password-protect your images as well as video clips. No matter how many files you have, you can hide them with the help of this free application. Although it is available for free, you might have to spend some money to unlock all functionalities so that you can use it without any problem. The user interface of Keepsafe Photo Vault is pretty good, and you should not have any problem even if you are about to use it for the very first time. The best thing about this app is that you can use PIN, fingerprint, and pattern lock to password protect your files. Download

    2] LockMyPix Secret Photo Vault

    Best Apps To Hide Photos And Videos On Android

    LockMyPix Secret Photo Vault is another awesome and convenient Android application to password-protect or hide photos without any problem. Like the above-mentioned app, you can have everything in this one too. For your information, it offers PIN lock, passcode, fingerprint lock, and pattern so that you can use anything as per your requirements. It doesn’t matter whether you want to hide ten images or a thousand images, you can do that with the help of this LockMyPix application. It can create albums and sub-albums so that you can organize all the photos as per your desire. Talking about the compatibility, you can download it on Android 4.4 or later versions. Download

    3] Photo Vault PRIVARY

    Best Apps To Hide Photos And Videos On Android

    Photo Vault PRIVARY can help you hide photos and videos on your Android mobile so that users can protect them from others. The user interface of this app is much better than most of the other tools mentioned on this list. Although it doesn’t have the pattern lock support, you can find PIN, passcode, and fingerprint lock in this app. Like most of the other standard apps on this list, you can hide unlimited images with the help of this app. No matter whether you have some photos in your internal storage or SD card, you can scan them all with the help of this app and hide them accordingly. Download

    4] Easy AppLock & Hide Pictures/Videos

    Best Apps To Hide Photos And Videos On Android

    The workflow of this app is much different than others on this list. Most of the other apps let you hide or password-protect pictures, whereas you can lock the existing Gallery app on your phone with the help of this application. It is possible to use PIN or pattern lock to password protect your application so that other unwanted people cannot access it in any way. This app requires Android 5.0 or later versions to be installed. For your information, you can download it for free from Google Play Store. However, you need to pay some dollars to unlock functionalities. Considering the interface and features, it is worth the purchase. Download

    5] 1Gallery – Photo Gallery & Vault

    Best Apps To Hide Photos And Videos On Android

    Some people have some RAW images or SVG images in their mobile, but most of the photo hide apps do not detect them like standard formats. However, that should not be a problem if you use the 1Gallery app on your mobile. It is also available for free, but you will get many more features than other apps on this list. One additional feature is already mentioned above. The second essential feature is you can find end-to-end AES encryption. The third handy option allows you to have a photo editor so that you can make basic changes in your images without installing another third-party app. The same thing goes for videos as well. It is possible to trim a video and play that with subtitles. Like most of today’s apps, you can find dark mode too. Download

    6] Gallery Vault – Hide Pictures And Videos

    No matter whether you want to hide images, videos, or any other files, you can do so with the help of this Android app. Some of the essential options are Fake Passcode, which helps you show fake content when someone types a wrong passcode. On the other hand, you can unlock your Vault with the help of a fingerprint as well. Like most of the other apps, you can download it for free, but you need to spend some money to unlock all features as mentioned on this list. Talking about the compatibility, you need Android 4.4 or later versions to download it from the Google Play Store. Download

    7] Vault – Hide Pics & Videos, App Lock, Free Backup

    Best Apps To Hide Photos And Videos On Android

    Although Vault has the in-app purchase functionality, it offers some awesome features for free. Like the Easy Applock, it can password protect any installed application, including your gallery. In other terms, you can lock down as many images and videos as you want with the help of this free Android app. The features of this tool are pretty good and the user interface makes the overall use even better. It is possible to unlock the Vault with the help of passcode as well as a fingerprint. The best thing is that you can upload your most confidential files to secured cloud storage so that other people cannot view them without your permission. Download

    8] Gallery Lock

    As the name suggests, it lets you lock the existing gallery application on your mobile with ease. There is no need to create an additional vault to hide your pictures when you can password protect the existing application. The highlight of this app is the Stealth Mode. In other terms, it captures a photo of the person who tries to enter the wrong password multiple times. It requires Android 4.1 or later versions to be downloaded on your phone. On the other hand, you might need to spend some money to unlock all the functionalities and get rid of advertisements. Download

    There are tons of other apps that can hide photos and videos on your Android mobile. However, these are some of the best in terms of features, encryptions, user interface, reliability, development, support, etc. We hope you will like this list.

  • How To Mirror Or Flip Photos On iPhone And iPad

    When you capture a selfie with your iPhone or iPad, it flips the image for the best output. However, some people do not like to do that. If you are one of them, you might want to re-flip the image so that you get the result that you want to see. Therefore, you can follow this article where you can find some of the best apps, tips, and tricks so that you can mirror or flip photos on your iPhone and iPad. Although you cannot change the “flip” settings in your iOS device, you can flip the image, as mentioned in this article.

    Before using an app, you should know that you can flip or mirror an image on iPhone and iPad without using any third-party application. Apple already included a comprehensive panel to edit photos, which comes with an option to flip the image as per the requirements. No matter whether it is a selfie or a random picture of some object, it is possible to flip the image with the help of this in-built option.

    How To Mirror Or Flip Photos On iPhone And iPad

    To flip photos on iPhone and iPad, follow these steps-

    1. Open an image that you want to flip.
    2. Tap the Edit button.
    3. Select the Crop option.
    4. Tap on the flip/mirror option.
    5. Save the image.

    To know more about these steps, you should keep reading.

    At first, you need to open the image on your device. No matter whether you are using an iPhone or iPad, you can open up the Photos app to get it. If you captured an image from your device, you could open the Camera app and get the photo from there. After opening the picture on your device, you can see an Edit option. You need to tap on it so that it opens the editing panel on your device.

    How To Mirror Or Flip Photos On iPhone And iPad

    Here you can find a couple of options for editing purposes. You need to switch to the crop panel, which is visible at the bottom of your screen, and it is the third icon from the left. Now, you can see a few options on the top. Tap on the very first icon from the left, which will flip the image immediately.

    How To Mirror Or Flip Photos On iPhone And iPad

    Now, you can save your change with regular options. Following the save, it is possible to share the image with your friends via social networking sites as well as email and WhatsApp.

    However, if you do not want to use the in-built option even when it is pretty handy, you can check out the following third-party app to get the same job done.

    Best Apps To Flip Image On iPhone And iPad

    1] Photo Flipper – selfie mirror

    Best Apps To Flip Image On iPhone And iPad

    Photo Flipper is a simple iOS application, which is compatible with the iPhone as well as iPad. No matter whether you have a selfie or something else, you can flip that with the help of this easy-to-use tool. As it doesn’t have a lot of options, you won’t find it very complex or time-consuming. Some of the basic options are flip, filter, crop, and rotate. The best thing is that it comes with an in-built camera option so that you can capture the image and flip it right away. Talking about compatibility, you need iOS 12.0 or later version to download it from the official repository. Download

    2] QuickFlip

    Best Apps To Flip Image On iPhone And iPad

    QuickFlip is another third-party application that is available for the iPhone and iPad. All you need is iOS 10.3 or later version to download it from the App Store. It is probably the most straightforward app that you can use to flip or mirror an image on your iOS device. You can use two fingers to rotate or flip it on your phone. To get started with this app, download and install it first. After that, open your photo with QuickFlip and use your two fingers to flip it accordingly. It doesn’t take much time and leave any watermark. Therefore, you can use the saved image on your Instagram or Facebook page as well. Download

    3] Flip Photos

    Best Apps To Flip Image On iPhone And iPad

    Flip Photos is a pretty old but working application that lets you flip any image on your iPhone and iPad. No matter which device you have, you should install iOS 7.0 or later version, which is available in almost any iOS device in these present days. Therefore, you might not have any problems related to compatibility. Talking about the user interface and features, you cannot find anything else except the flip option. Therefore, the UI is smooth and uncluttered. Just open up the image with Flip Photos and use the corresponding flip option to get the mirrored. Download

    4] Photo Mirror Effects Camera

    Best Apps To Flip Image On iPhone And iPad

    If you want to add some effects as well as flip photos on your device, Photo Mirror Effects Camera is probably the best option you can have on your phone. No matter whether you are using iPhone or iPad, if you have iOS 10.0 or later version, you can install this app without any problem. You can find tons of options to make the image professional and flip it for sure. However, most of the options are not available in the free edition of this app. Talking about the pricing, you can unlock all features for $12.99. Download

    That’s all! These are some of the best apps and methods to flip the image on your iOS device. If you do not want to get any particular effect, it is recommended to use the in-built option since you can do that without downloading any app. On the other hand, if you need a professional image editor as well as an option to edit the image, you should opt for the very last option called Photo Mirror Effects Camera.

  • Best Android TV Apps That You Can Install For Better Entertainment

    It’s been a long time since Android TV was first introduced. Nowadays, people often opt for Android TV because of flexibility. If you have an Android TV, this list would be helpful for you. These are some of the best Android TV apps so that you can get more out of your existing TV. We have made this list considering the fact that you like to watch shows and movies all the times. However, most of these following apps are available for free, but you might need an active subscription to make them on your TV.

    Best Android TV Apps

    Some of the best Android TV apps are-

    1. Netflix
    2. VLC Media Player
    3. Spotify
    4. Solid Explorer
    5. Google Chrome
    6. Kodi
    7. Amazon Prime Video
    8. Sideload Launcher
    9. Google Drive
    10. Hulu

    1] Netflix

    Best Android TV Apps

    If you need to watch top-notch movies and web series, you should check out Netflix. It is already a common platform where you can find countless films of different native and foreign languages. From documentary to web series to regional films, you can find everything on Netflix. Considering the quality of the content and streaming, the basic plan, $9, doesn’t seem so costly. However, if you want to enjoy Netflix’s movies in HD, you should opt for the Standard version, which costs around $13 in the USA. As the user interface of Netflix is pretty good and uncluttered, you would not find any problem using it for a long time on a small Android TV as well.

    2] VLC Media Player

    VLC

    Android TVs have some storage, and users can use that to store movies. However, you need a player to play them on your TV. For that, you can use VLC Media Player, which is equipped with almost all the essential functionalities so that you can play any file without any problem. The user interface is super smooth that makes you use it more often. No matter whether you have a movie or some web series, you can watch anything with the help of VLC Media Player. As it is available for free, you can try it out without losing anything.

    For your information, you can download the MX Player as well. This media player is an excellent substitute to VLC Media Player.

    3] Spotify

    Apple Music Best Spotify Alternatives

    If you often listen to music online, Spotify is a good source for you. From old classics to newest rock music, you can find almost anything in Spotify. You can use the auto-play feature in Spotify and keep doing your jobs while listening to your favorite songs. Talking about the pricing, you can use it for $4.99/month if you are a student. As a regular user, you need to pay $9.99/month for an “Individual” account. The “Family” account costs around $15, which is better if you know someone who is willing to buy Spotify premium.

    4] Solid Explorer

    If you often store files in your Android TV, you need a file management tool so that you can organize and manage with ease. Solid Explorer is a such a file explorer that allows you to do everything mentioned above. No matter whether you have pictures, documents, or videos, you can categorize and manage them as per your requirements. As the user interface is mostly white, you might face some issue related to eye strain. Otherwise, you should not get any problem while using the Solid Explorer app on your Android TV. To download this app, you do not need to pay any money. However, you might have to spend some dollars to get rid of advertisements. Download

    5] Google Chrome

    Google Chrome

    Although it’s been a long time since Android TV launched for the very first time, Google Chrome is still not available for this OS. Most of the people might not want to use a browser on a TV, but if someone wants to do so, he/she can do that with a little trick. The secret words are – you need to sideload the app on your Android TV. For that, download the .apk file from a trustworthy source, install a file manager app like Solid Explorer, and install the Google Chrome, respectively. Following that, you can use this browser to open any website without any issue.

    6] Kodi

    Best Airplay Receivers for PC

    When you have a lot of media files on your Android TV, and you want to solution to gather them in one place, you should take a look at Kodi. Kodi is a free and open-source media player that you can install on your Android TV. The user interface is well-organized so that you can find everything at its place within moments. It doesn’t matter whether you have movies, TV shows, music, video clips, or anything else, you can manage them all with the help of Kodi.

    7] Amazon Prime Video

    Best Android TV Apps

    If you are done with Netflix, the next thing you should check is the Amazon Prime Video. As the name defines, this OTT platform’s owner is Amazon, which is an online giant. Like Netflix, it has almost everything – from movies to web series to documentaries, etc. If you are a fan of watching regional and foreign film, you would be happy to have an account of Amazon Prime Video. The pricing of the Amazon Prime membership is quite impressive. You can purchase a one-month subscription of only Amazon Prime Video for $8.99.

    8] Sideload Launcher

    Best Android TV Apps

    If you often sideload apps on your Android TV, you might get some help from the Sideload Launcher application. This tool helps you launch all the sideloaded app on your device so that you can find which one is from the official source and unofficial source. It is q quite lightweight app for Android TV, but you should install it so that you can manage everything with ease. Download

    9] Google Drive

    Dropbox Alternatives Best Cloud Storage Services For Everyday Use

    When you need to transfer files from computer to Android TV and vice versa, you can take the help of a cloud storage service. When it comes to the cloud storage service, Google Drive tops the list every time because of the features, security, etc. Therefore, you can install Google Drive on your Android TV to move files from one device to another. On the other hand, you can open files from Google Drive directly as well.

    10] Hulu

    Live TV Streaming Sites

    You have purchased a TV to watch live TV – it is pretty obvious. However, if you do not have cable TV service, you can get a subscription of live TV streaming services such as Hulu. If you live in the USA, you should find Hulu very handy since it streams on-demand content as well as popular TV channels at a very minimum price. Talking about the pricing, it will cost you around $55 per month. Check pricing

    These are some of the best Android TV apps that you can install. We hope you will like this list.

  • Fix Instagram Keeps Crashing Or Not Working Issue

    If you have the Instagram app on your mobile, but it is not working correctly, and it keeps crashing after opening, you can follow these troubleshooting tips. Here are some of the best and operating guides to fix Instagram keeps crashing or not working issue on Android and iOS mobile. As it might be a considerable part of your daily life, you might want to fix the problem as soon as possible. Therefore, these following tips and tricks would be helpful for you.

    To fix Instagram crashing or not working issue on Android and iOS mobile, follow these steps.

    Check If Instagram Is Down

    It is the very first thing you should check before getting into any other guide. If Instagram is down officially due to any reason, you will waste your time searching for a solution to get it running again. There are several ways to check for it.

    First, you can open the instagram.com in any browser. If it is working, you should follow other solutions.

    Second, you can search for a keyword like “Instagram down” on Google. Similarly, you can search Twitter and Facebook as well.

    Fix Instagram Keeps Crashing Or Not Working Issue

    Third, you can open this website: isup.me and enter Instagram.com to check if it is only you or Instagram is down for everyone.

    Fourth, you can ask your friend to check that for you.

    No matter what you do, you should ensure that Instagram is up and running for everyone except you.

    Clear Cache And Data

    When an app doesn’t work on your mobile, it is the best solution to get it working again. If you are using an Android mobile, it is straightforward for you to clear cache and data because the OS already has these functionalities. No matter which Android mobile you use, you can find similar options on all phones. On the other hand, iOS uses do not have any such option, and therefore, this solution is not for them.

    Talking about clearing cache and data of an Android app, you need to follow a set of steps. However, not all phones have the same options, but you can find similar options in all mobiles.

    To get started, open the Settings app of your mobile and go to Apps or Application section. Here you should find all the apps installed on your mobile. However, some phone might show an option to disclose only third-party apps. In that case, you need to opt for that option. After that, select Instagram from the list. Here you should get some options like these – Clear all data, Clear data, Clear cache, etc.

    Fix Instagram Keeps Crashing Or Not Working Issue

    No matter which phone you use, you can find similar options in all of them. You need to use these options to get it done.

    Check App Permission

    Instagram may need certain permission to function in your mobile. For example, if you do not give the Storage permission, it would not be able to save anything. On the other hand, Media permission is essential when you need to upload some images and videos. If you blocked all the permissions, there is a chance of getting such problem on your mobile.

    For that, open the Settings > Apps > Instagram and check for App permissions. Here you can find all the permissions allowed or blocked for Instagram.

    Fix Instagram Keeps Crashing Or Not Working Issue

    You need to give all the permissions once and check the app to verify which one is the culprit.

    Update System

    If you have a very old Android version on your mobile, there might be a compatibility related problem. Therefore, you need to update your Android version to the latest possible version that the manufacturer launched for your mobile. If you are using a Samsung mobile, getting off such an update is quite easy. On the other hand, Xiaomi mobile users can quickly get the update as well. To check for an update, you should follow the manufacturer’s website since different mobiles have a different set of options. However, you can open the Settings app and search for “update” to get a possible option.

    Update Instagram

    Let’s assume that you have recently updated your mobile to the latest Android or iOS version. Most of the manufacturers often release updates like security patch, major system updates, etc. If the Instagram app stopped working after installing an update, there are two possible reasons-

    First, the app needs to be updated to comply with the system release.

    Second, the app is broken from the manufacturer’s side.

    Either way, you need to check for a pending update on Google Play Store or iOS App Store. Sometimes the system update may break the certain app, and the developers often launch an update to fix that. It that is what is happening with you, it is the best option to update the app from the respective app repository.

    Switch Internet Connection

    Sometimes the internet connection might be the culprit. If your ISP is blocking Instagram due to any reason, you won’t be able to open and use this app regularly. For that, you should switch to another internet connection and check whether it is giving the same issue or not. If you can open, it is the time to ask your ISP to get a resolution.

    That’s all! These are some of the best tips and tricks to fix Instagram crashing or not working problem on Android and iOS mobile. We hope you have solved it as of now.

  • How To Download Facebook Videos On iPhone Or iPad

    If you have an iPhone or iPad and you want to download Facebook videos, this article is for you. There are several tools and tricks to download any Facebook video on an iOS device. If you think you need to save a video to watch offline, you can follow this tutorial. It shows how to download Facebook videos on iPhone or iPad. It is easy and doesn’t take more than a minute to complete the process.

    Facebook is one of the best social networking websites, which is being used by more than a billion people from across the world. Different people use it for various purposes. For example, some people use it to increase sales, create a business profile, make new friends, communicate with others, etc. No matter why you opened your Facebook profile, you can use all the functionalities without any problem.

    Let’s assume that you are following some Facebook pages or some people, and they often upload videos along with some exciting images. For instance, your favorite sports club regularly uploads videos of their recent games. For obvious reasons, many people often want to download those videos to their mobile or computer. If you are one of them and you have an iPhone or iPad, you can follow this tutorial since this article will let you know the process to download Facebook videos to iPhone or iPad.

    For your information, there is almost no app on the official app store that allows users to download the desired video to any iOS device directly. However, there is a workaround that helps you to download the video to your device. All you need to use is a website, which can download such videos from any Facebook page. Countless websites might be helpful to you. Therefore, we have enlisted some of the best sites that can help you download videos from Facebook to your iPhone.

    Before getting started, you should know that you must have the video URL. Otherwise, you cannot do that. However, if you use Facebook in the mobile browser, you can copy the page URL for further assistance. Once you copy the URL, you can follow the following websites.

    1. SaveFrom

    How To Download Facebook Videos On iPhone Or iPad

    SaveFrom is one of the best websites to download Facebook videos to iPhone or iPad. It is handy but full of advertisements. Therefore, you need to be extra careful while using this app on a small screen mobile. However, if you have an iPad, you may have plenty of space. After opening this website, paste the video URL and go next. On the next screen, you can find an option called Download MP4. That said, it helps you to download videos in .mp4 format. If you tap on this button, it will start the download immediately.

    2. FB DOWN

    How To Download Facebook Videos On iPhone Or iPad

    FB DOWN is yet another convenient website to download Facebook videos instantly. Although it has a couple of options for the users, it is straightforward to download any number of videos with the help of this site. The user interface of FB DOWN is uncluttered. Therefore, you do not need to worry about anything as long as you have the Facebook video URL in your clipboard. At first, head to this website in your browser and enter the URL, as usual. After that, you can find a couple of options so that you can download the video in SD or HD. The best thing is that it has a Fix Audio option, which helps you to fix the corrupted of a Facebook video. It is useful when the audio gets corrupted due to some unknown reasons before downloading.

    3. Getfvid

    How To Download Facebook Videos On iPhone Or iPad

    Getfvid is another working website to download Facebook videos to your iPhone or iPad. No matter whether you want to download a sports video or movie clip, you can do whatever you want to do with the help of this website. The unique feature of this video download website is that it has an option to download the audio only. Otherwise, you can have similar options to other websites. To get started with this site, you need to visit the official website of Getfvid and enter the video URL. After that, you can find three options so that you can download the video in SD, HD, and download the audio only. Choose an option as per your needs. However, if you are using a computer to open this website, you can scan the QR code with your mobile to download the video to your iPhone or iPad.

    4. SaveAs

    How To Download Facebook Videos On iPhone Or iPad

    SaveAs helps you download Facebook videos to your iOS device without any problem. Apart from having a quite complex design, there is no problem with SaveAs. It doesn’t matter what video you want to download; you can do that with the help of this website. It is pretty easy and not much time consuming as well. Like most of the other sites on this list, you can find two options while downloading a video. The first option will let you download the video in SD, and the second option will help you do the same in HD. Check the website

    5. FB Downloader

    How To Download Facebook Videos On iPhone Or iPad

    Like Getfvid, you have an option to download the audio only from a Facebook video on the FB Downloader website. The download speed of this website is more than average, so that users do not need to wait for a long time to get the video even when they have a low bandwidth internet connection. Talking about other features, you can download the video in HD as well as SD. The good thing is that you can find the file size before downloading so that you can know how much space the video is going to consume in your device. Check the website

    You can download any website among these listed once. All of them have similar features. However, if you want to get the audio from a Facebook video, you need to use either Getfvid or FB Downloader.

  • Fix A Device Attached To The System Is Not Functioning

    If you are trying to connect your iOS device with a Windows 10 computer, and it is showing A device attached to the system is not functioning error, you can follow these steps. This error message might appear when you are trying to connect an iPhone, especially. However, you can find the same issue with an iPad as well. No matter which device is showing this problem, you can solve it with the help of the following solutions. There is no need to download another third-party software to fix it.

    Many people have an iPhone or iPad and a Windows computer. If you are one of them, iTunes is the best way to build communication between Windows PC and iOS devices. From transferring audio to make a backup, you can do everything with the help of iTunes. To use iTunes, you must have to connect your iPhone or iPad with a USB cable. However, if the Windows PC is showing the above-mentioned error after connecting the USB cable, you should follow this tutorial.

    A Device Attached To The System Is Not Functioning

    To fix A device attached to the system is not functioning error, you always need to keep the original file to your phone. By default, your iOS device automatically transfers photos and videos in a compatible format to your Windows or Mac computer. The default settings say so.

    However, you need to keep the original file even when Windows 10 has HIEF and HEVC codecs support. Some previous builds users might not get it, but the latest version of Windows 10 users can download it from the Microsoft Store. In other words, you can keep the original file without conversion.

    As that specific setting makes things awkward for you, you need to make the change as soon as possible. No matter whether you are using an iPhone or iPad, you can use this functionality to fix this issue within moments.

    At first, open the Settings app on your device and find out Photos. You might have to scroll down a bit to get this option. Here you can find a heading called TRANSFER TO MAC OR PC. By default, it should be set to Automatic.

    A Device Attached To The System Is Not Functioning

    You need to select the Keep Originals option. After that, try to connect your iPhone or iPad to your PC. That problem should not appear anymore.

    If this troubleshooting guide doesn’t help you, you can follow these following solutions as well.

    Check The USB Cable

    If the USB cable has some problem, i.e., broken or something like that, there is a chance of getting such an error on your PC. The solution is straightforward. You need to try to do the same with a new USB cable. It can be of another device, or you can purchase a new one for trying this out.

    Change USB Ports

    If the USB port of your computer has some problem, this error message might occur on your PC. Again, the solution is clear. You need to change the USB port. If the front side of your case has more than one USB port, do use that. Otherwise, go back to the backside of your case, where you can find some USB ports.

    Also, if you are using a USB hub or extender, it is an excellent time to get rid of it.

    Update/Re-install iTunes

    If you haven’t updated the iTunes on your Windows PC, you should install all the pending updates. To find whether any update is pending or not, you can do the following steps. At first, close the iTunes from the system tray. Then, open the app again on your computer. Now, you should find a popup window with a title called Apple Software Update. If it appears, you can find some available updates that you can install.

    Reset Location & Privacy Settings

    A “Trust” related popup message appears when you connect your iPhone or iPad to your computer via USB cable. If you ignored it or you didn’t allow it to access your data, there is a chance of getting such an error on your PC. Therefore, you need to reset the Location & Privacy settings so that it appears again. For that, open the Settings app and go to General > Reset. Here you can find an option called Reset Location & Privacy.

    A Device Attached To The System Is Not Functioning

    Use this option to complete the reset process. After that, try to connect your device with your computer.

    That’s all! These are some of the best working solutions to this problem. We hope they will solve your issue right away.

  • Best Mac Apps To Check iPad Battery Health

    Although iPads offer a great battery life, some people often face problems due to some reasons. If your iPad is not very old, but it is troubling you a lot due to the miserable battery life, you should check the health of it. Here are some of the best Mac apps to check iPad battery health. We are going to use Mac apps because there is no option to check the battery health of the iPad on that device itself. Therefore, you can try out these apps and come to a final decision.

    As mentioned earlier, there is almost no option to check the iPad battery health on the device itself. That is why we are about to use two beneficial apps, and both of them are available for Mac. They are pretty easy to use, and you do not need to spend much time to get the job done. However, it is essential to check everything minutely so that you can get a better battery backup from your device.

    Best Mac Apps To Check iPad Battery Health

    1] iMazing

    iMazing is a convenient Mac application, which is capable of showing the battery condition of your iPad. No matter whether you have an iPhone or iPad, you can use this tool to get a detailed overview of your Apple device’s battery condition. After connecting your iPad to your computer via USB cable, you can find your device on the screen. Now, you can see a battery sign on the bottom-right corner of the screen. Click the information (i) button.

    Best Mac Apps To Check iPad Battery Health

    Now, you should see everything on your monitor. It rates the battery health as Excellent, Good, Average, and Poor. Excellent means it has the full capacity. Good indicates that the battery can hold from 90% to 99% capacity. Average means the battery can hold 80-89% of its capacity. Poor implies that the battery cannot hold more than 80% of the full capacity.

    Apart from that, it shows the current charge and maximum charge capacity, charge cycle, battery state, instant voltage, etc.

    The free version of iMazing might not have all the options as mentioned here. Therefore, you should for the paid edition, which costs ₹2000 only. Check the deal

    2] coconutBattery

    coconutBattery is a well-known Mac application, which helps users to get the battery statistics of your computer. However, you can use the same app to get the battery health of the iPad. No matter how old or new your iPad is, you can find the current condition of the battery with the help of this tool.

    Best Mac Apps To Check iPad Battery Health

    The user interface of coconutBattery is neat and clean. Therefore, you should not have any problem using it for the very first time as well. As usual, you need to connect your device via a USB cable so that it can detect and show all the information. On the other hand, you must allow your computer to trust the device. Otherwise, it may not show what you are looking for.

    Once you make the connection successful, you can find this information- current charge capacity, full charge capacity, design capacity, manufacturer date, charge count, temperature, last update date, etc.

    The free version of coconutBattery shows this information. However, the PRO version has something more. For example, you can find WiFi support, iOS battery lifetime analyzer, iOS advanced viewer, etc. The premium edition costs around ₹937.95 in India. Check the deal

    How To Get Better Battery Backup From iPad

    Here are some tips and tricks to get a better battery backup from your device.

    Charge With Original Charger Only

    Even if your iPad takes a lot of time to recharge 100%, you should always charge your device with the original charger only. Some people buy after-market chargers with higher capacity to charge the device faster. Do not make that mistake. You might get a good result in the initial days, but it will eventually make things worse.

    Use Low Power Mode

    Low Power Mode helps users get a slightly better battery backup since all the unnecessary background processes get stopped. Also, your device might show less notification from mail and other services. For your information, you can enable Low Power Mode from Settings > Battery.

    That’s all! These are some of the best solutions to find the battery health and get a better battery backup from your iPad.

  • Best Apps To Merge Videos On iPhone And iPad

    Let’s assume that you have a couple of party videos, and you want to merge them to make them one. At such a moment, you can use these apps to merge videos on iPhone or iPad. It is quite easy to merge multiple videos on Windows or Mac. However, you can do that same on your iOS device as well. No matter whether you have a small screen iPhone or the 5.8-inch iPhone, you can use these apps to get your job done. Most of these apps are available for free. However, you may need to buy some packages to unlock all functionalities.

    Best Apps To Merge Videos On iPhone And iPad

    1] iMovie

    There is nothing better when it comes to the pre-installed app called iMovie. Countless people have been using iMovie to edit videos on their devices, and you can do the same as well. No matter whether you have two or twenty videos, you can merge them with the help of iMovie. The best thing is that iMovie is already installed on your iPhone and iPhone. Therefore, there is no need to open the app store to get it. However, if you have uninstalled it from your device, you must do that first. After opening the app, you can import all the videos that you want to merge and place them one after one before exporting.

    2] Video Merger

    Best Apps To Merge Videos On iPhone And iPad

    Video Merger is a fine-tunes iOS application that helps you merge two or more videos instantly. No matter how big your files are, you can combine them to make a single video. It is quite easy to merge two videos since it shows the exact steps, and it offers the correct options. On the other hand, you can add some music, effects, etc. so that it looks more professional. The user interface of Video Merger is clean, and that’s why you won’t have any problem using it for the very first time as well. Apart from those options, you can find the trim, cut, reverse, flip, along with texts, stickers, etc. No matter whether you are looking for a video editor or an app to merge videos, you can do both with the help of Video Merger. For your information, you need iOS 9.3 or later versions to download this app from the official repository. Download

    3] LumaFusion

    Best Apps To Merge Videos On iPhone And iPad

    LumaFusion is a paid iOS application, which costs around $30. As it is available for the iPad as well as iPhone, you can find a great UI for doing your jobs. In simple terms, LumaFusion is a video editing application for Apple devices. It implies that you can find almost all the options, including merge videos for doing professional work. Talking about the editing part, there is drag-and-drop import, frame rate management, video effects, transitions, etc. As it supports layer-based editing, it is straightforward and professional for many people who have been editing videos on computers. Regarding the compatibility, you should have iOS 11.4 or later versions. Download

    4] InShot

    Best Apps To Merge Videos On iPhone And iPad

    InShot is another application to merge videos on iPhone and iPad. As it is compatible with iOS as well as iPadOS, you would not face any problem using it to combine any number of videos. All the basic features such as trim, crop, etc. Are available in InShort app. On the other hand, some advanced options such as text, speed, effects, voice-overs, etc. are also available. Merging two videos in this app is very easy and not much time consuming as well. You need to import them first and then place them one after one as per your requirements. Then, you can do all the editing tasks and finally, export it. The only problem with this application is that it leaves a watermark behind. However, you can get rid of that by purchasing the premium pack, which costs $2.99 only. If you are ready to download, make sure that you have iOS 10.0 or later version. Download

    5] KineMaster

    Best Apps To Merge Videos On iPhone And iPad

    It doesn’t matter if you are professional or newbie video editor, you can edit videos smoothly with the help of KineMaster video editor. It is a feature-rich app, but the user interface makes it more accessible. It has a unique UI so that users can get all the options without seeing any clutter. If you have an iPad, you may not have to worry about anything since you got better options on a bigger screen. The most important feature of this app is that you can edit 4K videos and export files in 4K as well. No matter whether there are two or ten files to merge, you can perform your task without any problem. Regarding the compatibility, you must have iOS 11.4 or later versions. Download

    6] Filmmaker Pro

    Best Apps To Merge Videos On iPhone And iPad

    Although the name has a “pro” in it, you do not need to pay any money to download this app to your mobile. For your information, you can download it on iPhone and iPad as long as you have iOS/iPadOS 11.0 or later version. It has got all the necessary options to edit videos. One of them is “merge” so that users can join two or more videos instantly. In terms of other features, you can find some of the best options so that users can do whatever they want to do. From adding text to applying effects, you can do everything with the help of this app. However, it shows a watermark, and you need to pay some dollars to get rid of it. Download

    These are some of the best apps to merge videos on iPhone and iPad. We hope you will like them.

  • How To Reset Google Chrome On Windows, Mac, Android, And iOS

    Resetting Chrome browser has been mentioned on countless articles by different people whenever it comes to solve a specific problem. However, do you know how to reset Google Chrome on any platform, including Windows, Mac, Android, iOS, iPadOS, etc.? If no, you can follow this tutorial to get the job done.

    Google Chrome is a popular handy web browser, which helps you browse the internet smoothly. Irrespective of the platform, you can have a similar user interface and user experience from this browser. The features, extension support, etc. make it even better.

    However, like any other software, Chrome often shows various problems. For example, you might not be able to update the browser, change proxy settings, etc. At such a moment, you can reset Chrome on your computer or mobile. For that, it is requested to check out this tutorial where we mentioned the exact steps to factory settings Google Chrome.

    How To Reset Google Chrome On Windows And Mac

    To reset Chrome on Windows and Mac, follow these steps-

    1. Open Chrome browser.
    2. Go to Settings.
    3. Expand the Advanced options.
    4. Select Reset and clean up button.
    5. Click on Restore settings to their original defaults.
    6. Click on the Reset settings button.
    7. Wait for a few moments to reset Chrome.

    As the options are same on Windows and Mac, we have included screenshots of a Windows 10 computer. However, you can follow the same steps to get the same result on your Mac computer as well.

    At first, you need to open the Settings page of your Chrome browser. For that, open up the Google Chrome browser on your computer, and click on the menu button, which is visible on the top-right corner. Following that, select Settings from the list.

    You can find the Advanced menu on your left side, and you need to click on this button to expand more options. After that, click on the option that says Reset and clean up.

    If you do not want to go through all these options, you can enter this in the address bar, and hit the Enter button-

    chrome://settings/reset

    Here you can find two options, but you need to click on the Restore settings to their original defaults option.

    How To Reset Google Chrome On Windows And Mac

    It will help you reset your browser to the factory settings. After that, you need to select the Reset settings button in the popup window.

    How To Reset Google Chrome On Windows And Mac

    It will take a few moments to get the job done. After that, you can use the Chrome browser like fresh installation.

    If you have Google Chrome on your Android or iOS mobile, and you want to reset it, you cannot follow the aforementioned steps. Also, the process is different for Android and iOS mobiles. Therefore, it is recommended to follow the following guide minutely to reset Google Chrome on your respective mobile.

    How To Reset Google Chrome On Android

    To reset Google Chrome on Android, follow these steps-

    1. Open phone Settings.
    2. Go to Apps.
    3. Find Google Chrome on the list.
    4. Use CLEAR CACHE and CLEAR ALL DATA options to reset.

    To know more about these steps, you should keep reading. At first, you should know that different mobiles have different options, but they work similarly. For example, there is no guarantee whether you can find the same Samsung mobile options on a Xiaomi phone. Likewise, you might not get the same Stock Android option on a Samsung mobile. You should understand the workflow so that you can get it done irrespective of the mobile and ROM.

    Now, you can open your phone’s Settings app and go to the Apps section, where it shows the list of installed apps. After that, find out Google Chrome on the list and tap on it.

    How To Reset Google Chrome On Android

    There is another shortcut to open the same panel on your mobile. Most of the mobiles have this functionality. If your mobile has the same, you can utilize it like said here. You need to tap and hold the Google Chrome in the app drawer. An “info” like icon should appear on your screen, and you need to click on it.

    Depending upon the mobile, you can find these options – Clear Data, Clear Cache, etc. You might need to open the Storage section as well to get them on your screen.

    After that, make use of those options to reset Chrome on Android.

    How To Reset Google Chrome On iOS

    Follow the following steps to reset Google Chrome on iOS-

    1. Open Chrome Settings.
    2. Go to Privacy.
    3. Click on Clear Browsing Data option.
    4. Select all from the list.
    5. Tap on Clear Browsing Data button.
    6. Confirm the reset.

    To get started, you open the Google Chrome browser, tap on the three-dotted button, and select Settings from the list. After that, find out Privacy and tap on it.

    Here you can find an option called Clear Browsing Data. You need to tap on this option.

    How To Reset Google Chrome On iOS

    Now choose everything from the list and tap on the Clear Browsing Data button twice to confirm the reset.

    Although you cannot reset the Chrome browser on an iOS device, you can clear the browsing cache. It is almost like the reset for an iOS user.

    What happens when you reset Chrome

    Here are a few things that happen in the background when you reset Chrome on Windows, Mac, or any other device.

    • All your browsing cache, cookies, history, etc. get removed.
    • All the site settings, permissions, etc. get removed.
    • If you use Google account to synchronize the settings, it should be paused. You need to log into your account to resume the synchronization.
    • It hides the home button, but you can re-enable it from the Settings.
    • It deleted the custom search engine, and the default one gets set.
    • The startup page settings get changed to the factory original setting.
    • It uninstalls all themes and extensions. However, you can re-install them for the first time.

    That’s all! This is how to reset Chrome on computer and mobile. I hope it helps.

  • Best PDF Editors For iPhone And iPad

    If you have an iOS device and you want to edit some PDF files on it, this article might be helpful for you. Choosing a PDF editor is quite tough these days since there are countless options available in the market. There are few things you should check before opting for a PDF editor for your iPhone. This article will let you know about the points by walking you through these best PDF editors for iPhone and iPad list.

    Best PDF Editors For iPhone And iPad

    1] PDFelement – PDF Editor

    Best PDF Editors For iPhone And iPad

    No matter whether you need to make a minor or major change in an existing PDF file, you can opt for PDFelement. It is one of the best PDF editors for iOS devices. No matter whether you have an iPhone or iPad, you can find this app very handy for your daily work. Talking about the features, you can find font recognition, font size changer, font color changer, add a new text box, text call-out, stamps, etc. On the other hand, you can fill up an application form, sign your form with handwriting signature, and many more. The best thing is that it supports most of the common file formats. That means you can convert a PDF file into another format, which is compatible with Word, Excel, PowerPoint, etc. Regarding the compatibility, you need iOS 10.0 or later version to download it from the official store. Download

    2] Adobe Acrobat Reader for PDF

    Best PDF Editors For iPhone And iPad

    Abode Acrobat Reader is a very well-known PDF reader, which is available for multiple platforms, including iOS and iPadOS. You can download this application on any iOS 12.0 or later version devices for free. The only problem with this app is that you must have a paid subscription to edit the PDF files. However, if you need to make some minor changes, you might not opt for a premium account. Talking about the editing part, it has everything that you might want to use. From adding new text to editing the existing one – everything is possible with the help of this fine-tuned app for iOS. Download

    3] PDF Expert: PDF Reader, Editor

    Best PDF Editors For iPhone And iPad

    Let’s assume that you do not have much time in your hand, but you want to perform some significant number of editing in a PDF file. At such a moment, the PDF Expert app is probably a great choice for anybody. It offers all the essential options so that users do not face any lack of features. On the other hand, the user interface is pretty good for people who have no technical background so far. As this app is available for the iPad, you will have a great user experience. Regarding the features, you can find almost everything, including new text, font size manager, links, etc. The highlight of this application is that you can connect it to other cloud storage such as Dropbox, iCloud Drive, OneDrive, Google Drive, etc. Before downloading, you should know that you must have iOS 11.0 or later versions to download this app. Also, you have to purchase the premium pack to get all options and functionalities. Download

    4] iAnnotate 4 – PDFs & more

    Best PDF Editors For iPhone And iPad

    If you need a one-stop solution, there is nothing better than iAnnotate. No matter whether you want to read a PDF or edit it to some extent, everything is possible with the help of this application. As it is available for iPhone as well as iPad, you would not have any problem using it across both devices. The user interface of this app is certainly a plus point since it is very professional and uncluttered. Talking about the features and options it has got everything. From adding shapes to the new text, you can do everything without any problem. Also, you can add handwriting signature, fill up the application form, etc. Before downloading, you should know about two things. First, it is a paid app, which costs around $10. Second, you should have iOS 10.0 or later versions. Download

    5] GoodReader Pro PDF Editor

    Best PDF Editors For iPhone And iPad

    GoodReader is another paid iOS app, which can do whatever you want to do with a PDF file. Although the user interface of this app is old-school, you can find all the essential options so that users can edit the PDF without any issue. You can add new text, shape, highlight texts, fill up forms, and do more with the help of this PDF editor. The best thing is that you can read almost any text related files, including PDF, TXT, .docx, HTML, etc. On the other hand, you can connect GoodReader with some cloud storage such as Google Drive, Dropbox, OneDrive, Box, etc. No matter whether you need to open a file directly or you want to download the file first, you can do both with cloud storage files. You might have already guessed the price – it is around $20, and you should have iOS 9.0 or later version to download this app. Download

    6] LiquidText

    Best PDF Editors For iPhone And iPad

    LiquidText is a very professional PDF editor for the iPad. The user interface makes it even better because you might see the best UI among all these apps. Regarding functions, you can do all the basic as well as advanced tasks with the help of LiquidText. For example, you can add shapes, highlight text in different colors, convert files, etc. Like some other PDF editors, you can connect to various cloud storage services and open the PDF files directly to edit them on your iPad. However, you need to purchase the premium subscription for $30 to get all options on your screen. There is another drawback of this application as it is not available for the iPhone. Download

    These are some of the best PDF editors for iPhone and iPad. We hope you will find them useful to you.

  • How To Find Which App Is Showing Popup Ads On Android

    Although Android users can sideload apps from third-party resources, that particular thing has a drawback. Attackers often camouflage original apps with adware. That is why some users often get popup ads on their mobile. No matter which mobile you are using, this problem can occur on any of them. Therefore, you can follow this tutorial to find which app is showing popup ads on Android mobile. There is no need to opt for a specialist professional until you try out these troubleshooting tips and tricks.

    android-studio-android-9-pie-feature-image

    1. Check Recent Apps

    It is the best method to find which app is the culprit in this case. Whenever an app shows advertisements on your phone, it runs in the background. Whenever it runs in the background, it appears on the recent activity list. That is why it is the best trick to find which app is showing popup adds on Android mobile.

    No matter which mobile you are using, you can find a similar interface to get the recently opened apps. Therefore, open up the Settings app on your mobile and search for something like this – recent activity, recently opened apps, etc. There is a high chance of getting such an option in the “Apps” section. The name of the choice might be slightly different since different manufacturers use different names. However, the summary is the same across all devices.

    Whenever you find anything unusual, you should uninstall the app. For example, it is showing an app, which was not opened by you. Therefore, there is a high chance that the app is causing all the issues. Then, you need to uninstall the app and check if those advertisements are still appearing or not. If not, keep your phone as it is. If the ads are still making an appearance on your mobile, you need to follow other steps.

    2. Uninstall All Mods

    Google Play Store has several paid apps and. Many people often install mods of those paid apps because they are available for free. However, attackers use this methodology to spread malware, adware, etc. If you downloaded and installed such an app, it is the time to detect that and remove it as soon as possible. Countless people have got a positive result after performing this step. Therefore, you should try and check if ads are still appearing on your mobile or not.

    3. Uninstall All Unofficial Apps

    If you ever downloaded an app from any other resource except Google Play Store and those ads have started appearing after that, you should perform this step. Android has an advantage and disadvantage – users can sideload apps from any resource. The disadvantage is that attackers often insert adware in popular apps so that they can make victims. If you have ever downloaded an APK and installed that on your mobile, uninstall it as soon as possible.

    4. Find Apps Without Icons

    All professional and clean apps have an icon – you can check Google Chrome, your camera app, gallery app, and whatnot. However, if an app doesn’t have an icon but it appears in the menu, you should get rid of it immediately. You can open the APPS section in the Settings app of your mobile t get the whole list of such app. Before doing it, make sure that you do not make noise with system apps because some of them might not have icons, and it is completely fine.

    What To Do When Your Mobile Is Showing Popup Ads

    There are a few things that you can do, and some of them are mentioned below.

    • Scan Your Phone With An Anti-adware

    At first, connect your phone to a computer. Now, download an anti-adware software on your PC. Malwarebytes, AdwCleaner are some of the best in this field since they have been helping people for years. Therefore, scan your entire phone with that anti-adware tool so that it can find and remove the file as soon as possible.

    • Use AdGuard

    AdGuard is installing

    Although AdGuard is not available on the Google Play Store, it is entirely safe to use it on your phone, and we have been using it for years. So far, we have not got any problem with AdGuard. AdGuard helps you block all the advertisements from appearing on your mobile. Be is a popup ad or ads on a website; you cannot find anything after enabling AdGurd on your mobile. It is a paid tool, and it works perfectly.

    That’s all! We hope these guides would be helpful for you.

  • How To Download All Google Photos To Your PC

    Google Photos is a great place where you can upload images and keep them as it is for as long as you want. However, let’s assume that you need to download all the photos and albums to your PC due to any reason. At such a moment, you can follow this tutorial. This article shows the exact steps to download all Google Photos to your PC. Although you can use third-party software, it can be done without that as well.

    People who have very little storage left in their mobiles can use Google Photos to store all the images for free. No matter how many photos you have, you can store them in Google Photos for free. However, some conditions may apply, as per the official statement. For example, if you choose “Original” quality, you need to spend Google Drive storage. On the other hand, if you choose “High Quality,” it should not show you any upper limit.

    Many times, you might need to download all your images from Google Photos due to any reason. Let’s assume that you want to keep them in an external hard drive or upload them to another cloud storage. At such a moment, you can use this method. As Google Photos contain all your images, there is no need to rely on third-party software.

    The best thing is that Google has an official tool that might help you to download all Google photos to your PC without any problem. There is no pricing or anything like that. As it uses Google’s server, it gets done quite quickly. To know the exact steps, keep reading this article. For your information, we are going to use Google Takeout. Google Takeout is such a tool that helps you download all kinds of personal account data and files from Google. For example, you can download Google Play Movies & TV preferences, Google Photos, etc. It is entirely free, and you do not need to go through a lot of options to get the job done.

    How To Download All Google Photos To Your PC

    To download all Google photos to your PC, follow these steps-

    1. Visit the Google Account management page.
    2. Enter your login credentials.
    3. Go to Data & personalization.
    4. Click on Download your data option.
    5. Click on Deselect all options.
    6. Scroll down and make a tick in Google Photos checkbox.
    7. Click the Next step button.
    8. Select a delivery method.
    9. Choose file type, size, and frequency.
    • Click Create export button.
    • Download images from Google Photos.

    To know about these steps entirely, read on.

    At first, you need to visit the Google Account management page. You can enter this URL in the address bar of your browser: https://myaccount.google.com/. Now, type your Google email ID and password. Then, go to the Data & personalization tab. Alternatively, you can enter this in your browser’s address bar as well: https://myaccount.google.com/data-and-personalization

    After that, you need to enter your credentials to access further options. Now, scroll down a bit until you get the “Download, delete, or make a plan for your data” option. Here you can see an option called Download your data.

    You need to click on this option. It will redirect you to the Google Takeout page. Alternatively, you can enter the official URL of Google Takeout: https://takeout.google.com/. After that, click on the Deselect all button.

    Download All Google Photos To Your PC

    Otherwise, it will export everything alongside images from Google Photos. Now, choose Google Photos from the by making a tick in the corresponding checkbox.

    Download All Google Photos To Your PC

    From here, it is possible to select specific albums as well. As you are about to download all images, there is no need to use this option. Otherwise, you can click on the All photo albums included button and select the desired albums.

    Then, scroll down and click the Next step button. Here it will ask you to choose a file type, delivery method, and frequency.

    Download All Google Photos To Your PC

    Delivery method: How you want to get the picture? You can get a direct download link to your email, save everything in Dropbox, OneDrive, and Box as well.

    Frequency: How many times you want to export all images? You can choose Export once option.

    File type: It is wise to choose .zip as almost every operating systems support this format.

    After choosing all these things, click the Create export button.

    Now you can sit back and relax for a few moments until you receive any email. Once you get the mail, open it to find the download link.

    That’s it! It is as easy as it says. We hope you will find this article helpful to you.

  • Best Notepad++ Plugins For Coders And Writers

    Notepad++ is one of the best text editors for Windows. No matter whether you are using Windows 7 or Windows 10, you can install Notepad++ for your benefits. If you are new to this text editor for programmers, you can check out this list. Here are some of the best Notepad++ plugins so that coders and writers can get some help and do their jobs faster. No matter which language you use to write your script, you can follow this article to increase productivity.

    Best Notepad++ Plugins For Coders And Writers

    Best Notepad++ Plugins

    1] AutoSave

    As the name suggests, AutoSave helps you save the tab automatically on your computer. No matter how many tabs you have opened, you can save them all as you type. It has an options dialog box so that you can choose what you want to save and where you want to save.

    2] AutoSave2

    Although it has a similar name as the first plugin, it is quite different in terms of how it works. The first plugin saves the original file automatically. However, Autosave2 helps you create a copy of the currently opened file at your desired location so that the original file remains intact, whereas you can find the current editing in the copied file. Like AutoSave, it also has some options so that you can manage everything quickly.

    3] BigFiles

    Notepad++ can open any size of the file. However, if you choose a huge file of script, it might lag a bit – depending upon the computer configuration. Therefore, you can install this plugin called BigFiles. It works quite interestingly. Because of it, Notepad++ doesn’t open the whole file at once. It buffers a small portion of the file from time to time so that you can edit the code when Notepad++ loads the file in the background.

    4] BracketsCheck

    In programming languages, brackets play a vital role since they can make or break the script, and you will end up consuming the countless amount of time. BracketsCheck, as the name defines, helps you check the brackets balance automatically. It also shows where you have missed the bracket.

    5] Combine

    Let’s assume that you have opened ten files or tabs in Notepad++ and you want to merge them all. Instead of switching tabs and copy content one after one, you can use this plugin. It will combine them all and create a new file instantly.

    6] Compare

    By default, this plugin should be installed. However, if your Notepad++ installation doesn’t have this plugin, you can install it accordingly. Sometimes you might need to compare two files to find the change. It is very handy when you need to find the difference between an old and new copy of the same script. At such a moment, you can use this plugin called Compare. It will let you find the differences by opening them side by side.

    7] DSpellCheck

    If you use Notepad++ as a screenplay writing tool, you can use this plugin. It will help you to find all the spelling mistakes as you type. No matter whether you write codes or anything else, this plugin can do wonder for you.

    8] iTimeTrack

    If you like to track your work time or time to write a specific script, you should install this plugin. It is quite simple yet convenient in terms of features and options. You can find how much time you take to complete a project or a specific thing. It doesn’t matter if you write codes or screenplay, you can use this plugin to track the consumption time.

    9] NavigateTo

    Sometimes you might open fifteen or twenty tabs in the app. At such a moment, it is challenging to navigate from one tab to another. You might need to find it first and then click on it to make the switch possible. However, if you use NavigateTo plugin in Notepad++, it would be straightforward for you to move from one tab to another.

    10] PreviewHTML

    If you often write HTML and you want to check the live preview without opening it in a browser, you can use this plugin. It is effortless to check preview after installing this plugin since you do not have to take the help of a browser.

    11] Remove Duplicate Lines

    If you think that your script has some duplicate lines and some problems are occurring due to that, you can use this plugin. It helps you remove all the duplicate lines instantly. The only problem with this plugin is that it doesn’t show what lines it has removed.

    12] Explorer

    Sometimes you may need to open some files frequently. At such a moment, you can use this plugin, which shows the File Explorer on the left side of your Notepad++ window. From here, you can navigate to different paths and open desired files from time to time.

    There are tons of other plugins for Notepad++. However, these are some of the best plugins to get started with this app and make it more productive.