Author: Sudip Majhi

  • 8 Best Dark Mode Extensions For Google Chrome

    Although Google Chrome allows users to enable dark mode without using any third-party software, it doesn’t work as it should be. The main problem is that you cannot get the dark theme across all the locations, including the web pages. Also, they do not have an option to manage the dark mode as per the user’s needs. Therefore, you can check out these dark mode extensions for Google Chrome those will let you enable dark mode reader in Chrome browser without any problem.

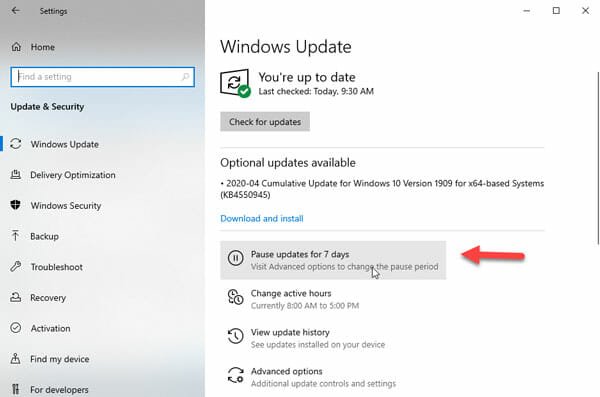
    Before getting started, you should know how to enable dark mode in Chrome without any third-party software or extension. You can do that easily on Windows 10 by changing the default app mode from the Windows Settings panel.

    To be precise, press Win+I to open the Windows Settings panel on your Windows 10 computer and go to Personalization. Following that, switch from the Background tab to Colors tab where you can find an option called “Choose your default app mode.” By default, it should be set to “Light”, but you need to select the “Dark.”

    After that, you can open up the Chrome browser on your PC to check how it works. As mentioned earlier, you cannot find the dark theme across all the locations in your browser. However, it shows the theme in the Settings panel and other familiar places.

    For your information, there is another way to enable dark mode in Chrome without extensions. For that, make sure that you have a desktop shortcut of Chrome browser. If so, right-click on it, and select Properties from the context menu. After that, add this text at the end of the Target box.

    –force-dark-mode

    Now, save your change by clicking the Apply and OK buttons. After that, you can double-click on that desktop shortcut to open Chrome with dark mode enabled.

    If you are not happy with this in-built dark mode facility of Chrome, and you want to get more out of it, you should keep reading. Here are some of the best extensions to enable dark mode in Google Chrome.

    1. Midnight Lizard

    8 Best Dark Mode Extensions For Google Chrome

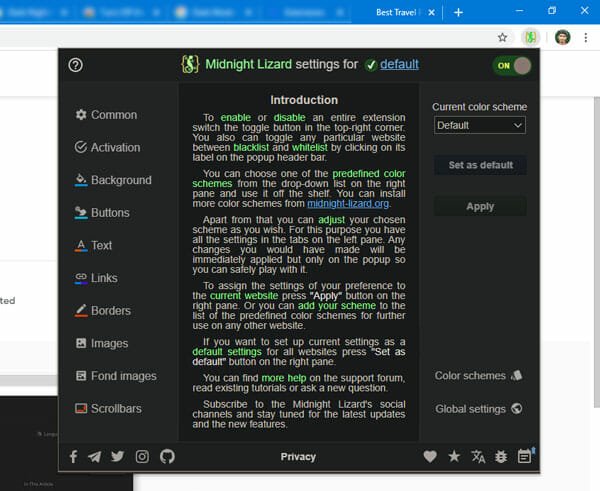
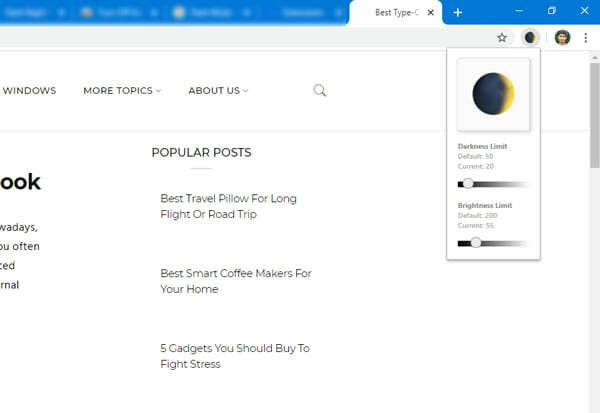
    Midnight Lizard is a great free Chrome extension, which helps you get the dark mode on all websites. In other words, if you often spend your day to read articles on various sites, you can check out this extension that can allow you to apply various color schemes without any issue. You can implement different color schemes for different websites, elements (links, texts, etc.). No matter whether you like to have a bright color link or blackish, you can get both with the help of this extension. The best thing is that you can change and apply a different setting without restarting the browser. Download

    2. Better Dark Mode

    8 Best Dark Mode Extensions For Google Chrome

    Although it doesn’t have as many options as Midnight Lizard, you can get what you want to have in the browser. In simple terms, you can get the dark theme on any website across the internet. No matter whether a website has a dedicated dark mode version or not, you can enable the dark theme on that site with the help of Better Dark Mode. It has a simple user interface where you can find an on/off button, an option to change the density of darkness, etc. To enable dark reader mode in Chrome, you need to click on the toggle button first. After that, you can tweak the density as per your requirements. Download

    3. Night Shift

    8 Best Dark Mode Extensions For Google Chrome

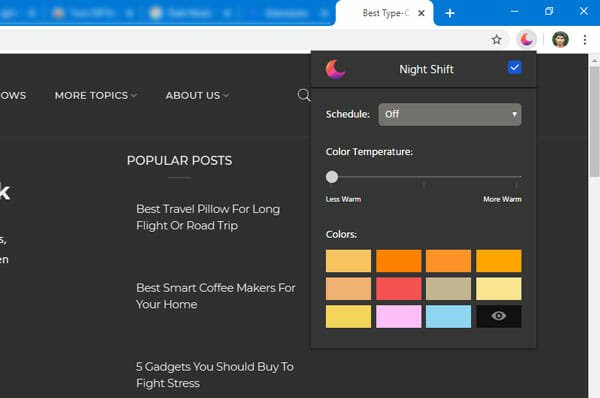
    Although the term, night shift, defines something else, you can get a dark theme out of this Night Shift extension, which is available for Google Chrome. It allows users to choose a specific color and tweak the temperature according to the requirements so that users get a pleasant environment to read articles. The highlight of this extension is that you can schedule the dark mode automatically so that users do not forget to enable it at times. The only drawback is that you cannot choose a color as per your desire since it only allows 12 color schemes. As black is there, it should not create a significant problem for you. Download

    4. Lunar Reader

    8 Best Dark Mode Extensions For Google Chrome

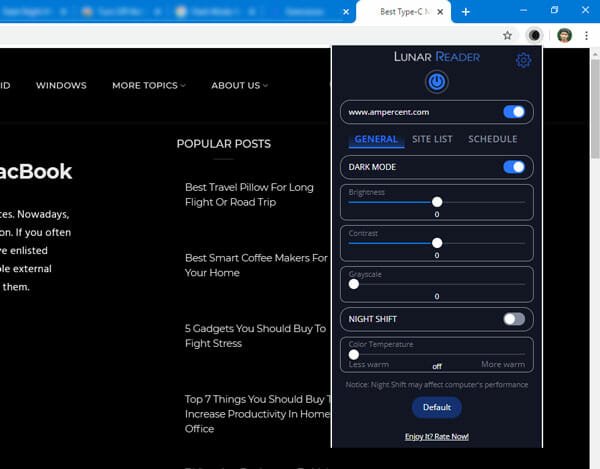
    Lunar Reader is yet another handy Chrome extension that helps you enable dark theme as well as night shift in the browser. Apart from allowing those two things, there are two important features you should know about this extension. First, you can schedule the dark mode whenever you want. No matter if you wish to enable it at 7 AM or 10 PM, you can do that easily. Second, you can whitelist a website so that the extension doesn’t work on it. When you enable this extension, it gets applied to all the sites. In case you do not want to let the dark theme on a specific site, you can exclude that with the help of this feature. Download

    5. Night Eye

    8 Best Dark Mode Extensions For Google Chrome

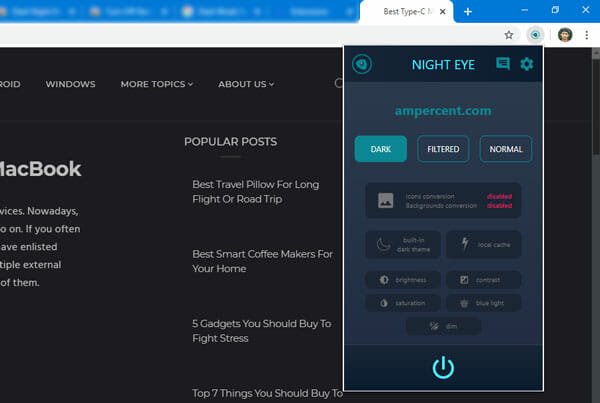
    Night Eye is a simple looking extension with lots of features that might attract you to use it. It enables the dark mode in the Chrome browser without any issue, and it works almost every website. It has some advanced options like some other extensions on this list. For instance, you can change the brightness, contrast, saturation, etc. On the other hand, you can reduce the blue light as well. There is a simple power on/off button that you can use to enable or disable the dark theme in Chrome. Download

    6. Dark Mode

    8 Best Dark Mode Extensions For Google Chrome

    If you do not need any additional feature and you want to have a simple on/off switch to enable/disable dark theme, this extension is for you. Dark Mode is a simple Chrome extension, which helps users to turn on dark mode in Chrome within moments. After installing, you can find an icon in the respective position. If it is not enabled by default, you can click on this icon to enable the dark theme on any website. Download

    7. Turn Off the Lights

    8 Best Dark Mode Extensions For Google Chrome

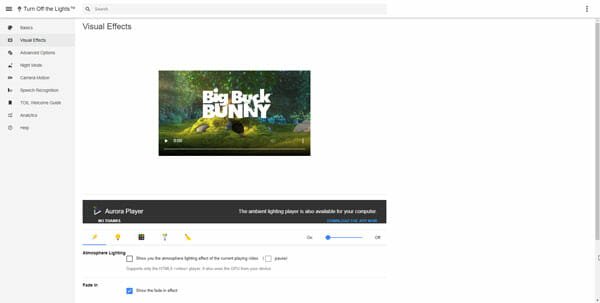
    It does what it says. That implies you can activate or deactivate the dark theme in Chrome with the help of this extension. Although it doesn’t show any option in the front, you can find several features to tweak after installing this extension. After adding the extension in this browser, you can toggle the corresponding button to turn off the lights in the browser. On the other hand, you can right-click on the icon, and select Options to reveal all features. From here, you can choose the color scheme, temperature, etc. Download

    8. Invert

    8 Best Dark Mode Extensions For Google Chrome

    As the name says, you can invert the color with the help of this extension. No matter whether a webpage has text or image, it can invert the color scheme of everything within moments. However, there is a mode, which can exclude the images and invert the color of other elements of a webpage. You can use it when you do not want to change the color of the image and want to see pictures as they are. There is no additional option to play with. You can install it in your browser and click on the button to enable the dark mode. Download

    That’s all! These are some of the best methods, tips and tricks to enable dark mode in Google Chrome.

    Do let us know about your favorite extension.

  • How To Change Your Name On Tinder

    Tinder is a well-known app to meet strangers and chat with them. No matter where you live, you can install Tinder and meet someone as per your needs. However, if you entered the wrong name or made a spelling mistake while creating your Tinder account, you might get some problems. Therefore, you can follow this guide to change your name on Tinder or rectify it as per your requirements. Before changing your name on Tinder, you should know a few things, and everything is mentioned in this article.

    When it comes to chatting with strangers, Tinder comes first since it is a very popular, common, and handy app, which is compatible with multiple platforms. Let’s assume that you have a Tinder profile, but there is a spelling mistake in your name. For obvious reasons, it will create problems, and other people might not recognize you. If you think that you should change your name on Tinder, this article will help you that.

    How To Change Your Name On Tinder

    There are ways to change the name on Tinder, and they depend on the method you used to create the profile. If you created your profile with the phone number or email ID, the procedure is different than those people who used Facebook to create the same profile. Therefore, at first, you should remember whether you created the profile with a Facebook account or phone number and email.

    For Facebook Account

    It is probably the most comfortable thing that someone can do. When you create a Tinder account with a Facebook profile, Tinder fetches all data from that social networking website. It implies that if your Facebook profile name “John,” Tinder would show the same name, John.

    Therefore, you need to change the name of your Facebook profile. For that, open up your Facebook profile and go to Settings. Then, make sure that you are in the General tab. Here you can find your name on the right side. Click the Edit button and enter your name with correct spelling.

    Tinder might take up to 24 hours to show the new name. After making the change on Facebook, log out of your Tinder account, and sign back in. It might accelerate the process, but it is not confirmed.

    For Phone/Mobile Number Users

    If you created your Tinder profile with a mobile number and email ID, it is near to impossible to change the name and keep all data intact. As this process requires you to delete your profile, it is not possible to continue with your existing data in your new profile. If you are okay with this procedure, you need to follow the following steps.

    At first, open your Tinder profile and tap on your profile avatar to get further options. Here you can find an option called Settings. You need to tap on it.

    Change Your Name On Tinder

    Now, you should see another option called Delete account. Use this option to delete your Tinder profile.

    After that, create your new Tinder profile with the same email ID and phone number. Now, you can set your desired name from scratch. No matter whether it was a small spelling mistake or complete name change, you can fix both problems with the help of this guide.

    That’s all! We hope this tutorial would help you.

  • Best Chrome Extensions To Record Screen

    Google Chrome is one of the best browsers out there, and the extensions play a vital role to make it even better. No matter whether you want to record screen or do something else, you can perform everything with the help of the extensions. Let’s assume that your friend needs some help with the Chrome browser, and you want to send a recorded video. Or, you are a teacher, and you want to send something to your students. At such a moment, you can check out these Chrome extensions to record screen without any problem.

    These are the best Chrome extensions to record screen-

    1. Awesome Screenshot

    Best Chrome Extensions To Record Screen

    Awesome Screenshot is a well-known name and convenient extensions when it comes to capturing Screenshot and record screen in Chrome browser. The best thing about this extension is that there is no upper limit of recording time. However, you may have to opt for a paid plan to get that functionality.

    The highlight of this tool is that you can record video and save it in the cloud automatically. Although it is also possible to save them in the local storage, you can upload files to share the video directly with your friends or anybody else.

    If you have a microphone attached to your computer, you can record the audio as well. To get started, install the extension and switch to the Record tab. After that, set it up as per your needs and click the START RECORDING button.

    2. Screen Capture, Screenshot & Record – Bukket

    Best Chrome Extensions To Record Screen

    It is yet another very handy solution for people who want to make record the screen for five or ten seconds. Although this extension has some limitations and drawbacks, it works fine in Chrome browser. The first problem with this extension is that it doesn’t save the recording in video formats. Instead, it saves the recording in .gif. Secondly, it doesn’t record more than ten seconds.

    No matter how much you try to record a video for more than ten seconds, you can do that with the help of Bukket. However, some people often try to make GIF files from a recording. Bukket is a good choice for them, for sure. After installing this extension, open it up, and select either Record selected area or Record visible area. Then, you need to choose an area based on the option you selected.

    The good news is that you can easily save the recorded clip to your computer in.gif format.

    3. Droplr

    Best Chrome Extensions To Record Screen

    Droplr is yet another useful Chrome extension to record screen without any issue. However, there is a tiny thing you should know about Droplr, and it is that you need to create an account to use fully featured Droplr on your computer. Otherwise, you might face some limitations. As it is quite a handy tool and you do not need to spend any money to create an account, you can make it for yourself to enjoy all the functions.

    To get started with this extension, you need to download and install it first. After opening, you need to switch to the Screencast tab. Here you can find some options such as Save to desktop, Microphone audio, recording area, camera source, microphone source, video quality, etc.

    If you haven’t created an account, you cannot enjoy unlimited recording. If you are okay with that, you can download the extension from here.

    4. Nimbus Screenshot & Screen Video Recorder

    Best Chrome Extensions To Record Screen

    Nimbus is a popular screencast extension that offers countless features for the users’ benefit. No matter whether you want to capture screenshots or record screens, you can do everything with the help of Nimbus Screenshot & Screen Video Recorder extension for Google Chrome. Talking about some essential features, you can find these-

    • You can record video of another active program.
    • Make small edits within this extension.
    • Convert the videos from WebM to MP4.
    • Crop, Trim videos.
    • Add custom watermark.
    • Publish the video on YouTube.
    • Upload recorded videos to Dropbox and Google Drive.

    For your information, not all the aforementioned features are available for free. You need to purchase a premium subscription to get all of them. As it has some complex functionalities, it is recommended to spend some time to understand this extension before hitting the record button.

    5. Screencastify – Screen Video Recorder

    If you like to use Google services all the times, Screencastify is a good option for you. Screencastify allows users to upload the recording directly to Google Drive so that people can share them without any problem. No matter whether you record five seconds or five minutes video, you can upload them to your Google Drive storage.

    The main problem with this extension is that you must have to create an account with your Gmail ID. Otherwise, you cannot use this extension freely in Google Chrome. Following the account creation, you would be able to record the browser tab, desktop, webcam, etc. If you have a microphone attached to your computer, you can record audio as well.

    After setting up everything, click the Record button to start recording. The good news is that it doesn’t take much time to upload the video to your Google Drive storage.

    6. Screen Recorder & Video Editor

    Best Chrome Extensions To Record Screen

    Sometimes you might need a screen recorder and a video editor at once. At such a moment, you can use this extension to get your job done. It has some very handy features so that users can record the screen and edit them as per their requirements.

    From trim, crop, to emoji, tags, etc. you can make all kind of annotations with the help of this screen recording extension. On the other hand, it is possible to create an animated photo (.gif) as well as save the recording in standard video formats.

    The only problem with this extension is that you must have to create an account with your Gmail ID. If you are okay with that, you can download the extension from here.

    These are some of the best Google Chrome extensions to record screen. We hope you will find them useful.

  • 20 Google Search Tips And Tricks To Get What You Want

    Many times you might get disappointed by the search result when you are in a hurry. However, if you use these Google search tips and tricks, there is a high chance that you would get what you are looking for. No matter whether your search is related to image, text, document, or anything else, you can use these little tricks to get the job done.

    1. Use Quotes To Find Exact Result

    When you search for a keyword, it might not show the exact result. Google displays the result with everything possible related to the search query. However, if you use a search term like this – “Ampercent,” it will show the result that contains Ampercent on the page. You can search for anything with two quotes.

    2. Mention File Type

    Let’s assume that you need to find a PDF file of an eBook. At such a moment, you can use a keyword like this-

    Book name filetype:pdf

    It will show results with PDF file so that users can download the file directly to their mobile or computer. You can use any file format, including ePub, .mobi, etc.

    3. Search For Wallpaper With Specific Resolution

    Google Search Tips And Tricks

    If you are not getting a wallpaper as per your screen size, you can use this search term-

    Wallpaper 1920×1080

    As per this keyword, Google will show wallpapers with a resolution of 1920 x 1080 pixels. It is meaningless to mention that you can change the resolution to find wallpaper for computer monitors as well as mobile.

    4. Find Quick Answers

    Google Search Tips And Tricks

    You can ask Google questions to get quick answers. For example, you can ask for someone’s age, weather report, or anything else. Most times, it shows the answers directly. However, if an answer is not available, you can find some specific website where you can get the answer to your question in one-click.

    5. Reverse Image Search

    Reverse Image Search helps you find an image based on an existing photo that you have on your computer. For that, you need to open the Google Image search and upload the image from your computer. You can also add a couple of keywords so that it can show the result quickly. Otherwise, Google will show approximate results on your screen.

    6. Search For News Using Tools

    If you read news from Google search, you can use the Tools section so that you can get the most recent news. By default, Google shows the most trending news on the result page. However, if you use the Tools > Any time > Past hour or Past 24 hours option, it would show the recent news only.

    7. Show Result In Another Language

    Google Search Tips And Tricks

    If you want to get the results in a different language, you can go to Settings > Languages. From here, you need to choose a language that you want. After clicking the Save button, Google will show results in that language. Also, you can use the search term in that preferred language.

    8. Increase Number Of Results Per Page

    Google Search Tips And Tricks

    By default, Google shows ten results on a single page. However, if you want to get more results, you can do this. Search for keyboard and click on Settings > Search settings. After that, choose a number from the Results per page option. It is possible to select up to 100 results per page.

    9. Change Region To Find Specific Result

    The same settings page has an option that allows you to change the region so that you can get a different result. Some websites publish region-based articles. If you want to get them, it is the best way. Here you can find an option called Region Settings. From here, you can choose a region and click the Save button.

    10. Check If Page Is Indexed

    If you are a website admin and you want to check if your webpage is indexed in Google or not, you can copy the URL and paste it in the search box. If Google shows the result of your website, the page is indexed. However, if Google shows something else, it implies that the webpage is not indexed yet.

    11. Use Calculator

    Google Search Tips And Tricks

    If you do not have a physical calculator, but you want to calculate a few things, you can use the Google search. You can simply type the equation, and it will show the result accordingly. No matter whether it is a complicated or straightforward equation, Google shows the result almost immediately.

    12. Use Converter

    Like a calculator, you can convert different things with the help of Google search. For example, you can convert volume, distance, currency, etc. Just search for the keyboard like this-

    1000m to km

    10lb to kg

    And Google will show the converted result immediately.

    13. Find Result Of Specific Site

    If you want to get a search result of a specific website, you need to enter a simple parameter like this-

    Google site:ampercent.com

    It is meaningless to mention that you can use any domain name as per your wish.

    14. Find Icons

    In case you are trying to find an icon of a specific thing, and you have already searched for it in the Google Image search, you can follow this guide. You need to open Tools and go to Size > Icon. Now only icons would appear in the search result.

    15. Find Royalty Free Image

    Google Search Tips And Tricks

    If you are trying to find some images to use on your website, you can use this tutorial here is how to find royalty-free images from Google. At first, search for the keyboard in the Google Image search and open the Tools option. Following that, expand Usage Rights and select a license type as per your requirements.

    16. Find Transparent Image

    The Tools menu has another option that would help you to find a transparent image from Google Image search. For that, you need to expand the Color menu, and select Transparent option from the list. Now, you can find all the images that have a transparent background.

    17. Translate Language

    Google Search Tips And Tricks

    If you are trying to translate language quickly, you can use the Google search. For example, search for a keyboard like this-

    Hola in English

    Here “Hola” is the unknown language, and “English” is the output language. You can change it to anything.

    18. Add Price Range

    If you want to get a list of products between a specific price range, you can use this technique.

    Chair $50…$100

    It will show you the result of chairs that has a price range from $50 to $100.

    19. Check Cache Version Of Webpage

    If a webpage has been deleted, but you want to open it for some reason, you can use the cache version. The only problem with this method is that you must have the exact URL of the specific webpage. After that, you can search for it in Google search box > click the arrow button > select Cached.

    20. Check Movie Showtime

    If a long-awaited movie is running at your nearest theater and you want to check the showtime to watch it, you can check it on Google. For that, type the movie name along with the keyboard called showtime.

    For example:

    Avengers endgame showtime

    It will show the result immediately.

    That’s it! These are some of the best Google search tips and tricks to find some excellent results.

  • How To Block YouTube Videos And Enable YouTube Kids

    If your kid often watches YouTube videos, it is your duty to make a safe environment for your kid so that he/she doesn’t get anything inappropriate. There are a few things you can do, and some of them are mentioned in this article. You can block 18+ YouTube videos, enable and use YouTube Kids, etc. This article has everything you might want to use. However, some of the features might not work with the free version.

    Let’s assume that your kids often browse YouTube to watch a suitable video. Thanks to some people, YouTube is no longer a safe place for a kid because of countless raw materials or content. If you do not want to allow you kids to watch such videos on YouTube, you should block the YouTube video and channel as well.

    How To Block YouTube Channel

    To block a YouTube channel, follow these steps-

    1. Sign in to your Gmail account.
    2. Open the YouTube channel.
    3. Go to the About page.
    4. Click on the flag icon.
    5. Select the Block user option.

    To know more about these steps, you should keep reading.

    At first, you need to sign in to your Gmail account that your kid uses while browsing this video broadcasting website. After that, open the YouTube channel on your computer. Following that, go to the About section of the YouTube channel.

    Here you can find a flag icon on your screen. You need to click on this icon and select the Block user option.

    How To Block YouTube Channel

    However, if you think the YouTube channel is not good enough in terms of content, you can report the channel as well. For that, select the Report use option and confirm the change.

    How To Report A YouTube Video

    If you want a video removed from YouTube, you can report it. However, only one report might not be enough because of some obvious reasons. In that case, several people need to report the channel.

    To report a YouTube video, open the video on YouTube, and click on the three-dotted icon. Here you can find an option called Report. You need to click on this option and confirm the Report.

    How To Report A YouTube Video

    That’s all!

    How To Turn On Restricted Mode On YouTube

    Restricted Mode is an essential part of YouTube that helps you remove all the random videos from the timeline at once. No matter whether you are or your kid is browsing this website, you can turn on Restricted Mode to get safe videos only.

    For that, click on your profile picture after opening the YouTube website and select the Restricted Mode.

    How To Turn On Restricted Mode On YouTube

    It should be visible at the bottom of the list.

    How To Block Videos On YouTube Kids

    YouTube Kids is probably the safes choice for parents to give it to their kids. It doesn’t have any 18+ content, and all the uploads are well monitored by the officials. For your information, YouTube Kids has only animation and kids related shows so that everyone can enjoy all the time. However, if you do not want to let your kid watch a specific video on YouTube kids, you can block that video using this guide.

    At first, open the YouTube Kids in your browser and play the video that you want to block. The video player should have a three-dotted icon on the top-right corner. Expand it and select Block video option.

    How To Block Videos On YouTube Kids

    After that, you will get two options – Block this video only and Block the entire channel: the channel name. If you want to block the single video, use the first option. However, if you want to prevent the entire channel, make use of the second option.

    That’s all! These are some of the methods to block videos on YouTube and YouTube Kids. For your information, you cannot use YouTube Kids for free. You must have to purchase a premium subscription, which doesn’t cost a lot. If you have a kid and you want to allow him/her to watch some animated videos, YouTube Kids might be the safest place for you.

  • Top 10 Live TV Streaming Sites To Watch News, Sports, Movies

    Days are gone when you needed to have a television with a cable network connection to enjoy live TV at your home. Now you can use these live TV streaming sites to watch the news, sports, movies, and whatnot. As these are some websites, you can watch live TV on mobile as well as computer. Some of the sites require to create an account when some of them might not need that. You need to open each website to check which one suits the most.

    Top 10 Live TV Streaming Sites

    Here are the best live TV streaming sites-

    1. YouTube
    2. Hotstar
    3. YuppTV
    4. Hulu
    5. wwiTV
    6. USTV Now
    7. Tubi TV
    8. EPC TV
    9. Crackle
    10. AT&T WatchTV

    YouTube

    Live TV Streaming Sites

    YouTube is one of the best live TV streaming sites that you can find on the internet. You may not find all the favorite channels, but most of the regional channels get broadcasted on this platform. No matter whether you want to watch the news or movies, you can find something on this video-sharing website. However, there is a trick to find a TV channel on YouTube. You need to do a search like this-

    Tv channel name + live

    Let’s assume that there is a TV channel called ABCD. Therefore, you need to search for – ABCD live. If the channel is available on YouTube, you can find that in the search result. Then, you can start watching as usual.

    Hotstar

    Live TV Streaming Sites

    Although it is definite about the channels, you can find the best streaming quality on Hotstar. The major problem with this website is that you need to have a paid account to start watching live TV. Although you can check the streaming quality for three minutes, you need to have the account afterward. Talking about the available channels, you can watch sports-related channels and some regional channels on this platform. The best thing is that you can download the mobile app and enjoy watching TV while traveling as well.

    YuppTV

    Live TV Streaming Sites

    If you are happy with the channel availability of YouTube and Hotstar, you can opt for this website. It is a popular live TV streaming website where you can watch most of the Indian TV channels for free. There is no need to create an account on YuppTV, and the best thing is that you can choose the language to stream a channel. No matter whether you live in the northern part or southern part of India, you can find your preferred language on this website. Following that, you can choose a genre from the list before getting a channel on your screen.

    Hulu+ Live TV

    Live TV Streaming Sites

    If you live in the United States, you might already know about Hulu, which has some of the most popular channels. Although it requires to pay a good amount of money, the channel list, features, and streaming quality would surprise you for sure. Regarding the available channels, you can find TLC, ESPN, National Geographic, CNN, Discovery, CNBC, Animal Planet, and tons of others. Not only on a computer, but also you can enjoy live TV on mobile, Chromecast, Apple TV, Fire Stick, Nintendo Switch, PS4, Xbox, etc. If you are already impressed with the features, you should know that users need to pay $55/month to enjoy their service.

    wwiTV

    Live TV Streaming Sites

    If you do not want to pay money for watching the live TV for thirty minutes or so, you can check out this website. wwiTV gathers all the live TV channels that broadcast the show through YouTube. No matter whether you want to watch the UK or India-based channel, you can find that on this website. However, you may need to go through some steps to get the channel on your screen. The good news is that it shows an option to find the channel base don language. Also, you can find an option called Webcam streams, which doesn’t have a good quality, but it may have your favorite channel.

    USTV Now

    Live TV Streaming Sites

    USTV Now has some of the best channels with a timeline of shows so that you can find something useful and set the reminder as per your desire. No matter if you are looking for a news channel or sports channel, you can see that on this website. However, you may have to opt for a paid account to get an HD version. Otherwise, you can enjoy the SD version for free. There is another restriction, which blocks users from watching only five channels if they do not buy a premium account.

    Tubi TV

    Live TV Streaming Sites

    Tubi TV is probably the best most professional website in this category that you can find on the internet. It showcases all the shows and channels differently so that users get attracted to it. For your information, you need to create an account to watch live TV on this website. Like Hulu, you can enjoy live TV channels on various platforms, including Android, iOS, Apple TV, Xbox, etc. Before heading to this website, make sure that you disabled the ad blocked installed in your browser.

    EPC TV

    Live TV Streaming Sites

    When you are in a hurry, and you need to watch a specific channel live, you should check out this website. EPC TV takes a few moments to start the streaming, but it works fine afterward. It doesn’t matter where you live or which channel you want to watch; you can find that on this website. It is quite easy to find your favorite channel because it shows the channel list, country list, language list, etc. Also, you can find some categories so that it becomes easier for a regular viewer to start watching something interesting.

    Crackle

    Live TV Streaming Sites

    Crackle is one of the best and free live TV streaming sites where countless channels are available. Although it is not available in most countries, you can use a VPN to unblock the blocked website. The quality of the streaming is pretty good, and you should not have a significant problem even when you do not have a high bandwidth internet connection. To find a channel, you can search for it, or you can check out the existing list. In case you do not want to watch live TV, you can always pick up something from the uploaded web series and shows.

    AT&T WatchTV

    Live TV Streaming Sites

    It is a famous company based in the USA, and they provide almost 35 channels that you can live on your favorite device. The list of available channels is virtually the same as the Hulu. However, you might find some differences here. Talking about the preferred device, you can watch it on Android, iOS, Browser, Fire TV, Fire Stick, and Apple TV without any problem. No matter whether you are sitting on your couch or traveling, you can continue enjoying the live shows on your mobile or TV. Check the website

    Here are some of the best live TV streaming sites. We hope you will like this list.

  • How To Fix Slow Wi-Fi On Windows 10? 8 Working Steps

    If you have a Wi-Fi connection in your home and it often creates problems due to some unknown reasons, you can check out this guide. The slow Wi-Fi connection is a prevalent issue in many areas and regions. However, if you have a decent bandwidth package but the Wi-Fi connection has suddenly become very slow, you should follow these tips and tricks. Here are some of the best troubleshooting tips to fix slow Wi-Fi on Windows 10.

    How To Fix Slow Wi-Fi On Windows 10

    To fix slow Wi-Fi on Windows 10, follow these steps-

    1. Restart Wi-Fi Router
    2. Change Primary DNS
    3. Scan PC For Malware
    4. Pause Windows 10 Updates
    5. Stop Automatic Software Updates
    6. Disconnect Other Devices From Router
    7. Reinstall Network Driver
    8. Stop Using VPN/Proxy

    Restart Wi-Fi Router

    If your Wi-Fi is running or on for a past couple of weeks, it is the time to give it some rest. All the electrical devices should have some rest like a human. Sometimes the heat can cause internet hardware issues, and thus, you might get a slow internet connection from your router. Therefore, it is always an excellent choice to restart your Wi-Fi router for the benefits. However, if it is possible, you can switch off the router for a couple of minutes before starting again. It will help you understand whether the router has any problem or not.

    Change Primary DNS

    Fix Slow Wi-Fi On Windows 10

    No matter whether you are using a direct Ethernet connection or Wi-Fi router, your network should have a primary DNS server and alternate DNS server. If the current DNS is causing the issue, you can change it to something else. The two most popular DNS servers are Google Public DNS and Cloudflare DNS. You can press Win+R, type ncpa.cpl, and hit the Enter button. Then, right-click on the Wi-Fi, and select Properties. Double-click on the Internet Protocol Version 4, select the Use the following DNS server addresses from the list and use the following-

    Google Public DNS: 8.8.8.8 and 8.8.4.4

    Cloudflare DNS: 1.1.1.1

    Now save your change and check if the internet connection is back on track or not.

    Scan PC For Malware/Adware

    Many people have faced this problem in the past, and some of them are still facing it right now. Many attackers design the malware to consume data so that victims cannot do anything, and the malware or adware continues doing its job smoothly in the background. If you think that you have the same problem, it is time to scan your PC for malware. There are tons of free, paid, and trustworthy anti-malware or adware tools that you can find on the internet. You can install anything reliable and scan the whole computer with it. No matter whether you have Windows Defender or not, you should follow this step minutely.

    Pause Windows 10 Updates

    Fix Slow Wi-Fi On Windows 10

    Windows 10 users often face this issue because the system downloads updates frequently in the background. Even though you like to download the updates as soon as possible, you should pause the Windows 10 update temporarily to check whether it is causing the issue or not. For your information, you can do that from the Windows 10 Settings panel. For that, press Win+I to open Windows Settings and go to the Update & Security section. Following that, click on the Pause updates for 7 days button on your right-hand side. If you are not getting this option, make sure that you are on the Windows Update page.

    Stop Automatic Software Updates

    While installing software, many of them ask users to check and download updates automatically in the background. If you enabled that for each software you have on your computer, this problem is widespread for you. If you enable this functionality in every installed software and you have more than ten or fifteen third-party software, there is a high chance that you can encounter this issue. To solve it, you have to open all the third-party software installed on your computer and check whether automatic updates are enabled or not. If enabled, you need to turn them off one after one.

    Disconnect Other Devices From Router

    If you have multiple devices connected to your Wi-Fi router, there is a small chance of getting such a problem on your Windows 10 PC. It is possible that other connected devices are downloading something in the background. That could be a reason why your computer is giving such a slow internet connection. Therefore, you need to disconnect all the other connected mobiles, computers, etc. from the router and check if you are getting a good speed or not.

    Reinstall Network Driver

    To use the internet connection, most of the computers require to install a network driver. This driver helps to detect all the networks and has better functionality and management. If the network driver has some internal issues, you might get such a problem. Therefore, it is better to uninstall the driver from your computer and reinstall it. For your information, you can do that from the Device Manager. On the other hand, you can also try to update the driver if anything is pending.

    Stop Using VPN/Proxy

    If you are using a VPN or proxy, and that service has some problems right now, you can find a slow internet connection. No matter how good your VPN provider is, it may have some problems at times. Therefore, it is better to pause the VPN connection for a short time and check if it solves the issue or not. If yes, you can contact the VPN provider and ask them for a resolution.

    That’s all! These are some of the best tips and tricks to fix a slow Wi-Fi connection issue on Windows 10.

  • How To Link Instagram And Facebook For Better Management

    If you have an online business, and you often sell products online, Facebook is one of the best places to find potential customers. Let’s assume that your business requires you to upload images and videos often to showcase the products. In that case, you can link Instagram and Facebook for better user management. On the other hand, you can share posts and stories from one platform to another by connecting both accounts. This article will let you know everything about this connection so that you can get started with it as soon as possible.

    Undoubtedly Facebook is one of the best social networking sites that you can find on today’s date. No matter whether you have an online business or offline business, you can certainly open a Facebook page and start sharing your products to find potential customers around your area. It is really easy to open a Facebook page or group – no matter whether you’re using a computer or mobile. On the other hand, Instagram is the paste image sharing platform that you can use to upload photos as well as small video clips. As both of these platforms are owned by the same company, you can find better integration and options after connecting your accounts.

    What Happens When You Connect Instagram And Facebook Accounts

    Sometimes you may want to share your Instagram story or Instagram posts on Facebook as well. Let’s assume that you have got a new product and you want to find customers to sell them. At such a moment, you can use Instagram to upload images and a small workaround video clip of your product. If you want to do that on Instagram as well as Facebook, there is no need to do them separately. When you connect your Instagram account to Facebook profile or page, you are giving access to Instagram to share your Instagram story and post to Facebook.

    In other words, there is no need to share them Manually on both platforms Since Instagram can do that automatically. However, Instagram shows options whether you want to share only stories or posts or both.

    For your information, it is straightforward to link Instagram and Facebook accounts or pages from your mobile app. You also do not need to install another third party application, as long as you already have the Instagram app on your mobile.

    How To Link Instagram And Facebook Accounts

    To links Instagram and Facebook accounts, follow these steps-

    1. Open the Instagram app on your mobile.
    2. Go to your profile page.
    3. Tap on the hamburger icon.
    4. Select Settings.
    5. Go to the Account section.
    6. Choose the Linked Accounts option.
    7. Select Facebook from the list.
    8. Enter your Facebook login credentials.
    9. Allow Instagram to access Facebook data.
    10. Select what you want to share automatically.

    To know more about these steps, you should keep reading.

    As mentioned, you must have the Instagram app on your mobile. If you do not have it already, you can download it from the Google Play Store or the iOS App Store. After opening the app and logging into your account, you need to tap on the profile page, which looks like an avatar and visible on the very right side of the bottom of the screen.

    Now you can find a menu icon that looks like three horizontal lines, and it should be visible on the top-right corner of your screen. After tapping on it, select Settings, which you can find at the bottom.

    How To Link Instagram And Facebook Accounts

    Now, tap on the Account option and select Linked Accounts from the list.

    How To Link Instagram And Facebook Accounts

    On the next screen, you can find all the social network sites that you can connect to your Instagram profile. For your information, Facebook should be there too, and you need to click on it to start the process.

    After that, enter your Facebook login credentials and allow Instagram to access your Facebook information. Once you do that, it would show you two options – Share Your Story to Facebook and Share Your Posts to Facebook.

    How To Link Instagram And Facebook Accounts

    The first option helps you post Instagram stories to Facebook automatically, and the second option lets you share the Instagram posts to the same social networking platform automatically.

    That’s it! From now on, you can post on Instagram, and it would be uploaded to Facebook as well.

  • How To Backup And Restore Contacts On Android

    If you are using an Android mobile and you want to backup all contacts, this article is for you. It will show you the steps to backup and restore contacts on Android mobile. There are two ways to do that. You can either use a third-party app, or you can use the in-built option to get it done. Either way, all the contacts can be synchronized across multiple devices using these simple methods.

    Let’s assume that you have an Android as well as an iOS device, and you want to synchronize all the contacts. No matter whether you need to get the same contacts on an iPhone or another Android mobile, there are some straightforward guides that you can use to backup contacts and get them on another mobile. Also, let’s assume that your mobile is old and not functioning well. A factory setting should be the answer, but that would remove your contacts. At such a moment, you can use these tips and tricks to backup and restore contacts on Android mobile.

    Method #1: Backup Contacts Using Google Contacts

    As Android mobile users require to have a Gmail ID in their mobile, it has become very easy for them to backup contacts and synchronizes them across multiple devices with the help of Google Contacts. All the stock Android mobiles already have this application. However, you can download the same app from Google Play Store and sign in to this app with your Gmail ID. It will ask to access your existing Contacts app. Once you allow it, it will show all the contacts.

    If you can see your contacts in the Google Contacts app, it implies that your contacts have been uploaded, and you can find them on another mobile in the Google Contacts app. The same should appear on most of the other contacts app from other manufacturers. For example, if you have a Samsung or Xiaomi mobile, and you log in to your Gmail account on your mobile, you can find all the contacts automatically.

    Method #2: Export And Import Contacts Using Google Contacts

    In case you want to keep a copy of the contacts to your email or cloud storage, you can do that too. If you already have the Google Contacts app on your mobile, there is no need to install another third-party application on your mobile. For obvious reasons, you should have a Google account on your mobile.

    Once you have that, you can open the Google Contacts app on your mobile and go to Settings. Here you can find an option called Export.

    Export And Import Contacts Using Google Contacts

    Tap on this option and select a location where you want to save the backup. It should show a .vcf file. Once you set the same and tap on the SAVE button, it should be saved to your mobile. Following that, you can upload the file to your favorite cloud storage account.

    To restore contacts from a .vcf file, you need to open the same location and choose to Restore option. Then, you can select the file and restore all contacts at once.

    Method #3: Backup And Restore Contacts Using Super Backup

    Backup And Restore Contacts Using Super Backup

    Super Backup & Restore is an excellent Android mobile that helps you backup contacts, SMS, call logs, etc. to your phone and restore them whenever you want. It is a free app, which is compatible with Android 2.3.3 or later versions. The user interface is neat and clean so that users do not get problems while using this app even for the very first time. To backup contacts on Android mobile using this app, you need to use the BACKUP option first. Following that, you can choose a location where you want the file and give it a name.

    After doing that, it is possible to share the backup or .xml file with anybody, or you can upload it to any cloud storage. If you want to restore contacts, you need to use the RESTORE option for obvious reasons. Then, you can choose the .xml file that you want to restore. You can download this free app from here.

    Method #4: Backup And Restore Contacts Using MCBackup

    Backup And Restore Contacts Using MCBackup

    MCBackup is another free app, which is compatible with Android 4.0 or later versions. It doesn’t have as many options as the above-mentioned app, but it does the job pretty well. After installing and opening it on your mobile, you can find an option called Backup. If you click this button, it will backup your contacts immediately and show you a prompt to send the file to somewhere or someone via email, social networking site, cloud storage, etc. For your information, it backs up contacts in .vcf. You can download MCBackup from here.

    These are some of the best methods to backup and restore contacts on Android mobile. No matter whether you have five contacts and five hundred contacts, you can do that with the help of these simple tips and tricks.

  • How To Block Someone On WhatsApp

    If someone is annoying you on WhatsApp, and you want to get rid of him/her, you can block that contact on WhatsApp. There is no need to use any third-party service since WhatsApp has this functionality by default. However, you cannot do that on WhatsApp for Desktop or on the WhatsApp Web, which is known as web.whatsapp.com. For your information, you can block someone on WhatsApp on Android as well as iOS mobile app.

    WhatsApp is a great instant messaging platform for people to do various tasks. No matter whether you want to chat with someone or send some photos/videos/audios etc. to your friend, you can use this medium to get it done. No matter how many images or videos you want to send to someone, you can do that for free. Although there are some restrictions on the size limit, you can perform most of the tasks without any problem.

    Although it has so many advantages, some people might use it to spam your inbox. If a person is sending you a lot of messages unnecessarily and you do you like to get those messages from that person, you can block him/her instantly. This article shows the exact steps to get it done.

    What Happens When You Block Someone On WhatsApp

    These are things that happen when you block a person on WhatsApp-

    When you block someone on WhatsApp, that person cannot send messages anymore. He/she won’t notice anything except a single tick for every message. The single tick defines that the message has been delivered to the server, but it has not been delivered to the recipient’s phone. Therefore, your sender cannot get any notification from you or WhatsApp since the message won’t reach your phone.

    The blocked person cannot call you. No matter whether it is an audio or video call, the person cannot reach you for obvious reasons. If he/she calls you, he/she won’t find anything except the usual ringing sound. On the flip side, your phone won’t show any notification.

    The blocked person cannot view your status. No matter how often you upload status on WhatsApp, if you block someone, he/she can no longer view your status. All the existing status uploads would disappear.

    The best thing is that WhatsApp doesn’t notify the person whom you blocked on the app. Hence, you can block anybody silently and unblock him/her at times whenever you want.

    Like said earlier, you can block someone on WhatsApp irrespective of the mobile platform you are using. However, the process and location are a bit different on Android and iOS. We have shown both, and you can follow the steps as per your mobile.

    How To Block Someone On WhatsApp For Android

    To block someone on WhatsApp for Android, follow these steps-

    1. Open the contact on WhatsApp.
    2. Tap on the three-dotted icon.
    3. Select More > Block.
    4. Select Block on the popup window.

    Let’s delve into the steps in detail.

    At first, open your WhatsApp application on your mobile and select the contact you want to block. You can open up the chat interface for that. After that, tap on the three-dotted icon visible on the top-right corner of your screen and select More option. On the next screen, you can find an option called Block.

    You need to tap on this option. Then, it will ask you whether you want to block him/her or report and block him/her. If you think that your contact is spam, it is better to use the REPORT AND BLOCK option. On the other hand, if you think that you need to block someone temporarily, you can use the BLOCK option.

    How To Block Someone On WhatsApp For Android

    WhatsApp blocks the contact immediately. If you want to check all the blocked contacts on your Android phone, you need to open up the WhatsApp Settings page first. After that, go to Account > Privacy. Here you can find an option called Blocked Contacts.

    If you need to unblock someone, you can tap on the contact and select Unblock [contact_name] button.

    How To Block Someone On WhatsApp For Android

    That’s it!

    However, if you are using an iOS mobile and you want to block someone on WhatsApp, you can follow this guide. Although options are almost the same, the locations are different. That’s why you may have a tiny problem finding the options.

    How To Block Someone On WhatsApp For iOS

    To block someone on WhatsApp for iOS, follow these steps-

    1. Select and open a contact’s chat window.
    2. Tap on the contact name.
    3. Select the Block Contact button.
    4. Tap on Block or Report and Block option.

    At first, open the WhatsApp application on your iPhone and select a contact that you want to block. After that, open the respective chat window and tap on the contact name on the top menu bar. On the next screen, you can find an option called Blocked Contact.

    How To Block Someone On WhatsApp For iOS

    You need to tap on this option. Then, you can find two options – Block, Report, and Block. As usual, if the person is spamming a lot of people, it is better to use the second option. Otherwise, you can make use of the Block option only.

    That’s it!

    If you want to find all the blocked contacts and unblock a specific person, you need to go to Settings > Account > Privacy. Here you can find an option named Blocked. Tap on it to see all the blocked contacts.

    Now select a contact that you want to unblock. Following that, select the Unblock Contact option once.

    That’s all! We hope this simple tutorial will help you a lot.

  • How To Remove Instagram Account From App

    If you are using an Instagram account on the mobile app, and you want to remove it, you can follow this tutorial. This article will show you the exact steps to delete Instagram account from the app. No matter whether the credentials are saved in your phone or not, you can clear the memory and remove your account accordingly. Also, it is possible to remove one account from the app if you are using multiple Instagram accounts.

    Instagram is one of the best images and video sharing platforms that you can use to grow your business. No matter whether you want to a personal account or for your business, you can certainly have both and use them simultaneously on your mobile. Although Instagram is a mobile-based application and service, most of the handy features and options are also available for computer users.

    Sometimes we need to remove the account from the app due to different reasons. Let’s assume that you are trying out something with your account, and it should not be used on multiple devices. At such a moment, you can remove your Instagram account from the mobile and use the service accordingly.

    In the older version of Android, there were no such problems like this since it didn’t allow users to save the login credentials. Starting from Android Oreo, users could save their username and password of various apps so that they can sign into them quickly. If you ever saved the username and password of Instagram, it would appear even if you log out of your account. That is why you should follow this tutorial to remove the Instagram account entirely from your mobile.

    How To Remove Instagram Account From Mobile

    To remove the Instagram account from mobile, follow these steps-

    1. Open the Instagram app and go to your profile page.
    2. Open Settings by tapping the hamburger menu.
    3. Tap on Log Out [username] button.
    4. Remove the tick from Remember my login info box.
    5. Tap on the Log Out button.

    Read on to know more about these steps in detail.

    At first, you need to open the Settings page of your Instagram profile. For that, open the Instagram app on your mobile, and go to your profile management page. It should look like an avatar icon, and it appears on the bottom-right corner. After that, tap on the three-horizontal like icon, which you can see on the top-right corner and select Settings. On the Settings page, you can find all the options, including Log Out [username]. You need to tap on this button.

    How To Remove Instagram Account From Mobile

    After that, remove the tick from the Remember my login info checkbox and tap on the Log Out button.

    Now, whenever you try to log in again to your Instagram account on your mobile, it should show two options – Log In as {username} and Remove. You need to tap on the Remove button and confirm it on the next screen.

    That’s all! Now you cannot find your account on this particular mobile.

    However, if you have multiple accounts in the Instagram app, and you want to remove all accounts, the options are a bit different.

    How To Remove Multiple Instagram Accounts From Mobile

    To remove multiple Instagram accounts from mobile, follow these steps-

    1. Open the Settings page.
    2. Tap on the Log Out All Accounts option.
    3. Select Not Now on the popup window.
    4. Tap on the Log Out button.

    To get started, you need to follow the same steps as above to open the Settings page. This time, you need to select Log Out All Account button. Following that, you can find a pop-up window with two options – Remember and Not Now. For obvious reasons, you must choose the Not Now button.

    How To Remove Multiple Instagram Accounts From Mobile

    On the next popup message, you should select the Log Out option to remove the account.

    Bonus Tips: If either of the tutorials doesn’t work for you, you can always clear the cache of your Instagram app. Depending upon the mobile and ROM, it might take from 15 seconds to 30 seconds to get it done. For your information, you can open up the Settings page and use Clear Cache, Clear Data, etc. options to get it done.

  • 3 Ways To Enable Dark Mode In Safari For iOS

    If you have an iOS device, i.e. iPhone or iPad, and you want to enable dark mode in Safari for iOS, you can follow this tutorial. Here are some of the best methods to get a dark theme in Safari browser for iOS and iPadOS. Apple has already included such functionalities to those platforms. All you need to do is to use the latest version of those respective platforms.

    Many of us use mobile and computer for a very long time. Although some professionals do not claim to have a bad sign on the eye because of the blue light, many people often get a temporary relief after enabling the dark mode. The dark mode might help you to reduce the eye strain when you are looking at the screen for a very long time.

    Nowadays, almost all the apps and mobile platforms have the dark theme facility, and there is no exception with Safari for iPhone or iPad as well. The best thing about this browser is that you do not need to install a third-party application to get the dark theme since Apple included such a function quite a long time ago.

    For your information, we have included screenshots of an iPad. However, it is the same steps and same options that you need to follow to get dark theme on your iPhone.

    Enable Dark Mode in Safari For iOS

    To enable dark mode in Safari for iOS, follow these methods-

    1. Enable system-wide dark mode
    2. Using Smart Invert and Classic Invert
    3. Use the in-built reader

    To know about these steps, you should continue reading.

    1] Enable System-wide Dark Mode

    Like most of the app, Apple included the dark theme for the entire system. The best thing about this functionality is that you can get the same dark theme across all the apps, including the Safari browser. If you already know the process, there is no need to follow this method. However, if you do not know how to enable dark theme in iOS, you can follow these steps.

    At first, open the Settings app of your mobile and go to Display & Brightness section. On your right-hand side, you should find two options – Light and Dark.

    Enable Dark Mode in Safari For iOS

    As usual, you need to choose Dark. It should be enabled immediately. After that, you can open the Apple Safari browser on your iPhone or iPad to get the dark theme.

    The problem with this dark theme tutorial is that it doesn’t apply to the website body. In other words, it gets applied to the settings page and other locations. However, you cannot read an article on any website with the dark theme enabled since the site would continue showing the default background. That is why you should follow these following methods.

    2] Use Smart Invert And Classic Invert

    All the iOS and iPadOS devices come with some features to help the special users. Two of the most important features are Smart Invert and Classic Invert.

    Smart Invert: It helps you invert the color of the screen except images. Many people often want to read the body in dark theme, but they do not want to make changes in the image color. At such a moment, the Smart Invert feature might be useful for you.

    Classic Invert: Classic Invert is same as Smart Invert, but the only difference is that you can invert the color of images as well.

    If you use either of the features, you would be able to invert the color of any website. As most of the sites use white as the background and black as the text color, it would be easy for you to get the dark theme across all websites as well as apps.

    To enable it, open Settings app on your mobile or iPad and go to Accessibility. After that, find out the Display & Text Size option. Here you can find two options called Smart Invert and Classic Invert.

    Enable Dark Mode in Safari For iOS

    You can toggle the corresponding buttons to enable it.

    3] Use The In-built Reader

    The Safari browser comes with an in-built reader where you can change the background color. Although it is not possible to change the color as per your wish, you can set black or grey as the background. To use this functionality, open a webpage that you want to read. After that, tap on the reader mode icon, which appears alongside the address bar. Then, tap on the Show Reader View button.

    Enable Dark Mode in Safari For iOS

    Now, tap on the same reader mode icon again and choose the black color. For your information, you can change the font of the text as well.

    That’s it! We hope these simple guides would be helpful for you.

  • 14 Less Known Command Prompt Tricks You Should Know

    Command Prompt is an essential utility in the Windows operating system. No matter whether you are using Windows 7 or Windows 10, you can find this in-built tool in your computer. There are countless things you can do with the Command Prompt. From deleting a partition to creating one for your system, it does everything for you. However, if you are moving from macOS to Windows and you do not know anything about this utility, you should check out this article. Here are some of the best and less known Command Prompt tips, tricks, and commands that you should know to get most out of this OS.

    Change User Interface

    Less Known Command Prompt Tricks You Should Know

    By default, the Command Prompt shows a black background with the usual font. However, if you want to change the user interface or the color, font, etc., this trick would be helpful for you. Earlier, it was not possible, but you can do it in the latest version of Windows 10.

    To do so, right-click on the title bar and select Properties. Then, go to Font, Layout and Colors tabs to change everything as per your needs.

    Change Command Prompt Title

    Less Known Command Prompt Tricks You Should Know

    The “Command Prompt” text appears in the title when you open the Command Prompt on Windows OS. If you open it with administrator privilege, it shows an additional text containing “administrator” word. However, if you want to change the title of Command Prompt, you need to enter a simple command-

    title [your-desired-title]

    For example, you want to show “Ampercent” in the title. For that, you need to enter this command-

    title Ampercent

    That’s it!

    Create WiFi Hotspot

    Less Known Command Prompt Tricks You Should Know

    If your Windows laptop or desktop computer has WiFi components, you can create a WiFi hotspot using Command Prompt. For that, enter a command like this-

    netsh wlan set hostednetwork mode=allow ssid=YourSSIDName key=YourKey

    For more information, follow this guide to turn Windows 10 PC into WiFi hotspot without software.

    Copy Command Output To Clipboard

    Let’s assume that you are not getting a good internet speed and your ISP asked you to send the network configuration settings. In that case, you can use the typical ipconfig command. However, if you enter the command like this-

    ipconfig /all | clip

    The result would be copied automatically to your Windows clipboard. Then, you can open Notepad or any other text editor and paste the output.

    Show List Of All Installed Programs

    If you want to show the list of all installed programs, you can take help of Command Prompt. By entering two simple commands, you would be able to get a list of installed software instantly. At first open Command Prompt with admin permission, and enter these commands-

    wmic

    /output:C:\InstallList.txt product get name,version

    Now open the C drive and find out InstallList.txt file.

    Run Command Prompt As An Administrator Automatically

    Less Known Command Prompt Tricks You Should Know

    Several commands require administrator privilege to show the result. On the other hand, Windows does not open the Command Prompt with admin permission, by default. Therefore, you can create a desktop shortcut of Command Prompt and do the following.

    Right-click on the desktop shortcut and select Properties. After that, click on the Advanced button and make a tick in the Run as administrator checkbox.

    Save your change and open the Command Prompt using the desktop shortcut.

    View a Drive’s Entire Directory Structure

    Less Known Command Prompt Tricks You Should Know

    If you need to check all the files and folders of a directory, you can use the tree command in Command Prompt. This simple command shows the whole list of files and folders in the Command Prompt instantly. No matter whether your directory has fifty or five hundred files, you can find them in the result. To use it, open the directory first. Then, type cmd in the address bar and open Command Prompt in that folder. Then, type “tree” and hit the enter button. You can find the output immediately.

    Open Command Prompt In Any Location

    Less Known Command Prompt Tricks You Should Know

    Previously, it was possible to open the Command Prompt in any directory. You could just press SHIFT and right-click on an empty location to get the option. However, Microsoft excluded that function in the latest version of Windows 10. Now you need to follow something else to open Command Prompt in any location directly. For that, open the directory in the File Explorer first. Then, type “cmd” in the bar where it shows the directory path and select cmd.exe.

    Check Network Information

    If you want to check the MAC address or physical address, IP address, Subnet Mask, Default Gateway, etc. of your network, you can check out this trick. You need to use the ipconfig /all command in the Command Prompt. Following that, it would show everything on your screen. In case you need to need to copy the output, you can use the fourth tutorial.

    Find Windows License Key

    If you need to find the product key of your Windows OS, you can use Command Prompt to find that out. For that, open Command Prompt with administrator privilege and enter this command-

    wmic path softwarelicensingservice get OA3xOriginalProductKey

    It should show the product key right on your screen.

    Get The Battery Health Report

    If your laptop’s battery is not functioning well, you can check the health report using Command Prompt. For that, you need to open the Command Prompt with administrator first, and enter this command-

    powercfg/energy

    After completing the task, you need to open this file-

    C:\WINDOWS\system32\energy-report.html

    It should show a detailed report, error, warning, etc.

    Delete Temporary Files

    If you often delete temporary files from the %temp% folder, you can use this method to get it done faster. You need to enter a command like this-

    del /S /F /Q %temp%

    it would delete the Userprofile Temp folder. On the other hand, if you want to delete Windows temp folder, you can use this following command-

    del /S /F /Q %Windir%\Temp

    That’s it!

    Use As SSH Client

    Less Known Command Prompt Tricks You Should Know

    Days are gone when you needed a third-party SSH client to connect to a server. Now, Microsoft has included the SSH functionality in Windows 10. If you are using the latest version of Windows 10, you can connect to a server using this command-

    ssh username@ip-address

    The whole thing looks something like this-

    ssh root@1.2.3.4

    Enable Hidden Administrator Account

    Windows has an in-built hidden administrator account that you can enable and use using Command Prompt. For that, open Command Prompt with administrator privilege, and enter this command-

    net user administrator /active:yes

    That’s all! We hope these simple tips, tricks, and commands will be helpful for you.

  • Dropbox Alternatives: Best Cloud Storage Services For Everyday Use

    When it comes to the best cloud storage services to store files at an affordable price, Dropbox appears on the list without any problem. Dropbox is one of the best cloud storage services that you can find on this date. No matter whether you need to back up your computer, mobile or storage images, videos, documents, etc. – you can use Dropbox without having a second thought. However, if you think that Dropbox does not have as many features as other cloud services offers, you can check out this article. Here are some of the best Dropbox alternatives or best cloud storage services that you can use at an affordable price.

    Best Dropbox Alternatives: Cloud Storages

    Here is a list of the best Dropbox alternatives for cloud storage-

    1] Google Drive

    Dropbox Alternatives Best Cloud Storage Services For Everyday Use

    No matter whether you have an Android mobile, iPhone, Windows PC, or Mac computer, you can use Google Drive without any issue. It is compatible with all the operating systems as well as you can use it online. The best thing is that if you have an Android phone, you can backup data very quickly and restore them whenever you want. The next big thing is the pricing. No matter what cloud storage you choose, you should always check out the pricing so that you do not face problems while upgrading. In terms of pricing, Google Drive is a very affordable cloud storage service that you can use.

    2] OneDrive

    Dropbox Alternatives Best Cloud Storage Services For Everyday Use

    Microsoft OneDrive is another big name in this market, and you might have already heard of it. OneDrive provides a lot of storage at a reasonable price. Let’s assume that you need Microsoft Office apps as well as OneDrive storage. If so, you are one of the luckiest people here since that package doesn’t cost a lot and you would get 1TB of OneDrive storage. Like Google Drive, OneDrive is compatible with almost every platform, including Windows, Mac, Android, iOS, etc. The user interface, features, options, etc. Are up to the mark. On the other hand, it is an excellent place for small teams to work on a single project.

    3] iCloud

    Dropbox Alternatives Best Cloud Storage Services For Everyday Use

    If you are using any Apple device, iCloud might be a better choice for you than Google Drive or any other cloud storage. It is because Apple made the iCloud for the Apple ecosystem. No matter whether you are using an iPhone, iPad, MacBook, etc. you can use iCloud and synchronize your data easily. It doesn’t provide much free storage, but they offer very affordable pricing. For example, you can purchase 50GB storage for $0.99, 200GB storage for $2.99, and 2TB storage for $9.99. The user interface and security of iCloud are pretty good, and you should not have any problem using it on the web.

    4] pCloud

    Dropbox Alternatives Best Cloud Storage Services For Everyday Use

    It might not have as many collaboration functionalities as other cloud storage services; you can find it quite useful to store your files. The best thing about this Dropbox alternative is that you can purchase 500GB storage for a lifetime for $175. On the other hand, 2TB storage is also available for $350, and it is also a one-time payment. Talking about other features, it offers 500GB download link traffic, fair share, download link branding, 30 days trash history, etc. It uses 256-bit AES encryption to protect the privacy of customers. On the other hand, it comes with an intuitive interface so that you can use it without any problem. Check pricing

    5] Box

    Dropbox Alternatives Best Cloud Storage Services For Everyday Use

    Box is suitable for small teams and businesses since it provides classy features to the customers. No matter whether you purchase the Starter plan or the Enterprise plan, you will get the same amount and level of security. The features and pricing are different for different plans, but you can find the same interface so that you can upgrade your plan anytime without any problem. It has Enterprise app integrations, version history, unlimited user support, etc. However, some of the features are limited to higher plans. Talking about the pricing, you need to pay Rs. 410 for 100GB for one month. Similarly, if you purchase the Business plan, you will get unlimited storage for Rs. 1160/month. Check pricing

    6] Mega

    Dropbox Alternatives Best Cloud Storage Services For Everyday Use

    Mega is handy when you need to upload files and send them to someone. Although free account holders might not be able to do much, you can find some essential features in all paid accounts. The best thing is that they provide a lot of storage at a reasonable price. For example, you can get 400GB storage for 4.99 €. On the other hand, they offer 16TB storage for 29.99 €. No matter which accounts you choose, you can find top-notch security. The user interface of Mega is uncluttered so that users can upload and manage their files easily. Check pricing

    Final Word

    There are tons of other cloud storages those might work as a Dropbox alternative. No matter what cloud storage you choose, you should keep few things in mind. For example, the pricing should be a top priority when you need to upgrade your account frequently. The second thing is the user interface. A handy clout storage service offers a useful UI so that users can do their job without a significant problem. The third but not the least thing is the security. You should always consider safety above everything. If cloud storage doesn’t provide good security, there is no meaning to purchase their account.

    Considering everything, it seems that Google Drive, OneDrive, etc. are pretty good. Google Drive is known for collaboration, and small team owners can collaborate with the members quickly. On the other hand, the security of OneDrive is top-notch. They offer something called Personal Vault, which is a private vault inside your cloud storage.

  • Best Type-C Multiport Adapters For Your MacBook

    Days are gone when Apple used to provide more than one USB port to connect external devices. Nowadays, you need to buy an external adapter to connect your pen drive, mobile via USB cable, and so on. If you often connect multiple devices to your new MacBook, you should have a look at this article. We have enlisted some of the best Type-C multiport adapters for your MacBook so that you can connect multiple external devices at once. The price of these products is reasonable so that everyone can opt for any of them.

    Best Type-C Multiport Adapters For Your MacBook

    1] USB-C Digital AV Multiport Adapter

    Best Type-C Multiport Adapters

    Apple sells this product to the consumers for $69, which is higher than most of the other same products available in the market. However, they do not compromise with the quality, and their products are very long-lasting products. If you keep these two things in mind, you should purchase it from the official website of Apple. This adapter has one USB, one HDMI, and one USB-C port. You can use it with any Type-C compatible device, including MacBook. The best thing is that you can use it with iPad Pro as well. Check the deal

    2] HooToo USB C Hub

    Best Type-C Multiport Adapters

    As the name defines, it is a USB hub that you can purchase from the Amazon website. The best thing about this adapter is that you can find almost anything you might need in a hub. No matter whether you are unable to use a pen drive or memory card with your MacBook, you can certainly use them without any problem. For your information, it has a memory card reader, three USB ports, one HDMI port, and one USB-C port. No matter whether you want to use it with MacBook or Chromebook, you can do that without any problem. Even if you use all the ports at a time, you should encounter any problem. The build quality of this USB hub is pretty good, and you can carry it anywhere to get the work done. Check the deal

    3] Satechi Aluminum Multi-Port Adapter

    Best Type-C Multiport Adapters

    Like the aforementioned USB hub, Satechi Aluminum Multi-Port Adapter has almost everything. You can connect it with your MacBook and use pen drive, external SSD, HDMI cable, etc. The best thing about this USB hub is that there is an ethernet port as well, so that you can use the internet with wire from your router. Talking about the number of ports, you can find these-

    • Three USB ports
    • One HDMI port
    • One ethernet port
    • One Type-C port
    • One SD card reader

    The overall appearance of this product is pretty good, and it looks professional. On the other hand, the build quality is good enough to run for more than two years without any problem. Check the deal

    4] Kingston Nucleum USB C Hub

    Best Type-C Multiport Adapters

    Although the number of ports is fewer than other USB hubs mentioned on this list, you should take a look at the manufacturer, Kingston. Kingston is a great company, which makes powerful pen drives, hard drives, etc. If you rely on this company, you should check out this product as well. First thing first. The build quality of this product is top-notch and far better than others in some ways. Regarding the ports, you can find these-

    • One USB-C port
    • One USB 3.0 port
    • One HDMI port
    • One USB 2.0 port
    • One MicroSD card reader
    • One SD card reader

    It is a value for money product that you can purchase from the Amazon website. It doesn’t matter whether you want to use a hub with your MacBook, Chromebook, iPad Pro, or anything else, you can think of this Kingston Nucleum USB C Hub. Check the deal

    5] Elgato USB Hub

    Best Type-C Multiport Adapters

    Many people often need to use a DisplayPort and HDMI port at the same time. If you opt for other products, you might not get them. However, this Elgato USB Hub has both ports, and users can use them at a time without having any issue. However, they should have compatible devices to get the job done. Otherwise, they cannot use both at any cost. This product has a metallic coating so that it looks fancy and professional at the same time. Talking about all the ports, you can find one DisplayPort, one HDMI port, one ethernet port, and one USB port.

    The only problem with this product is that you cannot find any Type-C port in it. Sometimes you might need to connect a phone, which has Type-C to Type-C connector. If so, it would be a problem for you since it lacks that functionality or port. However, considering the price, it is a significant drawback since it costs around $135 on the Amazon website. The same product has two other variants – Pro and Standard. If you opt for Pro, you will get all the essential ports. Check the deal

    6] StarTech USB-C to HDMI

    Best Type-C Multiport Adapters

    Many people make workstations based on the MacBook, which has only one USB-C port. If you want to connect two monitors with HDMI cables, you should take a look at this product. Although it costs comparatively higher than usual, you should also check the build quality before deciding on something else. As mentioned earlier, you can find only two HDMI ports so that you can connect external monitors in your workplace. However, if you need to connect three monitors, you might need to pay some extra money since that costs around $111 whereas the two-port product costs around $68. Check the deal

    That’s all! These are some of the best multiport USB hubs for MacBook. I hope you like this list.