Have you ever thought of your most favourite browser loading pages 150 times faster than it did earlier ? Or using up a minimum part of your RAM ?
I’m sure that makes you feel better.The ‘+‘ in the post title means x,xxx,xxx,xxx,xxx times & the ‘x‘ mean digit/integer.
Now follow the simple steps to have a better web experience.
Category: General
-
Speed Up Mozilla Firefox 150x+ times
-
Find Broken Links and Missing Images On Your WordPress Site
 Broken or missing links on any website creates a very bad user experience.
Imagine how would a visitor react when he finds a lot of broken links on your website or blog. How do you find broken links or track them on a regular basis? Should you check each and every link on your website and test them manually? or should you use a script or plugin to detect broken links on your website?
Typically, every website or blog has a 404 page which is shown whenever a visitor enters a wrong web address in the browser address bar. If your site visitors keep on getting the same 404 page on every other link, there is a high chance they won’t enjoy your website.
The cause of broken links can be many. Some examples are as follows:
1. You had a section on your website which was very popular a couple of years ago. You linked to that section frequently from your blog posts, service and sales pages. Now you have deleted that section and all the previous links that are present in old blog posts now return a 404 error.
2. You have changed your blog’s hosting provider and during the migration from a different content management system to a new one, your previous links are all broken.
3. You changed the permalink structure of your WordPress blog and now all the older permalinks return a 404 page, instead of returningg the actual page that’s on your site.
The Best Way To Fix Broken Links On Any Website
Whatever may be the case, broken links should be fixed and taken care of because search engines don’t love websites who have tons of missing links placed randomly across various pages. remember that search engines crawl the internal pages of your site through links and if these links are broken in the first place, search bots will have a difficult time crawling and indecing your entire site.
Furthermore, a large number of broken links on any website is a violation of Google Webmaster quality guidelines. Your site may be penalized for having a bad structure and you may lose organic rankings for your content.
Here are a few tools I would recommend using, if you want to regularly find broken links on your website:
Detect Broken Links On Your WordPress Blog With broken Link Checker Plugin
If your site in on the self hosted WordPress platform, install the Broken Link Checker plugin for WordPress. This is a very useful plugin which automatically checks the status of each and every link embedded within the pages of your WordPress powered site. Every post and page is checked on a routine time interval and the plugin will show you how many broken links were found, how many redirects are present on your site and which of the external links are either missing or broken.
When you get the list of all broken 404 links on your site, you can do three things:
1. Delete the link by hitting the “Unlink” button placed next to each link.
2. Delete the post or page that contains the broken link.
3. Mark the link as “Not broken”Additionally, the plugin will also show you the anchor text and the target address, as shown in the following screenshot:

The plugin will not only check for links but it will also check whether there are any missing or broken images embedded within a page. If any missing URL of an image is found, the plugin will list the URL in the Plugin options page.
This is very useful when you want to find all the posts and pages of your website which have missing and broken images. I highly recommend this plugin for every WordPress blog.
Another advantage of broken link checker is that the plugin will periodically send email notifications, whenever a few missing links are found on your site. So you don’t have to check the plugin options page manually.
Find Broken Links On Any Website With Xenu Link Sleuth
While the broken links checker is very useful for WordPress blogs, websites that are hosted on a free hosting platform can not use it. This is because blogs that are hosted on BlogSpot.com, WordPress.com or Tumblr can not upload and install any script or plugin.
So how do you find broken links on your Blogger or Tumblr blog and fix them? Enter Xenu Link Sleuth – a powerful link scanning software which can detect 404 errors on any website and show broken redirects and missing images.
Using Xenu Link Sleuth is easy, all you have to do is enter the web address of your blog and hit the scan button. Xenu also lets you scan only a section or subdirectory of your website, so this is handy for those webmasters who have multiple subdomains running on the same web server. Using XENu Link sleuth, you can find 404 errors on a section of your website and your entire website as a whole.
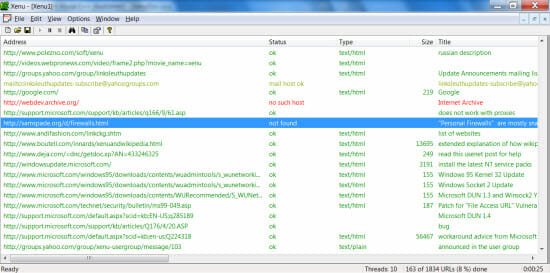
The biggest advantage of using XENU over free link scanning programs is that XENU lets you download your scan report as CSV, HTML or PDF – so you can complete the scan and download a sample report to work upon. Link verification is done on links, images, iframes, plugins, backgrounds and other HTML objects. The results are displayed hierarchically so you can filter them based on a criteria of your choice.
-
Turn Off Auto Play on CD/DVD Drives and USB Storage in Windows XP and Windows7
Almost all versions of Windows operating system have a built in feature to automatically detect external storage e.g CD drives, DVD drives, removable USB storage or an external hard drive. Whenever you plug in a removable device, Windows starts scanning its files and pops in an autoplay dialog box.
The auto play dialog box in Windows shows you a list of options for actions you can take on the files that are stored in the removable storage device. If it’s an audio DVD, the auto play dialog box will provide an option “Play all media from this DVD”, which is sometimes very useful.
However, a lot of users find the autoplay options really annoying. Whenever you insert a CD, thumb drive or a DVD, Windows starts the auto play options which you may want to permanently turn off.
In this article, we will show you some simple steps using which you can disable autoplay options in Windows7 and Windows XP. After you turn off autoplay in Windows, you have to manually open the removable storage location and use the content thats stored there.
Turn off Autoplay Of CD/DVD and USB Drives in Windows XP
1. From the start Menu go to Run and type “regedit” to open Windows registry editor.
2. Select administrative templates in the left Pane. Under administrative templates, select system.
3. On the right pane, look for an option labelled “Turn off Autoplay”. Double click the option to enable it.


4. You can select only CD ROM drive or all drives.Then click ok.
Disabling autoplay for all drives will turn off autoplay for USB devices, external hard drives and other storage devices – your digital camera for example. If in any case you want to re enable the auto play features for a p[articular drive, follow the above method and choose “Disabled” in “turn off autoplay properties” settings panel.
Disable Autorun Feature In Windows 7
The steps to disable auorun in Windows7 is exactly the same as in Windows XP but in case you need the step by step instructions, we thought it would be wise to post it anyway. Here goes:
1. Click the Windows 7 start menu and type “gpedit.msc” in the search box. Then click gpedit in the search results pane to open the local group policy editor
2. On the left hand pane of local group policy editor, navigate to Administrative templates . Windows components . Autoplay policies and look for the option “Turn off autoplay” in the right pane

3. Click enable and choose OK. That’s it, you have just disabled autoplay option in Windows7. Now Windows wont bother you with the autoplay dialog box whenever you insert a USB thumb drive, a CD or a DVD.
Why You Should Disable Autoplaying CD’s And Pen Drives
Personally I would recommend that you permanently turn off autoplay for all external devices because its always better to have the control in your fingers. Autorun commands are stored in an autorun.inf file which can be used to start an application, run a system command or even a batch file. Generally, these commands do no harm to your system but there are situations when the autorun.inf file can be modified and used otherwise. let me share an example case.
Let’s say one of your friends wants to have some fun with you, so he gave you a movie in a removable drive and told you to copy the video on your computer. Feeling excited, you plug in the USB device on your computer and find that your computer has stopped responding. Thinking that there might be a problem in the USB storage device, you plug it out but find that Windows is not responding as earlier before. You reboot Windows but find that the system fails to boot because an internal system file is missing.
What went wrong here?
The USB drive had a trojan in it and your friend has intentionally modified the autorun.inf file to run the trojan on your system. Hence, the moment you plugged in the USB drive, the autoplay feature was triggered which harmed your computer.
Accidents like these can happen anytime so we suggest you to disable Windows from autoplaying the contents of any removable drive, USB drive, CD or DVD and make your system more secure.
Also read: 3 ways to Prevent USB Drives from Auto running Programs
-
5 Online Tools to Turn Videos and Images into Cartoons!
Gone are the days of profile pictures and cover photos. We are now treading an era wherein the millennial are on a constant lookout for cool avatars and unique ways to represent themselves on their social media accounts. The good news is, you don’t need to be proficient in Photoshop or any other sophisticated software tools to be able to turn images into cartoons!
Want to change your images or videos into a cartoon? All you need is five minutes and you can have a Cartoon version of any image without Photoshop or image editing software. The best part is that you can do more than just cartoonize your image. There are a lot of effects to choose from that you would never get bored of it! You don’t have to be a graphic designer or a cartoonist to get yourself an impeccable and cool cartoon; all you need is the help of any of these online sites and tools to convert images into cartoons!
#1. Cartoonize using pho.to
This website is pretty easy to use and can cartoonize any image in the matter of few seconds! Simpy follow these steps:
Step 1: Navigate to http://cartoon.pho.to/
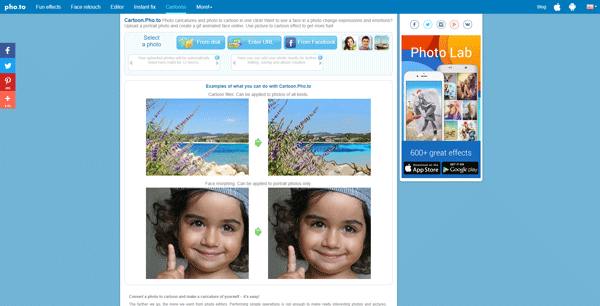
Step 2: Select the source out of Disk, URL or Facebook link to the picture that you want to edit.
Step 3: The website will automatically edit and give you the cartoonized version. Here’s an example:
#2. Cartoonize using Befunky.com
Just Upload your photos and Befunky generates a Black and white Cartoon version of the Image.You can later add colors, accessories and also warp the picture according to your need.
Step 1: Go to www.befunky.com/
Step 2: Click on the Photo Editor out of the multiple available options.

Step 3: A window would load prompting you to upload an image. Click on the Upload button and select the image source from the drop-down list.

Step 4: The uploaded image should now appear on the screen, ready to be edited.

Step 5: On the left side you would see some photo editing options. Click on the Flower Icon (Artsy) and Select Cartoonizer Option.

Step 6: Choose an option that you require from the list.

This is the final output image:

There are many other options you can try apart from these which make the website super fun and engaging!
#3. Cartoonize using Kusocartoon
This is yet another fun website which allows you to convert images into cartoons through 5 easy steps.
Step 1: Select a style for your cartoon out of the provided options.
Step 2: Upload the picture that you want to edit.

Step 3: Wait for the photo effect conversion to complete.

Step 4: View and optimize your cartoon accordingly.

Step 5: Download your cartoon. Right-click on the picture you wish to download, and then select “Save image as”.

#4. Cartoonize using Snapstouch
In this website, you can convert your images into cartoons and fun sketches, paintings, pencil sketch, outline, drawing and give a plethora of other effects as well using these easy steps.
Step 1: Go to http://www.snapstouch.com/
Step 2: Select the Cartoon Effect that you want to use.

Step 3: Select and Upload the image file which is to be edited.

Step 4: The uploaded image would get populated on the screen. Click on the Paint button.

Step 5: After clicking paint, wait for some time and click on the download button.

This is what the final cartoon would look like!

#5. Cartoonize using Cartoonize
Step 1: Go to http://www.cartoonize.net/
Step 2: Click on Image Source and Choose file to upload the image

Step 3: Click on an Image Effect of your choice.

Step 4: You can Right click and save the image to your computer. This is what the final image would look like!

These are the top websites that let you cartoonize images with ease. However, the list is not exhaustive and there are many more such websites out there in the market if you care to look for. You might have noticed the ease and speed with which your image gets cartoonized with the help of these websites. Plus like we said before, you don’t need to be proficient in an image editing software to do this!