How to Install a Local WordPress Blog and Transfer it in Web Server

You can install a local WordPress blog in your computer for various testing purposes. Using the local blog you can create new themes, plugins and perform other experiments. Here is a detailed guide on how to transfer the local WordPress blog in your web server with the same preferences, posts, plugins and themes.

Preeti asked:

I have a local WordPress blog in my computer made using Wamp. I want to transfer this blog in my web sever, with all the posts, pages, plugins, themes etc. What are the steps involved for the entire process.

Installing a Local WordPress Blog in your Computer with Wamp

Here is a step by step guide to install a WordPress blog in your system which you can use without requiring an internet connection. You can use this tutorial to install a WordPress blog in Windows XP, Vista and Windows 7.

1. Download the latest version of WordPress.

2. Download Wamp and install the application. During installation, Windows firewall will throw a message like this

installing-wamp-windows

Choose “unblock” and continue to finish the installation process.

3. Go to the directory of your wamp installation. Typically it would be present in the C drive as C > wamp.

4. Open the folder “www” and create a folder named test (the folder can be named anything but for the sake of this tutorial we will stick to the name “test”).

5. Extract all the files from the WordPress package in to this folder. So that means, all the core WordPress files will be present in “C:\wamp\www\test”

offline-wordpress-installation

Thus the url of your Local blog becomes : http://localhost/test

6. Start the Wamp server program and select “Start all services” from the system tray icon.

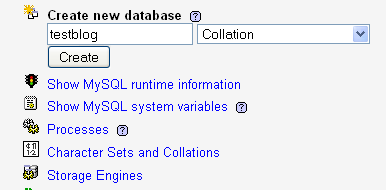
7.  Open your web browser and navigate to http://localhost/phpmyadmin. You will see something similar as shown below:

8. Now you are going to create a database for the local WordPress blog in your computer. In the “Create a new database” field type a name for the database of your blog. (e.g testblog)

create-local-database-phypmyadmin-wamp

9. Go to the installation directory of your local WordPress blog ( C >wamp >www > test), right click the wp-config-sample.php file and rename it to wp-config.php.

10. Open the wp-config.php file with notepad or any Html editor and enter the following details:

DB_NAME : testblog (name of the database)

DB_USER: root

DB_PASSWORD: (keep it blank)

DB_HOST: localhost

Here is the screenshot of the database details

wordpress-database-details-wamp

11. Now open http://localhost/sqlitemanager/ in your browser.

12. Enter the database name you created in phpmyadmin (in this case it’s “testblog”).

13. Click the Browse button and navigate to the following path

C >wamp > bin> mysql > data >testblog

You will find a “db.opt” file in that folder. Select the file and the checkbox “upload database”. Hit save when you are done.

wamp-sqlite-manager-wordpress

14. Open your browser and browse to the address of your local blog (in this case http://localhost/test).

15. Bingo ! You will see the WordPress installation screen. Give a Blog title and enter any email address and hit “Install WordPress”.

install-wordpress-locally-wamp

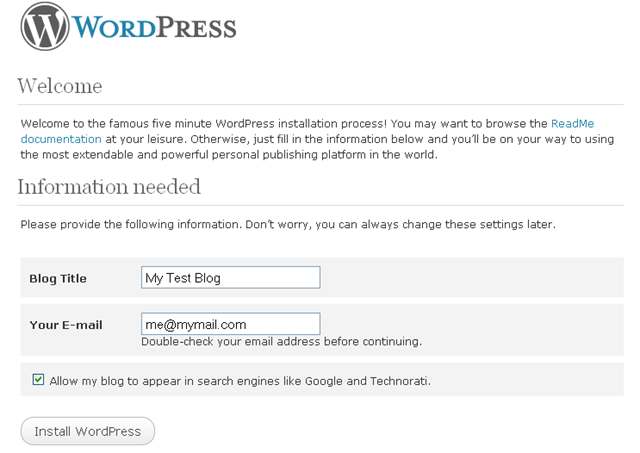
WordPress will be installed and you will be given a username and password to login to your  dashboard.

Note: If you do not see the Installation page, probably you missed out something. It’s better to restart the process from scratch.

Configuring the Local WordPress Blog

Now that the Installation part is over, you can start customizing your local blog. At first, login to your local blog and change the password to something you can remember. You can install all the plugins, themes, write posts, pages and do the necessary customizations in your local WordPress blog. After you are satisfied with all the customizations, it’s time to move the blog in your web server.

How to Move the Local WordPress blog in your Web server

Let us suppose you want to transfer the local WordPress blog in your computer (http://localhost/test) into your web server at www.yoursite.com/blog. While you can do it at your root directory as well, for the sake of this tutorial, we have chosen http://www.yoursite.com/blog as the web address.

Before you read on, here are a few points to take note of

Scenario A: You already have an installed WordPress blog in your web server. You just want to transfer the local blog in the same installation directory ( e.g http://localhost/test > http://www.yoursite.com/blog).

Scenario B: You do not have an online WordPress blog. You want to transfer the local blog in to a newly created online blog.

Following are the steps involved to perform the migration of your local WordPress blog to your Web hosting account:

1. At first, disable all the plugins in your local WordPress blog.

2. Backing up the database of your Local blog: Next, you need to back up the database of your local WordPress blog. You can use a database back up plugin to back up the database of your local blog or you can back up the database from phpmyadmin as well.

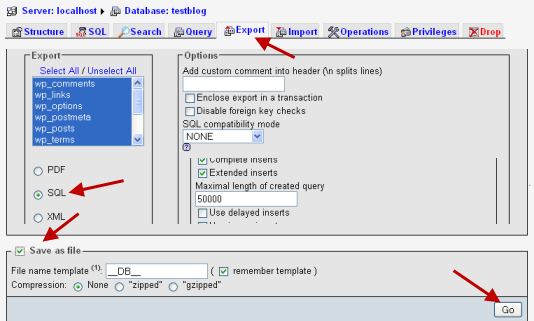
To back up the database from phpmyadmin, open http://localhost/phpmyadmin in your browser and select the database of your local blog (in this case “testblog”).

Navigate to the “Export” tab, keep everything untouched, scroll down and select the checkbox “Save as file”. Then click “Go” and you will be prompted to save the database in Sql format.

back-up-sql-database-phpmyadmin

3. Very important: Open the database backup file (testblog.sql) in notepad. We have to replace the URL of the blog with the newer url of your blog where you will be mounting the database.

For example : If your local blog’s url is http://localhost/test/ and your web blog url is http://www.yoursite.com/blog then you will have to replace every url (http://localhost/test/ with http://www.yoursite.com/blog in the database).

Once you open the database file in notepad, search for your local blog’s base url ( in this case it’s http://localhost/test). Replace the Url with the root address of your Web blog. (http://www.yoursite.com/blog). Use Ctrl + F to find the local blog’s base URL in notepad and then paste the web blog’s base URL. Next, hit “Replace all” and you are done.

4. Now it’s time to upload all the core WordPress files, themes, plugins etc. Open your FTP program and upload all the files of your local WordPress blog in to your web server

upload-wordpress-files-local-blog-web-server

If you already have all the WordPress files uploaded in your web server then no need to upload them again. Just delete the “Wp-content” folder and upload the “Wp-content” folder of your local blog in the respective directory.

It would be better to do a fresh migration and hence it is recomended to delete all the old files and start afresh.

For example : If you want to install WordPress at your web server at http://www.yoursite.com/blog then first delete all the files and then upload all the files from C:\wamp\test in that web directory

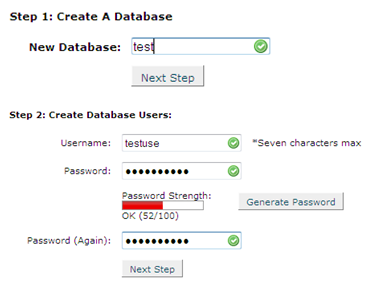
5. Once the upload is complete, login to the C panel of your web hosting account. We will create a new database and import the database of the local WordPress blog here.

Create a new database in your web hosting account, using the database wizard. Create a new database user and give all the privileges to the user you just created.

database-wizard-phpmyadmin

5. Open your FTP software and browse to the directory where you have uploaded your WordPress files.

6. Download the wp-config.php file in your computer and open it in notepad for editing

7. The wp-config.php file will still contain the database information of the local blog. You will need to update it with the database information you created in step 2.

Here is how the wp-config.php file looks

database-config-wordpress

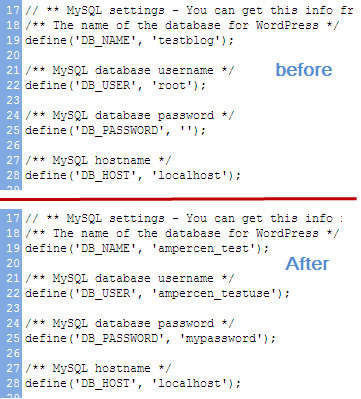
8. After updating the wp-config.php file, upload it back at your web server’s WordPress installation directory. ( i.e http://www.yoursite.com/blog)

9. Now browse to the root of your blog. You will see the installation screen of WordPress.

wordpress-install-screen

10. Do not install WordPress from here on. We will mount the database of your local blog in to this database.

11. Open the C panel of your Web hosting account and navigate to PHPMYADMIN.

12. Select the database you created in step 3 from the left pane and click the import tab

phpmyadmin-import-database

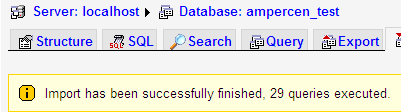
13. Click the browse button and upload the database backup of your local blog that you backed up in step 3. Hit “Go “ when done.

14. Hopefully, importing of the database will be successful.

15. Browse to the root of your Web blog. You will see the exact copy of your Local blog in your web server.

Do let us know whether you were able to transfer the local blog in your web server or not through a comment

Email this article

Written by on Monday, December 14th, 2009

  1. Reader Comments

  2. Udegbunam Chukwudi

    Wonderful tutorial as always. I’m saving this one to my scrapbook for future reference. Thanks

    December 15th, 2009
    • SOM

      @Udegbunam Chukwudi Nice to hear that man.

      December 15th, 2009
  3. altaf

    An amazing article, just worked out for me.

    February 6th, 2010
    • Amit Banerjee

      Thanks Altaf for your appreciation.

      February 9th, 2010
  4. Tony

    That is a really nice detailed guide, thanks. Being able to modify your site in a test environment is essential if you are going to develop and change themes, and don’t want your visitors to see your site as broken when you are in the middle of tests.

    March 5th, 2010
    • Amit Banerjee

      Thanks again Tony for all those comments. For all those bloggers who are new to WordPress, I highly recommend Wamp, because it gives you a testing place to know and learn about WordPress, do custom theme mock ups and test plugins.

      March 5th, 2010
  5. Rg Enzon

    This is a very great guide. I would consider bookmarking it as it is exactly what I was looking for. Now I just got my demo site online and can show it to my client via my remote server online. Thank you!

    March 26th, 2010
    • Amit Banerjee

      @Enjon: Glad you liked it. Yes, this guide is exactly for the purpose which you have stated in your comment.

      March 26th, 2010
  6. James

    Great post,

    Can this be applied if your taking your website from remotely to locally? I am interested in doing this, so that I can modify my site while people viewing it.

    April 21st, 2010
    • Amit Banerjee

      Yes, you can transfer a remote blog to your webserver after taking the above actions. The thing is, backup the entire blog in your computer, do the changes offline and then upload it in your web server.

      April 21st, 2010
  7. ssectore

    thanks, sidebar didn’t load but tutorial is great!

    May 28th, 2010
  8. Peter Hobley

    Great, worked a treat. Although WordPress’s documentation is comprehensive, could never find something like this that was exactly what I wanted to do.

    June 4th, 2010
    • Amit Banerjee

      @Peter: Glad it helped. Feel free to ask more questions n WordPress, thanks for the comment

      June 4th, 2010
  9. asaf

    when importing I got the next error message

    Error
    SQL query:

    /*!40101 SET @OLD_CHARACTER_SET_CLIENT=@@CHARACTER_SET_CLIENT */;

    /*!40101 SET @OLD_CHARACTER_SET_RESULTS=@@CHARACTER_SET_RESULTS */;

    /*!40101 SET @OLD_COLLATION_CONNECTION=@@COLLATION_CONNECTION */;

    /*!40101 SET NAMES utf8 */;


    – Database: `blog`

    – ——————————————————–

    – Table structure for table `wp_commentmeta`

    CREATE TABLE IF NOT EXISTS `wp_commentmeta` (

    `meta_id` BIGINT( 20 ) UNSIGNED NOT NULL AUTO_INCREMENT ,
    `comment_id` BIGINT( 20 ) UNSIGNED NOT NULL DEFAULT ’0′,
    `meta_key` VARCHAR( 255 ) DEFAULT NULL ,
    `meta_value` LONGTEXT,
    PRIMARY KEY ( `meta_id` ) ,
    KEY `comment_id` ( `comment_id` ) ,
    KEY `meta_key` ( `meta_key` )
    ) ENGINE = MYISAM DEFAULT CHARSET = utf8 AUTO_INCREMENT =1;

    June 9th, 2010
  10. asaf

    never mind
    I tried again and it worked

    June 9th, 2010
    • Amit Banerjee

      @asaf: I am glad the tutorial worked for you. Thanks for the comment

      June 9th, 2010
  11. asaf

    Hey,
    Now there is another problem. Try to enter the site : http://www.myui.co.il. though it’s in hebrew, the problem is obvious.
    I followed all the steps, but the site doesn’t present itself good, the links don’t work, and there is no access to the database.

    Will it be the same if I create a new wordpress blog inside the server, and to override the wp-content directory ?

    I don’t know what to do

    June 11th, 2010
    • Amit Banerjee

      Yes, you can create another blog on the same server and re upload the wp-content directory. Won’t be an issue because the wp-content directory contains your uploads and plugins, themes

      June 12th, 2010
  12. asaf

    Thank you,
    I fixed my mistake, the problem was, in the editing of the blog.sql, I changed all the links to http://www.myui.co.il/wordpress instead of just http://www.myui.co.il. the problem now, is that for some reason the footer.php, refuses to upload.

    June 13th, 2010
    • webmaster

      @asaf: Check your WordPress theme files for errors, switch to the default theme and see whether everything is fine or not.

      June 13th, 2010
  13. asaf

    Thank you for the response.
    I tried the entire procedure over again, and now I have a problem with my database.
    Can you point out please what may cause a
    “Error establishing a database connection”

    asaf.

    June 15th, 2010
    • Amit Banerjee

      @asaf: Please check the wp-config.php file , you must have entered wrong database details or hostname address

      June 17th, 2010
  14. Mark

    Hi

    I’m getting the following error message when attempting to uploading the database, do you know why this is???

    Error

    SQL query:


    – Database: `hip_wordpress`

    – ——————————————————–

    – Table structure for table `wp_commentmeta`

    CREATE TABLE `wp_commentmeta` (
    `meta_id` bigint( 20 ) unsigned NOT NULL AUTO_INCREMENT ,
    `comment_id` bigint( 20 ) unsigned NOT NULL DEFAULT ’0′,
    `meta_key` varchar( 255 ) DEFAULT NULL ,
    `meta_value` longtext,
    PRIMARY KEY ( `meta_id` ) ,
    KEY `comment_id` ( `comment_id` ) ,
    KEY `meta_key` ( `meta_key` )
    ) ENGINE = MYISAM DEFAULT CHARSET = utf8 AUTO_INCREMENT =5;

    MySQL said: Documentation
    #1046 – No database selected

    June 26th, 2010
    • Amit Banerjee

      @Mark: Have you disabled all the plugins before taking the database backup ?

      June 27th, 2010
  15. Stacy H

    Do the versions Apache,PhpAdmin,and MySql on my local WAMPserver need to match/be the same as the server I’m moving my blog over to?? Being new to this, I’m concerned about putting all this work into building a blog locally and not being able to move it. I just want to make sure I’m doing it right from the start and save myself some frustration.

    Thanks
    Stacy

    August 2nd, 2010
    • Amit Banerjee

      @Stacy: The versions, need not match on your local computer and remote host. Your php version should be php4 and once you have made a local WordPress blog, perform a test and upload it to your web server. If you don’t have hosting right now, you can use some free hosting providers for the test. Thanks for the comment.

      August 2nd, 2010
  16. HJ

    Great post.

    Wonderful tutorial. I will definitely pass this to my friends.. Tanks

    August 17th, 2010
  17. 24Q

    Excellent post! Exactly what I needed but I may have missed a step.

    When I want to access to wp-admin it redirects me back to my original localhost. What did I miss?

    Thx!

    August 26th, 2010
  18. 24Q

    I noticed that I didn’t properly replace URLs within sql backup. I did it again and now I got the error message:

    SQL query:


    – Dumping data for table `wp_comments`

    INSERT INTO `wp_comments` ( `comment_ID` , `comment_post_ID` , `comment_author` , `comment_author_email` , `comment_author_url` , `comment_author_IP` , `comment_date` , `comment_date_gmt` , `comment_content` , `comment_karma` , `comment_approved` , `comment_agent` , `comment_type` , `comment_parent` , `user_id` )
    VALUES ( 1, 1, ‘Mr WordPress’, ”, ‘http://wordpress.org/', ”, ’2010-08-06 01:16:14′, ’2010-08-06 01:16:14′, ‘Hi, this is a comment.To delete a comment, just log in and view the post's comments. There you will have the option to edit or delete them.’, 0, ’1′, ”, ”, 0, 0 ) ;

    MySQL said: Documentation
    #1062 – Duplicate entry ’1′ for key ‘PRIMARY’

    Any ideas?

    Thx!

    August 26th, 2010
  19. 24Q

    Got it! Forgot to empty database before importing updated sql backup and reloaded it.

    August 26th, 2010
    • Amit Banerjee

      Yes, youhave to first empty the tables and then move the local blog in your web server becaue the older tables still contain the data. When you have migrated , simply import the sql backup and you are done.

      Thanks for testing this one out and commenting here. It will help other users as well

      August 26th, 2010
  20. Roy S

    All of this worked very well. It was the missing piece to finally get us out in public. I had one small problem – all 404s off the home page when I got to public, but I just had to select the names permalink option and we were in business. Thanks!

    August 27th, 2010
  21. Roger

    I’ve got stuck on step 11 of the first section (“Installing a Local WordPress Blog in your Computer with Wamp”). SQLiteManager does not exist on my machine and there’s no explanation of what it’s for or how to get hold of it or how to install it. A web search suggests that it’s a plugin for Firefox but I’m using Internet Explorer. I did manage to download SQLiteManager but there are no instructions on how to install it.

    I guess I need to do some more research to get past step 11.

    September 2nd, 2010
  22. Roger

    More info:

    On step 13 of “Installing a Local WordPress Blog in your Computer with Wamp” my db.opt folder is to be found in:

    C > wamp > bin > mysql > msql5.1.36 > data > testblog

    and not in:

    C > wamp > bin > mysql > data > testblog

    FYI I’m using WAMP version 2.0i.

    September 2nd, 2010
    • Amit Banerjee

      I am not sure whether you have installed Wamp properly or not. Create a simple folder and drop an index.html file in that folder, now try to visit the same index.html file by typing localhost/foldername in the browser addres bar. Can you view this index.html page ?

      September 2nd, 2010
  23. Roger

    Thanks for the reply, Amit.

    I think (!) I’ve now completed the WAMP and WordPress installation.

    I had to install Firefox in order to install SQLiteManager but I’ve still no idea what SQLiteManager is for or what relevance it has to either WAMP or WordPress.

    The version of SQLiteManager I installed (0.6.1) looks nothing like the screenshot in your instructions so I don’t know if what I did has actually worked.

    My WAMP folder structure still features that extra mysql5.1.36 sub-folder. I’ve no idea if that’s going to cause a problem but I guess I’ll find out soon enough.

    September 2nd, 2010
  24. Roger

    Amit,

    I’ve finally completed the installation of WordPress on my local computer and then successfully uploaded it to my remote web site.

    One important difference in what I did compared to your instructions is that in step 4 of “How to Move the Local WordPress blog in your Web server” I uploaded all the WordPress files from my local computer to the /www/blog folder on the web server instead of just /blog.

    When I uploaded to /blog it didn’t work – as I had expected. That is because presumably the URL which people use to navigate to the web site is pointing at the contents of /www. If you put your WordPress blog in /blog it will never be found. The blog must be a sub-folder of /www.

    And I still have no idea what SQLiteManager is for!

    Anyway, thanks for your instructions. I would not have had a clue how to proceed without them.

    Roger

    September 2nd, 2010
    • Amit Banerjee

      @Roger: The SQLlitemanager controls the databse of your local WordPress blog

      Regarding the folder, it will work even if you use it in a sub directory or a subdomain but make sure you replace the URL in the database first.

      September 2nd, 2010
  25. Nassim

    Thank you so much. This saved me big time :)

    September 14th, 2010
  26. Amit

    I am using Xampp on local system, is the process of uploading will be same. Also in we change many plugins and posts so to upload them we have to upload all items again or only specific posts can be uploaded.

    September 24th, 2010
    • Amit Banerjee

      @Amit: It depends on your database backup, if you backup only specific posts or comments and then mount the SQL backup in your webhost, it will show up only the posts that are in the database. The concept of uploading the local blog is same for XAMPP as in the case of WAMP. Thanks for the comment.

      September 24th, 2010
  27. Server Transfer

    Oh great! such a nice tutorial of How to Install a WordPress and Transfer it in Web Server. Keep it up. Thanks.

    September 25th, 2010
  28. Pedro

    great tutorial!

    October 5th, 2010
  29. GP

    Great tutorial, thnx!
    But I still have a problem…
    I did follow the procedure (db back-up + import on new server, WP files trasnfer, edit config.php, etc.) but when I connect to the new site, I still see the installation screen of WordPress, WP seem not to be installed despite the DB & files transfer.
    Any idea?
    Thanks in advance.

    November 30th, 2010
  30. Mukarram

    Thanks…. It’s helpful :)

    December 23rd, 2010
  31. Sohail Ashraf

    its very use full to install wordpress in our local and webserver.

    but we have some query that what is the diffrence between
    DB_Name, and DB_Username.

    December 24th, 2010
  32. richapallote

    Hi,

    Thank you for your great post!It has been very insightful.It is very useful to install the wordpress and transfer to webserver.

    http://gloriatech.com/on-premise-hosting-at-your-home–office.aspx

    January 4th, 2011
  33. mike

    i try to import my sql file and i get this error

    SQL query:


    – Database: `wordpress`

    – ——————————————————–

    – Table structure for table `wp_commentmeta`

    CREATE TABLE `wp_commentmeta` (

    `meta_id` BIGINT( 20 ) UNSIGNED NOT NULL AUTO_INCREMENT ,
    `comment_id` BIGINT( 20 ) UNSIGNED NOT NULL DEFAULT ’0′,
    `meta_key` VARCHAR( 255 ) DEFAULT NULL ,
    `meta_value` LONGTEXT,
    PRIMARY KEY ( `meta_id` ) ,
    KEY `comment_id` ( `comment_id` ) ,
    KEY `meta_key` ( `meta_key` )
    ) ENGINE = MYISAM DEFAULT CHARSET = utf8 AUTO_INCREMENT =1;

    MySQL said:

    #1050 – Table ‘wp_commentmeta’ already exists

    January 16th, 2011
  34. Daedra

    Ive been having alot of trouble with this .. my hosting site is not very helpful so maybe you guys can help .. i dont recommend surpass to anyone boo! Any how i try to upload the database but it wont allow me to throwing this error :

    Error

    SQL query:


    – Database: `information_schema`

    CREATE DATABASE `information_schema` DEFAULT CHARACTER SET utf8 COLLATE utf8_general_ci;

    MySQL said: Documentation
    #1044 – Access denied for user ‘biancaba’@\'localhost’ to database ‘information_schema’

    which was supposedly is a password error so the hosting company had me upload the file via email to them the localhost file which i did and now none of my wordpress pages are there. can anyone help im in tears over the all the work that has gone into this locally. Do i have ot make all the pages again ? I really hope not!

    January 18th, 2011
  35. Alec

    Awesome tutorial – you saved my butt! Thanks!!!!

    January 18th, 2011
  36. imon

    I wana add my blog http://www.mynightdreams.wordpress.com to my localhost server. How can I do it. Please help me. it very important for me.

    February 11th, 2011
  37. Tim Baker

    Problem at Step 11
    11. Now open http://localhost/sqlitemanager/ in your browser.

    I get an error HTTP 404 Not Found…

    Also, WampServer icon in system tray is green, but says offline.

    Thoughts?

    February 14th, 2011
  38. jamesmlambo

    I would like to know whether its possible to transfer new alterations to my already existing wordpress blog. Above seems like you have given a solution whereby someones does not hold anything thats when the method works. In my case already have an existing wordpress and would like to update. Also i would like to know whether its possible to use this offline method on some days and to use the online method on other days of keeping my blogs

    February 21st, 2011
  39. Sibel Balli

    I’ve the same issue as Tim posted Feb 14th.

    At step 11, HTTP 404 Not Found when opening http://localhost/sqlitemanager/

    any ideas?

    @Tim my WAMP server had an offline status until I restarted using Admin Tools, then I could choose to put the WAMP server online from the system tray menu.

    February 25th, 2011
  40. Erin

    Amazing tutorial. Easy to follow and understand.

    I appreciate your time and effort. Thanks-Erin

    March 18th, 2011
  41. william

    Hi,

    All went well until I attempted to up load the database backup file from step 3. I was able to get to the install, and then went to the phpAdmin on the server and then imported the backup sql file.

    I received the following message:
    #1064 – You have an error in your SQL syntax; check the manual that corresponds to your MySQL server version for the right syntax to use near ‘– phpMyAdmin SQL Dump
    – version 3.3.9
    – http://www.phpmyadmin.net

    – Ho’ at line 1

    Can you give me insight on what is causing the error message? Thanks!

    March 22nd, 2011
  42. keen

    i’ll be applying these to my own…thanks!

    March 22nd, 2011
  43. william

    Hi again,

    Figured out #1064 SQL syntax error. When I did a backup of the localhost MySQL database, I needed to save it as a “text” (not zip) file. Then login to the phpAdmin on the remote server, selected the new database and imported the file. It worked!

    Just in case anyone here is having an 500 server error when you attmept to login at the WP Admin (like I did), after transferring your WordPress site from localhost to remote server, just create a php.ini file with Notepad and type one line: memory=20MB, save the file. Upload the file into the wp-admin folder and it will work. This is regarding those that are on shared hosting.

    March 22nd, 2011
  44. Fabio

    Hello, Im getting this error when I try to import my word press database to a new hosting server.
    can anyone shed some light, I know very little about Mysql.
    thanks, really appreciate it.

    Error
    SQL query:

    (

    `meta_id` BIGINT( 20 ) UNSIGNED NOT NULL AUTO_INCREMENT , `comment_id` BIGINT( 20 ) UNSIGNED NOT NULL DEFAULT ’0′, `meta_key` VARCHAR( 255 ) DEFAULT NULL , `meta_value` LONGTEXT, PRIMARY KEY ( `meta_id` ) , KEY `comment_id` ( `comment_id` ) , KEY `meta_key` ( `meta_key` )
    ) ENGINE = MYISAM AUTO_INCREMENT =144 DEFAULT CHARSET = utf8;

    MySQL said:

    #1064 – You have an error in your SQL syntax; check the manual that corresponds to your MySQL server version for the right syntax to use near ‘`meta_id` bigint(20) unsigned NOT NULL auto_increment,
    `comment_id` bigint(20)’ at line 2

    April 2nd, 2011
  45. James Quinn

    Hi, I can access the amin part of wordpress, but there seem to be images missing. Also, I’m not sure what I’ve done wrong, but I’m getting this error:
    The server encountered an internal error or misconfiguration and was unable to complete your request.
    Please contact the server administrator, webmaster@vital-therapy.co.uk and inform them of the time the error occurred, and anything you might have done that may have caused the error.

    More information about this error may be available in the server error log.

    Additionally, a 404 Not Found error was encountered while trying to use an ErrorDocument to handle the request.

    ——————————————————————————–

    Apache/1.3.42 Server at vital-therapy.co.uk Port 80

    April 8th, 2011
  46. James Quinn

    Just to clarify, I’ve moved the local wordpress blog into the web server. With the database backup I replaced the line: http://localhost/wordpress with
    http://vital-therapy.co.uk as I’m building a complete site not just a blog.
    Should I have added the www.
    It took about 8 hours to replace that line so any feedback would be appreciated before I attempt to re-edit it.
    Many thanks

    April 8th, 2011
  47. Jean-Manuel

    Hi,

    Great tutorial ! I followed each step but still at the end when I open my website it is a blank page ?

    Any idea of which step could be responsible for this ?

    Thank you

    April 29th, 2011
  48. z1r

    I saw a comment above ‘you have to first empty the tables and then move the local blog in your web server becaue the older tables still contain the data. ” I have not tried yt just want to eliminate potential issues. Can any tell me how to empty the Sql Tables before I move from local to server. Most excellent guide to this point Thanks

    May 19th, 2011
  49. z1r

    Also a note for others the WAMP I downloaded from the text link would not provide the Sql manager in the menu I had to acquire elsewhere – No Biggie just a word of caution

    May 19th, 2011

Add Your Comment

All Comments are Moderated.

YOUR COMMENT

About This Site

Ampercent is a technology blog on computer tutorials, software guides, how to tricks and web tools. The blog is updated daily and written by two computer science students from India. Read More »

Tip Us »

Have a great tip which you want to share with fellow readers? Send in your ideas to tips@ampercent.com