Category: General

  • Best Surge Protectors To Charge Your Electronics Gadgets

    Best Surge Protectors To Charge Your Electronics Gadgets

    No matter where you live in the world, you must have faced surges in the electric current problem while charging mobiles, using computers, or so. A surge protector can help you in such situations by managing the surges. If you are looking for a surge protector to charge your electronics gadgets safely, you should check out this list.

    A surge protector or surge suppressor looks almost the same as a power strip, but it works differently. A standard power strip or extension cord doesn’t have much power during a problem, whereas a surge protector can protect your expensive devices from being ruined. In the USA, 120V is the standard voltage, and in India, it is 220V. If your standard device like mobile, laptop charger, etc. gets more than that standard voltage, there might be some damages.

    Take it differently. Let’s assume that you can eat only one standard size burger, and someone forced you to eat ten. The same thing will happen with your devices when they get pushed to receive more voltage than the standard rate. Funny, but it is what happens every day with countless people across the globe.

    Therefore, if you have some expensive devices like mobile, laptop, desktop computer, etc. and you do not want any problem while giving them power, you should buy a surge protector.

    Best Surge Protectors For Everyday Use

    1] Belkin 12-Outlet Surge Protector – $40

    Best Surge Protectors For Everyday Use

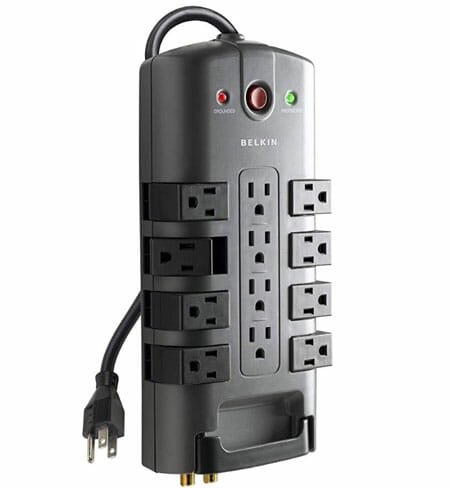
    This surge protector is a little bit expensive, but you won’t be disappointed after using it in your home or office. As the name says, this 4320-Joule surge protector has 12 outlets so that you can create a hub in your home to charge everything. It comes with an 8ft cable, and that might help you in some way. It looks quite promising, but some people are not happy with the build quality because of the plastic they use to make it. It also has an 8-outlet version with 1800 Joules of surge protection. Both products have two indicators for “grounded” and “protected.” Check the deal

    2] Belkin F9E600Zb2Mgry Essential Series 6-Socket Surge Protector – $22

    Best Surge Protectors For Everyday Use

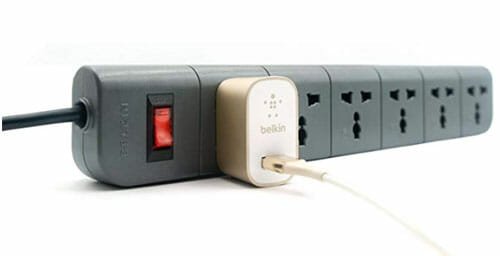
    Belkin is a popular name in the electronic appliance industry, and they have this handy yet straightforward product called Belkin F9E600Zb2Mgry. It looks simple and something like regular power strips, but it is a surge protector and has all the required equipment built into it. It has six outlets, 3-line protection, and other security features. However, the only problem with this surge protector is that the power cord length is very short. Check the deal

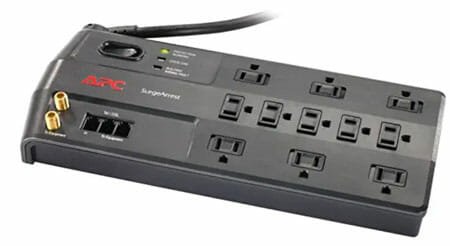
    3] APC 11-Outlet Surge Protector – $25

    Best Surge Protectors For Everyday Use

    No matter how many devices you have, you can use this surge protector for your benefits. As per the name, it comes with 11 outlets to help you with all the things. This product looks fancy, and you should not have any issues while using it for an extended period. It has 3020 Joule of surge protection so that your devices do not get burst due to any problem. On the other hand, it includes an 8ft power cord, safety shutters, etc. The best thing about this tool is that you can find three indicators, i.e. surge protection working, overload, and wiring fault. Another important thing is that you can find Co-Axial Protection against Power Surges. Check the deal

    4] Belkin 8-Outlet Power Strip Surge Protector – $17

    Best Surge Protectors For Everyday Use

    This surge protector is comparatively cheaper than the other two Belkin products, but it does a pretty good job. The best thing about this product is that you can find different variants so that you can select how long your cable should be or how many outlets you need, etc. Like a standard surge protector, it has two indicators, and one of them shows you if the protection is working or not. This product has 2500 Joule of surge protection so that users can use it for reasonable purposes such as charging mobile, laptop, etc. As it has a long power cord, you should not face any issue while giving it power supply. Check the deal

    5] AmazonBasics 6-Outlet Surge Protector – $11.49

    Best Surge Protectors For Everyday Use

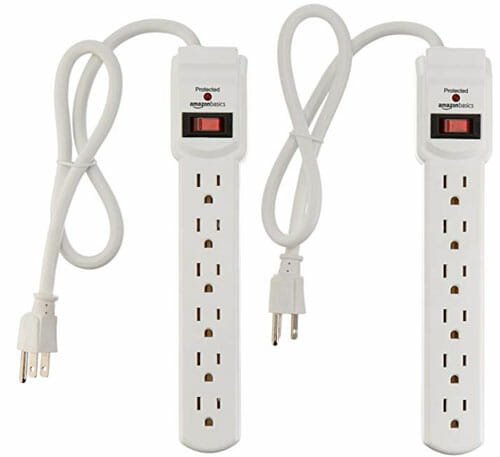
    If you need a cheap surge protector and you do not want to spend much money, you can check out this AmazonBasics product. It comes with six outlets alongside 200 Joule of surge protection. This product is not fancy, but it does the job without any problem. As usual, you can find the protection enabled indicator included in it so that you can understand if it is working or not. The major problem with this surge protector is that it has only a 2ft long power cord. In other words, if your wall outlet is far away, this product might not be very suitable for you. Check the deal

    6] Lovin Product Surge Protector – $28

    Best Surge Protectors For Everyday Use

    It is probably the unique looking surge protector, which has 14 outlets and a maximum of 3000W of protection for your home as well as office. No matter whether you want a surge protector for your computer or mobile, you can use it without any problem. Not only the 14 outlets, but also it has 4 USB ports so that you do not need to plug in your mobile charger to charge your phone. The next big thing is that you can find a 6ft long power cord. The last but not the least thing is that you can get a handle to carry it from one place to another. Check the deal

    Can I Use Normal Power Strip With Surge Protector?

    The answer is debatable since it is never recommended to create a chain using extension cords – be it a surge protector or regular power strip. No matter how expensive your surge protector or power strip is, you should not create nested cords.

  • Lenovo Legion Y540 Review: Modern Laptop For Casual Gamers

    Lenovo Legion Y540 Review: Modern Laptop For Casual Gamers

    Lenovo is a famous brand in the computer industry, and its products are pretty cooled in terms of features and appearance. Lenovo Legion Y540 is not an exception since it sports almost all the possible features within $1100. If you are looking for a laptop for casual gaming, photo/video editing, etc., you should check out Lenovo Legion Y540. It might be a perfect fit for you mainly when your budget is not more than $1100. Here is everything you need to know about Legion Y540 2019 edition.

    Lenovo Legion Y540 Specifications

    Before getting started, you should know about the specifications so that you can know if this will suit you or not.

    Lenovo Legion Y540

    Processor, RAM, Storage: Nowadays, people are going towards the Intel i9 processor, but this laptop comes with Intel Core i7-9750H Processor (9th Gen) with hexa-cores that produces 2.6GHz speed. However, you can Turbo Boost it to up to 4.50Ghz. In other words, it should be any problem when it comes to running multiple high-end apps side-by-side. On the other hand, you can find 1 x 8GB DDR4 RAM included in it, and the speed of those RAMs are 2666MHz.

    No matter which laptop you choose, the storage might be useful for any purpose. For example, you need to install four different games and save all the data, or you will install graphics designing software such as Photoshop, Illustrator, etc. In such a situation, you must have the proper storage. To get rid of such an issue, Lenovo provides 256GB SSD alongside 1TB HDD. The second variant of this laptop comes with 1TB SSD, and it is for them, who doesn’t want to carry two hard disks in one computer.

    Display: Before getting into the display, you should know that you can find 6GB NVIDIA GeForce GTX 1660Ti. As mentioned earlier, this laptop is for a casual gamer; you should not have any graphics related problem even when you spend most of the time playing different games with high configuration. Talking about the display, it has a 15.6-inch IPS panel with anti-glare coating. On the other hand, you can find a 1920 x 1080p resolution at a 60Hz refresh rate.

    Lenovo Legion Y540 Performance

    Battery: As you are going to purchase a laptop, the battery will be an essential component. This laptop includes a 57w Li-Ion battery that can provide power supply for a reasonable time.

    Ports: While using this laptop, you should not have any issue related to ports because Lenovo has not compromised in that section. More specifically, you can find 3 x USB 3.1 Type-A, 1 USB 3.1 Type-C, 1 HDMI, 1 Mini DisplayPort, Ethernet port, and 3.5mm headphone jack in this gaming laptop.

    Now, as you know, the configuration, you already have an idea in your mind how this laptop is going to be. Well, let us explain a few things before you head towards your final decision.

    Design And Build Quality: Lenovo has some dull-looking laptops in the market, and everyone knows that. However, here is an exception since Legion Y540 looks quite impressive from 360 °. It has only a one-color variant, and that is black. The minimal branding on the back makes it quite classy. Although it is made of plastic, the build quality seems stable, being a laptop for gamers. The only problem with this laptop is the webcam position. Although it has a more than average webcam, you might get some issues while making a video call.

    Display: In gaming, display plays a vital role – no matter if you have a 27-inch 4K monitor or a 15.6-inch laptop. Lenovo included anti-glare coating on this display to reduce the reflection. In other words, you can find the matte finish on screen, but it is bright, crisp, and you should not have any issue while playing a game in bright or low lightroom.

    Trackpad And Keyboard: Many gamers prefer mechanical keyboard for gaming. If you are one of them, you might be disappointed since it doesn’t have that “clicky” sound. However, it is pretty good for typing because of the soft keys and well-placed trackpad. Many laptop users often face problems with the trackpad position. However, that should not be here on this laptop.

    Lenovo Legion Y540 keyboard

    Audio: Who doesn’t love to play a song or watch movies on the laptop. You won’t find any problem with the color reproduction of the monitor and so with the audio quality. They use HARMAN-tuned audio technology to provide the possible sound. No matter whether you spend time on Netflix or playing games, you can certainly be impressed with the audio quality.

    Battery: Sometimes, you may not be able to connect to your power supply. If that happens with you a lot, you should know that this laptop can provide up to 5 hours of backup. However, the rating is not the same when you do heavy work. Gamers should not expect that much battery life from this laptop, and that is probably the only disappointment.

    Performance: With such as great processor, RAM, and graphics card, you should not have any lag while playing a high-end game on this laptop. It doesn’t matter if you want to spend time on writing an article or playing CS: GO, you would not face high memory issue on this gadget. The display quality is top-notch with the power of NVIDIA GeForce GTX 1660Ti.

    The overall quality of this laptop is pretty good, and users should not have any issue despite the category of their job. There are many other same-priced laptops, but this one is special because of the graphics card and audio quality. Check the deal

  • How To Install And Play Steam Games On Chromebook

    How To Install And Play Steam Games On Chromebook

    It’s been a long time since Chromebooks were launched for the users. Although it is a lightweight device for basic tasks, many people often try to play games. You may download some games from the official repository; you cannot sideload any game from third-party sources. On the other hand, other PC users can take advantage of Steam, which is a massive gallery of exciting games. If you have a Steam account and you often load games from that place, this article would be helpful for you. Here is how to install and play Steam games on Chromebook.

    By default, Steam is not available for Chrome OS as you can download it only for Windows, Mac, and Linux distributions. The official website has no download link for Chrome OS, and that is where the problem starts. If you have a Chromebook and you want to play Steam games, here is what you need to know and do.

    To install Steam on Chromebook, you need to follow these steps-

    1. Enable GPU acceleration
    2. Install Linux virtual machine
    3. Use Terminal to download and install Steam
    4. Open Steam app, sign in to your account, start downloading games

    How To Enable GPU Acceleration In Chromebook

    Before getting into the steps, you should know that GPU acceleration is not available in all Chromebooks. You need to check manually for your device. For example, the Google Pixelbook, Acer Chromebook 13, Lenovo Yoga Chromebook C630 have GPU acceleration. If you know that your Chromebook has this functionality, you need to go ahead to follow the following steps.

    At first, open the Google Chrome browser on your Chromebook and enter this in the address bar: chrome://flags

    After that, search for Crostini GPU Support using the search box. It should be set to Default. You need to expand the drop-down menu and select Enabled.

    Following that, you have to relaunch your browser to get the change.

    How To Install Or Setup Linux On Chromebook

    Chrome OS is good enough for an individual who wants to watch YouTube videos, do some online courses, etc. However, if you set up Linux on Chrome OS, you can do more – a whole new world will be opened for you since you will have Linux apps on Chromebook. The best thing is that you can get official support.

    To get started, expand the system tray, and click the settings gear icon. After opening the settings panel, you can find an option called Linux (Beta). You need to switch from the Network tab to the Linux (Beta) tab.

    In case you cannot find this option, you need to upgrade your Chrome OS to the latest version. After that, if you cannot see it, that means your Chromebook doesn’t support this functionality.

    Anyway, after visiting the Linux (Beta) tab, click the Turn on button to start the installation process.

    How To Install Or Setup Linux On Chromebook

    After following all the screen instructions, you will get it installed. After finishing the installation, you need to check if there is any pending update or not. For that, open up the Terminal and enter this command-

    sudo apt update

    If it finds any pending update, you need to enter this command-

    sudo apt upgrade

    At a certain point, you need to accept the installation. Once everything is done, you can start the Steam installation process.

    How To Install Steam On Chromebook

    The process is quite simple, as you need to use some commands only. To get started, fire up the Terminal and enter this command-

    echo ‘deb http://httpredir.debian.org/debian/ jessie main contrib non-free’ | sudo tee -a /etc/apt/sources.list

    it will add the sources. After that, enter these commands-

    sudo dpkg –add-architecture i386

    sudo app update

    To start the installation, you have to use this command-

    sudo apt install steam

    it may take some time to finish the installation process. In the meantime, you need to accept the installation. If everything goes without an issue, you can open up the Steam from Terminal. For that, enter “steam” and hit the Enter button.

    How To Install Steam On Chromebook

    Now you should find the Steam window, where you need to enter your login credentials.

    After that, you can install any game and play it on your Chromebook. Also, you may not need to use Terminal to open Steam on your Chromebook. You can find an icon in the dock as well.

  • Best Smart Light Bulbs For Your Home

    Best Smart Light Bulbs For Your Home

    Days are gone when you need to get up from your bed to switch off the light before sleeping. Unless you used a lamp of your table, it was very irritating for an individual to get back and switch off the light. Also, many people suffer from numerous kinds of headaches and eye strain due to harsh lighting. That is where smart bulbs come in. A smart bulb can help you in different ways. You can change the color scheme, turn it off or on from anywhere in the world, and so on. If you are looking for a smart bulb, but you do not know where to start searching, you should check out this list. Here are some of the best smart light bulbs that you can use in your home as well as office.

    Best Smart Light Bulbs For Your Home

    1] Philips A19 – $47

    Best Smart Light Bulbs For Your Home

    Everyone has heard of Philips while purchasing a light bulb. The same company has produced A19, which is a smart bulb for your room. You can select any color for your room with the help of the Hue Bluetooth app. According to the official statement, you can set almost 16 million colors from your mobile. No matter whether you need a warm or cool environment, you can use your bulb to do the job for you. The best thing is that you can find Amazon Alexa and Google Assistant support. That means you can control everything (including switching it on or off) with the help of voice command. Check the deal

    2] SAUDIO LED RGB Color Changing Bulbs – $40

    Best Smart Light Bulbs For Your Home

    It is yet another trendy smart bulb that you can use in your home or office room. You do not need to have any hub to install this bulb. Just connect it via Wi-Fi, and you are good to go. Like some other smart bulbs, you can use it with Siri, Alexa, Google Assistant, IFTTT, etc. so that you do not need to use your hands to get the job done. It has RGB support, which means you can set any color for this light, and it will work without any problem. It is a 7-watt bulb, which requires 110 volts of electric supply. Regarding the connectivity, you should have a 2.4 GHz Wi-Fi connection in your home. Check the deal

    3] C by GE A19 C – $25

    Best Smart Light Bulbs For Your Home

    If you do not need RGB setup in your bulb and you are looking for a white bulb for your bedroom or so, you can check out this smart bulb. C by GE A19 C is a single-color smart bulb that works with Alexa to give it a voice command. It doesn’t require a hub in your home to install it. Talking about the light, you can get warm in the night and calm in the morning from this bulb. As usual, it is possible to manage this bulb using the mobile app. Check the deal

    4] LIFX 1100-Lumen – $48

    Best Smart Light Bulbs For Your Home

    This 11-watt LED bulb can make your room very bright, and that is why it is recommended to have a comparatively big room for this installation. Like any other smart bulb, you can manage everything with the help of a mobile app and get your job done wirelessly. On the other hand, it is compatible with Alexa, Apple HomeKit, Google Assistant, etc., so that voice commands work for you. You should be able to schedule your light, set various moods, etc. The best thing about this bulb is that you do not need any hub to install it in your room. Also, you may not have to spend much time to set it up. Check the deal

    5] Sengled Smart Wi-Fi LED Multicolor – $25

    Best Smart Light Bulbs For Your Home

    This smart bulb works via a 2.4GHz Wi-Fi network that you can access from your Android as well as iOS mobile. No matter which mobile you use, you should learn some voice commands so that you can do the job hands-free. It supports almost all the smart home assistants, including Alexa, Google Assistant, etc.  As it is a multicolor bulb, you can set any color for your room. It is a 9-watt bulb, but it produced bright light because of being an LED. Check the deal

    6] Wixann 9W Smart Wi-Fi Light Bulb – $28

    Best Smart Light Bulbs For Your Home

    If you need cheap yet good quality, you should check out this company and its smart bulbs. You can get three smart bulbs for $28 and they are 9-watt bulbs. You can RGB support so that you can change the color of the light whenever you want. Also, you get Amazon Alexa and Google Home Assistant so that you can control it using voice command. The light depth is not very harsh and that’s why you can use it while reading or working on a computer. It has several modes and you can control them from the mobile app. Check the deal

    7] Eufy Lumos Smart Bulb 2.0 – $51

    Best Smart Light Bulbs For Your Home

    The first version of Eufy Lumos Smart Bulb was dull because of not having third-party app support. However, the newer edition comes with all the essential functionalities that you want to get in a smart bulb. Although it is quite expensive being a single-color smart bulb, it does the job pretty well. As per the statement, this 9-watt LED bulb is equivalent to a 60-watt bulb. On the other hand, you do not require any hub to use it in your room. All you need is a Wi-Fi connection so that you can connect to your phone and manage it accordingly. Check the deal

    Before purchasing any smart bulb, do read some user reviews so that you can know the original pros and cons.

  • Pros and Cons of Using a VPN to Protect Your Privacy

    Pros and Cons of Using a VPN to Protect Your Privacy

    Virtual private networks have become quite popular recently because of the safety and security issues Internet users are facing. Loss of data and online theft of personal data are among some of the strongest reasons why many people decide to browse the Internet through a VPN.
    However, there are both pros and cons of using VPNs, as not all users find them helpful.

    Admittedly, they form a minority of Internet users but you still need to inform yourself about all the pros and cons of VPNs to protect your online privacy before you contact a provider and ask for hosting services.

    How does a VPN work?

    The principle a typical VPN functions on is rather simple. Namely, your internet connection gets encrypted in such a way that anyone observing your online activity will believe you accessing the Internet from a location different than the actual one.

    Once you establish such a secure internet connection, it is much easier to protect your privacy by concealing your online identity. Hackers or anyone else (mostly big corporations and governments) who wish to eavesdrop will be unable to keep track of your online activity.

    Pro: Accessing geo-blocked content

    Have you ever had to deal with the grim message: “The following content is not accessible in your region?” If you had, then you have probably cursed at your IP address that stopped you watching your favorite show. With a VPN, this scenario will never again occur because a good VPN will help you bypass any form of a geo-block.

    The next time you travel abroad on holiday or for business reasons, you will be able to unblock Netflix or censored content that is unavailable in the country where you’re staying. You will be able to access all your favorite streaming services back home because a VPN will alter your IP address.

    Con: Slower Internet connection speed

    One of the biggest drawbacks of a VPN is the fact that it can significantly decrease the speed of the Internet connection. The benefit of an encrypted online presence comes with the cost of a slowed-down connection.

    Many users lose their patience waiting for a page to load and simply exit the browser, giving up on a VPN. Since providers are well aware of this problem, they offer more expensive hosting packages that offer high-speed Internet connection without jeopardizing online security.

    Pro: VPNs are quite affordable

    Speaking of money and how much a VPN will cost you, we must say there are VPNs that are totally free! Sometimes, making a choice is difficult, however, here you can find a great online list of free VPNs that might help. Of course, you will not enjoy the same level of privacy as if you were subscribed to a high-quality premium service, but secure, anonymous, and browsing without any hidden costs is possible in December 2019 as well. Like other apps and services, top-notch VPNs get shut down or decrease the quality of the service they offer over time but other VPNs appear on the market to take their place.

    When selecting a VPN service, whether you’re a premium user or is it totally free, take care of the terms of the agreement. Some shady VPNs will openly sell your data to third parties which they blatantly state in the contract so be careful what you agree to.

    Con: The existence of powerful anti-VPN software

    As you might have guessed based by now, VPN services are not liked by everyone, especially large streaming services like Netflix that depend on paid membership. They don’t fancy anyone bypassing their systems so they develop VPN blockers to jam private secure connections.

    These blockers resemble computer viruses in the sense that they constantly evolve to keep track of VPNs developing technology. It is highly likely that one day you’ll turn your computer on and realize that the VPN of your choice is no longer doing its job. Luckily, the most popular VPN services are evolving as well, including the aforementioned free ones.

    After we have explained how a VPN works and listed some of the biggest pros and cons of a virtual private network, you’re able to determine whether you require one. Regardless of decreased browsing speed and the existence of blockers, VPNs are still one of the best ways to secure your online privacy against third parties who wish to get hold of your confidential personal data.

  • Best Bluetooth Headphones For Music Lovers In 2020

    Best Bluetooth Headphones For Music Lovers In 2020

    No matter what kind of music you like, you should have a headphone that can produce decent audio to satisfy your needs. You can listen to music on a mobile or computer, but you must have a good headphone to get a better experience. For example, you have a 6-hours flight, and you need something to kill time. If you are one of them who watches movies and listens to music at such a time, this article will be helpful for you. Although there are so many wired headphones, you may not want to manage a wire while travelling.

    Best Bluetooth Headphones For Music Lovers

    1] Sony WH1000XM3 – $348

    Best Bluetooth Headphones For Music Lovers

    Sony is a well-known company in the headphone production industry, and they have come up with Sony WH1000XM3, which is one of the best wireless headphones for music lovers. It includes some unique functionalities with quick charge facility so that you can plug it in for 10 minutes and read to listen to music for almost 5 hours. The design of this headphone is amazing, and so is the comfort. It has touch control options so that you can increase or decrease volume, change music, use voice assistant, etc. According to the statement, it has 30 hours of battery life, which is more than enough for an avid music listener. Check the deal

    2] Bose 700 – $399

    Best Bluetooth Headphones For Music Lovers

    Bose doesn’t have one thing, and that is haters. You can pick up any headphone of this company, and you will fall in love with it. Bose 700 is one of them that will attract you for sure. It comes with smart touch controls, Amazon Alexa support, Bose AR, etc. It is needless to mention some functionalities such as noise cancellation, 20 hours of battery backup, etc. On the other hand, it has SimpleSync facility that lets you pair your headphone with Bose soundbar 500 or 700 to get a personal listening experience. The overall comfort level of this headphone is much higher than others, and that is where it excels again. Check the deal

    3] Sony WH-XB900N – $198

    Best Bluetooth Headphones For Music Lovers

    Many people do not want to spend $350-400 to buy a headphone – even when they need it for daily work or so. For them, Sony has brought a wireless headphone that will grab your attention. There are many $200 headphones on any website and offline store, but Sony WH-XB900N is something different, and you can feel that after playing music. It offers 30 hours of battery life, which is impressive from a $200 headphone. On the other hand, it comes with Quick Charge, touch control, ambient sound mode, extra bass, voice assistant, foldable design, and app support to customise the sound according to your requirements. The design of this headphone looks sleek, and it doesn’t weigh a lot too. Check the deal

    4] Audio Technica ATH-M50xBT – $199

    Best Bluetooth Headphones For Music Lovers

    Audio Technica is another top-rated company to find top-notch headphones, and ATH-M50xBT is just another example. You can find some essential and unique features in this headphone. For instance, it has a voice assistant, excellent sound isolation, touch control, extra bass, etc. No matter what kind of music you like to listen, you can wear it and start playing your favourite song. It requires almost seven hours of charging so that you can use it for 40 hours without interruption. The comfort level of this headphone is top-notch, and you should not feel any pain in your ear or head even after using it for hours. Check the deal

    5] Bose QuietComfort 35 II – $349

    Best Bluetooth Headphones For Music Lovers

    Bose has an excellent reputation, and they know how to manage it with quality. Like the other Bose headphone on this list, you can find some of the best features included in Bose QuietComfort 35 II. For example, it has AR for your ear that generates a great listening experience. On the other hand, the noise cancellation lets you cut off the outside noise with ease. Apart from that, you can find Amazon Alexa support, Bose Connect app facility, music sharing option, etc. According to the official statement, you can get up to 20 hours of battery backup from a single charge. It weighs 8.3 ounces only, and that is why you can wear it for hours with any ache in your ears. Check the deal

    6] AKG N60 – $224

    Best Bluetooth Headphones For Music Lovers

    AKG N60 comes with various accessories as your travel companion so that you can take it on a trip. Like some of the above-mentioned headphones, you can find almost 30 hours of battery life in this one too. As it has noise cancellation facility, you would not find any issue while listening to music in a crowded area as well. According to some people, this headphone produces a cleaner sound than some of the other high-end headphones. That is because of 10Hz – 22kHz frequency response. Talking about comfort, you should not have any problem using it for a long time. Check the deal

    7] Sennheiser HD 4.50SE – $200

    Best Bluetooth Headphones For Music Lovers

    Sennheiser is a very famous name in the audio industry, and you can find the proof from this headphone. It costs $200 and it worth every penny. It has Bluetooth 4.0, NFC, etc. for the smart connectivity lovers. On the other hand, it can provide up to 25 hours of battery life so that you do not run out of backup on a long flight. It is needless to mention anything about comfort because you won’t get any issue at all. Although some cheap Sennheiser headphones give ear pain to the users, this one won’t do anything like that. Check the deal

    These are some of the best wireless headphones for music lovers. No matter which headphone you choose, you should try it yourself at a local store. Otherwise, you cannot know if it is good enough for you or not.

  • Best 5K And 8K Monitors For Gaming And Video Editing

    Best 5K And 8K Monitors For Gaming And Video Editing

    If you often make videos for a living or you are a professional gamer, who streams gameplay online, you should opt for the best possible equipment. Nowadays, people are moving from 4K to 5K and 8K so that they can create content for the next generation of people and stand in the crowd. It doesn’t matter if you are a gamer, video editor, or an average PC user, you should check out these 5K and 8K monitors to know what you are missing out on.

    Best 5K And 8K Monitors For Gaming And Video Editing

    1] Dell UltraSharp 32″ 8K Monitor: UP3218K

    Best 5K And 8K Monitors For Gaming And Video Editing

    A sleek looking 8K monitor for gamers and video editors who don’t care about the weight of the gadget. The IPS panel of this monitor is very sharp and crystal clear so that you can find a tiny flaw in your video effortlessly. The native resolution of this monitors us 7680 x 4320 at 60Hz. It comes with 2 x DisplayPort, 3 x USB 3.0 Type-A port, audio line-out, etc. Dell included anti-reflective and 2H hard coating on the screen so that you can play games in a bright room without any glare. The 32-inch edition of this monitor costs around $3699 on the official website. Check the deal

    2] LG 34WK95U-W UltraWide 5K2

    Best 5K And 8K Monitors For Gaming And Video Editing

    LG is quite competitive in the monitor production business, and LG 34WK95U-W UltraWide 5K2 is one of the many examples. As the name suggests, it has a 5K IPS panel with a resolution of 5120 x 2160 pixels. As it is an ultrawide monitor, it has a bigger panel, and thus, it consumes comparatively more power than some other monitors. The design of this monitor is more than awesome, and that makes things easier for someone to pick it instead of others. It includes USB-C, HDMI, USV Down-Stream, display port, USB Up-Stream, ThunderBolt, etc. Apart from that, you get factory calibration, reader mode, DAS mode, response time control, HDR, auto-brightness, six-axis control, auto standby, and more. On the official website, it is priced at $1300. Check the deal

    3] Samsung 55″ Class Q900 QLED Smart 8K UHD TV

    Best 5K And 8K Monitors For Gaming And Video Editing

    Days are gone when you needed only a monitor for your monitor as now you can use a TV as your primary as well as a secondary monitor. Samsung 55″ Class Q900 QLED Smart 8K UHD TV is such an example, which most of the PC users use rather than normal TV viewers. It is an 8K monitor that includes most of the advanced and essential functionalities to provide the best experience. For instance, it has Quantum HDR 24X, 100% Color Volume with Quantum Dot, multiroom link, woofer, Bluetooth headset support, Wi-Fi connectivity, Wi-Fi Direct, HDMI, USB-C, etc. As it is quite huge, you might need a bigger desk or wall mount to put it in place. On Samsung’s official website, you can find the price as $2200. Check the deal

    4] LG 27MD5KB-B UltraFine

    Best 5K And 8K Monitors For Gaming And Video Editing

    LG 27MD5KB-B UltraFine is a 27-inch 5K monitor for your daily work. Many users use a bigger monitor alongside a MacBook, and if you are one of them, you can use this monitor regularly without any issue. Before knowing the features, you should check the look as it is not much impressive for modern desk setup. However, feature-wise, it excels for sure since it includes Thunderbolt 3, USB Type-C, Built-In Webcam with Microphone, Built-In USB Type-C Hub, 500 cd/m² Brightness, 178°/178° Viewing Angles, 60Hz refresh rate, etc. You can adjust the height according to your requirement, and that is one big plus point. On the Amazon website, the price starts at $1200. Check the deal

    5] Samsung CRG90

    Best 5K And 8K Monitors For Gaming And Video Editing

    Samsung CRG90 is a 5K gaming monitor, which is a great deal for video editors as well. When editing a video, you might need a bigger screen to manage all programs simultaneously. As it has a 49-inch IPS panel, you should not get any problem regarding space management. It provides a 120Hz refresh rate at 5120 x 1440 pixels alongside FreeSync 2 with HDR, HDMI, etc. Frame lagging is not very common in this monitor, and that is a huge advantage of using it. Talking about the input solutions, you get 1 HDMI, 2 DisplayPort, 3 USB ports in this monitor. The last but not least thing is the appearance, which will attract you for sure. This monitor costs around $1152 on Amazon. Check the deal

    6] Dell UltraSharp 49 Curved Monitor: U4919DW

    Best 5K And 8K Monitors For Gaming And Video Editing

    This another Dell monitor is popular among gamers and video editors, and that is because of the size. As the name suggests, it has a 49-inch curved panel with 5120 x 1440p at 60Hz. You can find 2 HDMI 2.0, 1 DisplayPort 1.4, 5 USB 3.0 Down-stream port, 2 USB 3.0 Upstream port, 1 USB -C port in this monitor. It has an antiglare coating so that users do not get eye staring while using it for a long time. It has a 99% sRGB color gamut with Delta E calibration accuracy. It is possible to tilt the monitor as well as adjust the height accordingly. The official website says that you need to pay $1250 to purchase it. Check the deal

    Final Word

    These are some of the best 5K and 8K monitors available right now in the market that you can use for gaming and video editing purpose. There are more other companies, which build monitors in that size, they often lag Samsung, LG, Dell, etc. because of the quality, and essential functionalities.

  • Internet Is Connected But Unable To Use Error On Windows 10

    Internet Is Connected But Unable To Use Error On Windows 10

    If you are unable to use the internet on your computer even after connecting to an internet source, you should check out these troubleshooting tips and tricks to get it fixed. No matter why you are unable to use the internet on your computer, you can find a possible solution in this article. This is recommended to go through all the steps to troubleshoot this issue on your Windows 10 computer.

    Internet Is Connected But Unable To Use Error On Windows

    1] Check Ping Status

    Internet Is Connected But Unable To Use Error On Windows

    This is the first thing you need to check before doing anything else on your computer. By checking the ping status, you can make sure if your internet connection is valid or not. No matter if you are using a mobile hotspot, Wi-Fi router, or Ethernet connection, you can check the ping status of your internet connection quickly. To get it done, you need to know the preferred DNS. If you already know it, you can open the Run prompt, and enter this-

    ping IP -t

    However, if you do not know the preferred DNS, you can contact your ISP. They will let you know the information you need.

    2] Use Network Troubleshooter

    Network Troubleshooter Tips And Trick For Windows 10

    Windows 10 is pretty feature-rich as it comes with tons of in-built features than other older versions. For example, Microsoft included some troubleshooters in this operating system that you can find in the Windows Settings panel. To open it, press Win+I, go to Update & Security > Troubleshoot. Here you see two different troubleshooters, i.e. Internet Connections and Network Adapter. You need to choose one troubleshooter at a time, click the Rub the troubleshooter button, and follow the screen instructions to get it done. These two troubleshooters will let you fix common problems like this one. As they are already included in your OS, there is no need to install any third-party app.

    3] Airplane Mode

    Network Troubleshooter Tips And Trick For Windows 10

    Airplane mode is a very handy feature that is included in almost all mobile phones and Windows 10 computer. In case you do not know the workflow of airplane mode, you should know that it can help you disconnect the internet and reconnect to the internet source. Sometimes some internal problems can cause issues, and that can be fixed temporarily by enabling airplane mode. As Microsoft included the airplane mode in Windows 10, you do not need to install third-party software to get the job done. To get started, open the Action Center first, and click on the Airplane Mode button. After that, click the same button again to disable the airplane mode so that you can use the internet normally.

    4] Disable Firewall Software

    If you have recently installed a firewall software on your Windows computer, this is an important thing you should check. If you mistakenly changed something in your firewall software, the internet connection can be blocked on your computer. As firewall checks all incoming and outgoing connections on your computer, you have to disable the firewall software temporarily. Thus, you can know if the problem belongs to the firewall software or not.

    5] Install, Scan And Disable Antivirus

    If you have already installed an antivirus on your computer, you need to disable it for a temporary basis. Sometimes a bug in the antivirus can cause this issue when you cannot use the internet on your computer. At such a moment, if you turn off the anti-malware service on your computer, you can know whether that security tool is causing the issue or not. Similarly, if you haven’t installed any antivirus on your computer, and your PC has become quite slow, this is the time to install such a tool and scan your PC with it. If some malware or adware attacks your computer, it will cause this problem.

    6] Update App

    If one particular application is unable to access your internet connection, this is the time to update it on your computer. For example, you are unable to use the internet in Google Chrome or Firefox browser. Therefore, you have to check if there is no available update of Google Chrome or not. If yes, you need to update the browser immediately and check if you can use the internet or not. If that doesn’t solve the issue, you have to do three more things-

    • Reset the app
    • Uninstall and reinstall the app
    • Check firewall if the app is blocked or not

    7] Change Network Adapter

    If you have an old desktop computer and you are using a Wi-Fi dongle to connect to your Wi-Fi router, this is a good time to change the network adapter. It will help you ensure if your computer is working fine or not. You can simply plug in the Wi-Fi dongle in a different computer and check if you can use the internet or not. If you can use the internet, you need to work on your old computer. Otherwise, this is the time to replace the network adapter with a new one.

    8] Change Internet Service

    Sometimes your internet service has some issues, and that can cause this problem on your computer. Therefore, this is wise to change your internet source and connect to a different network. It can be an Ethernet connection or a mobile hotspot or Wi-Fi router.

    9] Contact ISP

    If nothing is working positively, you should contact your internet service provider as they can fix the issue for you. Your ISP might be working on some internet issues, and that is why you are unable to use the internet. To confirm it, this is recommended to contact your ISP.

    That’s it! These simple tips and tricks will be helpful for you for sure.

  • Best Tools To Fill Out A PDF Application Form

    Best Tools To Fill Out A PDF Application Form

    PDF or Portable Document Format is a well-known, handy, and secure file format that you can find almost anywhere. Let’s assume that you are going to get an admission at a university, and the authority has sent you a PDF file that you need to fill out with your details. At such a moment, you can use these tools to fill out a PDF application form quickly. As it is not possible to edit a PDF file without software, you should check out these utilities to get the job done.

    Best Tools To Fill Out A PDF Application Form

    1] Microsoft Word

    Best Tools To Fill Out A PDF Application Form

    Microsoft Word is probably the best tool that can do your job effortlessly. If you already have the Microsoft Office package, you do not have to worry about anything. However, if you do not have it already, you need to purchase the subscription. Before seeing the second option, you should check out the pricing and compatibility. Microsoft Word is a multi-functional tool that offers the countless amount of features for writers. No matter whether you are a student, office employee, or anybody, you can use this tool to get started with your writing. If you are using an old version of Microsoft Word, you cannot get this feature, but the latest version (Office 365) users can edit PDF files in Microsoft Word without any problem. Find deals

    2] Google Docs

    If you do not like to use Microsoft Word because of the price, you should know about Google Docs. As the name suggests, Google manages this online tool, and you can perform a lot of tasks for free. No matter whether you have Google One subscription or not, you can find all the editing functionalities in the Google Docs. As this is an online tool, you need to upload the file first to your Google Drive account. Following that, you can open it in Google Docs like you can edit PDF files in Microsoft Word. As it supports various add-ons, you can get more options while filling out a form in Google Docs. The user interface of Google Docs is uncluttered, and that is why you should not have any problem to fill out any form.

    3] PDFelement

    PDFelement is a paid software, and Wondershare makes it. As the name defines, this tool is a PDF editing software that is compatible with Windows Vista and all the later versions, including Windows 10. Before opting for the paid version, you can try out the free version so that you can know if this tool is made for you or not. The user interface of PDFelement is very clean, and all the options are well-organized. No matter if you want to create a new PDF file or edit an existing file, you can use this software to get your job done within moments. The standard version of PDFelement costs around $6.99/month, whereas the PRO version costs $9.99/month. If you are going to edit a PDF file, this is recommended to go for the PRO version instead of Standard edition. Check pricing

    4] PDFBuddy

    Best Tools To Fill Out A PDF Application Form

    PDFBuddy is an online PDF editor, and that means you can use it on any platform. No matter if you are using a Windows or Mac computer or Android or iOS mobile, you can open up the website, upload your file, and start editing. It does all the tasks efficiently so that users do not need to spend much time when they are in a hurry. It has some basic editing options to write or edit text, which is quite crucial while filling out an application form. When you are writing down your private information on a third-party website, you should check out the security. For your good luck, PDFBuddy offers AES-256 bit encryption so that the uploaded files always have a security layer. The best thing about this tool is that you can move your new text to adjust to the form. Some forms do not have much space, or a simple line of text can break the whole form. Such a thing doesn’t happen with PDFBuddy as they allow you to move the text wherever you want. Check website

    5] PDFescape

    Best Tools To Fill Out A PDF Application Form

    PDFescape is yet another online tool that offers a lot of features for the users’ benefits. The free version of this tool has some limitations, whereas the paid version doesn’t create any barrier for you. The main advantage of using the paid version has a bigger file size limit. Otherwise, your file should not exceed more than 10 MB and 100 pages in total. You can create a new PDF file, edit an existing file, fetch a file from the internet/website, get previously edited files, etc. The editing panel of PDFescape is pretty good, but it has some advertisements (for free account holders) that might distract you from the editing pane. Otherwise, you can perform almost all the tasks like other standard PDF editing tools. Check website

    6] Adobe Acrobat DC

    Best Tools To Fill Out A PDF Application Form

    Although those days are gone when PDF and Adobe Reader was internally integrated into each other, you can still find it pretty useful. Adobe Acrobat DC is a paid tool, and it does pretty much everything you want to do. It offers a “Prepare Form” option that is made for this purpose only so that users can perform the task swiftly. The user interface of this tool is clean, even though it offers a lot of options to manage and edit PDF files. You can download this software on a Windows computer and start filling out your form on the go. Download

    I hope these tools will be helpful for you to fill out a PDF application form.

  • List Of Most Secure Cloud Storage Services

    List Of Most Secure Cloud Storage Services

    If you are one of the people who like to keep everything on cloud storage, you should check out this article. While choosing a cloud storage service, you should know everything about the company as you are about to hand over your important files to a third-party service. Keeping that in mind, we have listed down some of the most secure cloud storage services so that you do not need to worry about anything. You might find some new and old cloud storage names on the list, but it is recommended to check out the features, pricing, compatibility, etc. before opting for anything.

    Please note that we haven’t given any rank to these cloud storage services as they are equally handy for a regular user. However, we have gone through a checklist before naming them.

    Most Secure Cloud Storage Services

    1] OneDrive

    OneDrive is a widespread name in the cloud storage business that is owned by Microsoft, the popular software and hardware company. Many people are already using OneDrive, and that is why it would be very convenient for someone to opt for the unique security layer that Microsoft rolled out a few weeks ago. It is called Personal Vault that helps you create a password-protected folder where you can store your confidential files. Even if someone cracks down your OneDrive password, that individual cannot access the Personal Vault without an OTP. Talking about other security layers, it offers AES 256-bit encryption, TLS protocol, etc. Pricing-wise, OneDrive is quite cheap as they provide 100 GB storage for $1.99/month only. Check pricing

    2] Google Drive

    Google Drive

    Google always takes extra care of the users’ security, and if you use Google Drive, you should not worry about anything. Your files protected with additional two-step authentication so that you do not fall into a phishing trap. It has the TLS protocol for security, but you cannot find AES 256-bit encryption since it offers AES 128-bit encryption to the users. The pricing of Google Drive is attractive, and that is why you might opt for this one instead of anything else. As you can download the Google Drive app on any platform, this is very easy for a user to upload and synchronize files across multiple devices. No matter which plans you choose, you need to pay a minimum amount every month or year. Check pricing

    3] Dropbox

    Transfer ownership of shared folder in Dropbox

    Dropbox is another cheap cloud storage provider, and it offers some of the top-notch security facilities to the users. No matter which plans you choose, you cannot find any compromisation in the security aspect. For instance, all of their plans include AES 256-bit encryption, TLS protocol, fast synchronization, etc. Another handy feature is the password-protected sharing option that is unavailable in most of the other cloud storage services. The user interface of Dropbox is elegant, and that might be a plus point because you do not have to spend much time understanding or find all the options they offer to the users. If you own a business, you can pay only $12.50/user/month to obtain 5 TB storage. However, the pricing is low for individuals. Check pricing

    4] Sync

    Best Cloud Storage For Multiple Users

    You need Sync when you have a countless amount of confidential data that you want to store on cloud storage. You can name any security feature, and that can be found in this cloud storage service. For getting started, you can get end-to-end encryption, no third-party tracking, file history facility, downloads restrictions, password protected sharing, and more. Apart from that, there are remote device lockout, 2-step verification, granular permissions, activity log, administrator account, multi-user admin console, centralized billing, etc. As this is perfect for multiple users, you can manage passwords of all users from one screen. Although it has a slower data transfer speed, you do not need any knowledge to set things up, and that is the most significant advantage of using Sync. Regarding the price, you need to pay only $8/month to get 2 TB storage alongside all the above-mentioned features. Visit official website

    5] pCloud

    Best Cloud Storage For Multiple Users

    The biggest plus point of pCloud is that there is no limit of file size. In other words, you can upload any size of a file to your pCloud account without any error, whereas all the other cloud storage services have some restrictions. pCloud users can upload almost anything, including image, video, PDF, TXT, contact, etc. to their account and store them for as long as they want. The web user interface is neat and clean, so that you do not face any trouble while using it for the very first time. Another useful feature is multi-user support. That implies you can allow someone to access your storage or upload and download files from your account. Regarding the price, it has two different modes, i.e. Annual and Lifetime. The 500 GB variant costs $3.99/month (billed annually) whereas the 2 TB variant costs only $7.99/month (billed annually). Visit website

    6] Zoolz

    Most Secure Cloud Storage Services

    Although the price is quite higher than other cloud services, you can find almost all the security functionalities in this tool. Before getting started, you should know about the price as it costs $15/month for 100 GB storage only. You can download the official application on your mobile and use it accordingly. However, the web user interface of Zoolz is pretty good, and you should now have any problem to upload any file. Like most of the other cloud storage, you can add users to access or manage your data. On the home screen, it shows all the information about the user, data, storage, etc. so that you can know the remaining storage amount quickly. Check website

    There are tons of other cloud storage providers, but they are not as secure as these services. I hope you will find this useful.

  • Best Remote Connection Apps For iPhone And iPad

    Best Remote Connection Apps For iPhone And iPad

    iOS devices are pretty good in terms of the user interface, features, app compatibility, etc. If you are using an iPad, you can use it in different ways – no matter whether you are a student, businessman, writer, or anything else. You can use an iPad or iPhone for remote desktop connection as well so that you can connect to a computer remotely and access different things on the go. For that, you can check out these best remote connection apps for iPhone and iPad; those will let you perform every task efficiently.

    Best Remote Connection Apps For iPhone And iPad

    1] Microsoft Remote Desktop

    Microsoft Remote Desktop Preview App is Available for Mac

    Microsoft Remote Desktop is probably the best remote connection app for iPhone and iPad. No matter where you are, you can access a computer remotely. The best thing is that you can connect Windows and Mac computers with the help of this application. Some of the notable features are-

    • Access remote computer
    • Secure connection for data and apps
    • Manage all connection effortlessly
    • Redirect your clipboard

    You can access almost anything on the remote computer from your iPhone or iPad. The user interface won’t disappoint you as it is neat and clean. For obvious reasons, if you have a bigger screen, you will be able to use all the options without any problem. Regarding compatibility, you need iOS 13.0 or later versions. Download

    2] TeamViewer Remote Control

    Best Remote Connection Apps For iPhone And iPad

    TeamViewer is an old player in this game, and it knows how to attract people. TeamViewer application is compatible with almost any popular PC and mobile platform such as Android, iOS, Windows, Mac, etc. For your information, you can install the TeamViewer app on iPhone as well as the iPad – the only requirement is iOS 10.0 or later version. It has an elegant user interface where you can find all the option you might need. It can mirror your remote computer screen onto your mobile so that you can find all the options on your screen and manage things accordingly. The unique functionality of this tool is online chatting. Let’s assume that you are trying to solve an issue on your friend’s computer, and you need to talk to him to understand the problem better. At such a moment, you can make use of this function. Download

    3] VNC Viewer

    Best Remote Connection Apps For iPhone And iPad

    VNC Viewer is another important player in this list. Although it doesn’t offer as many features as other tools do, you can get your job done with the help of this simple remote desktop app for iOS. This is very easy to get started with this tool, as you may not need to go through a lot of steps. Like Microsoft Remote Desktop and TeamViewer, you can manage every aspect of your remote computer with the help of VNC Viewer. However, things are not as easy as it is said. You might need to find the option manually as they appear differently on different devices. The last but not the least feature is the trackpad functionality. In other words, you can turn your touchscreen into a trackpad so that you can use it for scrolling and all. Regarding compatibility, you need iOS 9.0 or later versions. Download

    4] Jump Desktop

    Best Remote Connection Apps For iPhone And iPad

    Although Jump Desktop is a paid application, it has a lot of popularity because of the features. It offers a lot of options so that users can manage everything without any issue. No matter whether you want to type something, open application, change any settings, or anything else, you can perform that task on your remote computer from your iPhone or iPad. If you enable iCloud connection synchronization, you will be able to synchronization all the connections of Jump Desktop as well. It also offers SSH tunneling with a password and public key authentication. If you are using an iPad Pro, you will get one extra feature in this application, and that is full support for split-screen with Apple Pencil. Regarding the price and compatibility, you need to pay $14.99 to download it on iOS 11.4 or later version. Download

    5] Screens

    Best Remote Connection Apps For iPhone And iPad

    Like Jump Desktop, Screens is also a paid remote desktop app for iOS, but it offers more features than some other tools, as mentioned above. The most important feature is the Curtain Mode. Let’s assume that you do not want your friends or somebody to know what you are doing on the remote computer. At such a moment, you can use the Curtain Mode to obscure the display. The second feature is the secure connectivity. According to the official app download page, it establishes a secure connection between the mobile and remote computers. The third essential option is a gesture that will let you perform various tasks with hand gestures. Like the Jump Desktop, you can convert your iPhone or iPad screen into a trackpad for scrolling or anything like that. If you like all the features, you can purchase it for $19.99, and you can download it on iOS 13.0 or later version. Download

    6] LogMeIn

    Best Remote Connection Apps For iPhone And iPad

    LogMeIn is a simple yet quite handy remote connection app for iPhone and iPad that you can download for free from the official App Store. It has the option to access your home and work computers and control your computer like you are sitting in front of it. You can adjust mouse settings, screen settings, zoom slider, change the display resolution, brightness, etc. On the other hand, it produces HD video and sound so that you do not miss out on anything. The highlight of this tool is the multi-monitor view that lets you switch between monitors by shaking or using three fingers. If you like the features of LogMeIn, and you want to download it, make sure you have iOS 12.0 or later version. Download

    These are some of the best remote connection apps for iPhone and iPad. I hope you will like them.

  • Best Security And Antivirus Apps For Android

    Best Security And Antivirus Apps For Android

    Mobile users often face a lot of problems regarding security and data encryption. If you are using an Android mobile, the chance is higher than using an iOS device. Most of the attackers often attack Android mobiles because of some obvious reasons. If you often face different issues while using an Android mobile, you should check out this article. Here are some of the best security and antivirus apps for Android so that you can make your phone secure from attackers.

    Before getting started with these apps, you should know the features, price, compatibility, etc. Therefore, here is everything you might want to know.

    Best Security And Antivirus Apps For Android

    1] Kaspersky Antivirus

    Best Security And Antivirus Apps For Android

    Kaspersky is a well-known security application for different devices, including Android. You can make your mobile secure with the help of this security shield. Some of the important features are antivirus protection, background checking, find my phone, anti-theft, app lock, anti-phishing, and web filter. It has a very safe and secure filter so that it can detect malware and other phishing attacks on your mobile. Also, if your phone doesn’t have an in-built app lock facility, you can get that with this app. You can download this application for free for Android 4.2 or later version. However, you may need to spend some money to unlock all the features. Download

    2] Avast

    Best Security And Antivirus Apps For Android

    Although Avast has been facing some issues with Google Chrome, you can install this security app on your Android mobile to make it secure. This tool offers a lot of features so that you can protect your device from different aspects. Regarding the features, it has anti-malware service, app lock, anti-theft, photo vault, VPN, power saving mode, privacy protection, firewall, RAM booster, junk files cleaner, web shield, Wi-Fi security, app insights, etc. There is another feature that is quite popular among Avast users, and that is Wi-Fi speed test. Meaningless to mention that you can check your Wi-Fi speed with the help of this option. It requires Android 5.0 or later version, and you need to buy some features to get the fully working version. Download

    3] AVG AntiVirus Free

    Best Security And Antivirus Apps For Android

    Like Avast, AVG is also facing some issues with Google Chrome, but it is also offering a pretty good anti-malware shield for Android devices. As the name suggests, it is available for free for Android 5.0 or later version. Like other security apps, it has some useful options for your benefits. For example, you can scan apps, games, settings, stop unnecessary background process, use power-saving mode, lock apps with a PIN, password, etc. and more. It has an option to scan Wi-Fi networks for possible vulnerabilities so that you can connect to secure Wi-Fi connections only. On the other hand, you can find a VPN integrated into this tool to browse the internet anonymously. Download

    4] Bitdefender Antivirus Free

    Best Security And Antivirus Apps For Android

    Bitdefender is a popular name in the antivirus and network security industry. You can install the Bitdefender application on your Android mobile running Android 4.1 or later version so that you can get a better device. Like the user interface, it comes with some awesome features. The anti-malware engine of Bitdefender antivirus is handy when you need to scan files, apps, games, settings, etc. Apart from that, it is quite lightweight so that it doesn’t make your phone slow in any way. The free version of Bitdefender is more than handy, but you can unlock all the options by upgrading to the Total Security edition. The highlight of this tool is the configuration as you do not need to change anything to get started with this tool. Download

    5] McAfee Mobile Security

    McAfee is another convenient mobile security shield for your Android mobile, and it is compatible with Android 4.2 or later version. It is available for free, but you can upgrade it to the PRO version that offers even more functionalities. Talking about the free options, you can get anti-theft and antivirus. On the other hand, you can get a device lock facility, find my phone, app uninstall protection, manage app remotely and more. The paid version has some more options that you can use to get more jobs done. You can find Wi-Fi guard VPN to browse the internet anonymously, block risky websites, guest mode, app lock, etc. The best thing is that you cannot find any advertisement in the paid version. Download

    6] AdGuard

    AdGuard is installing

    AdGuard is an ad-blocking application for Android that you can use to block advertisements on your Android mobile. No matter whether the source is an application, website, or YouTube video, you can block the ad with the help of AdGuard. It is quite lightweight so that you do not face any problem while using it. The free edition of AdGuard is good enough for a regular user, but you can find more options in the paid version. One important feature is the block or allow WebRTC so that you can unlock restricted content on various websites. The user interface of AdGuard is uncluttered as all the options are well organised. Download

    7] Lookout Mobile Security

    Lookout Mobile Security is yet another security shield for Android 4.4 or later version, and you can download it for free. It has all the basic features like other apps mentioned don this list. For example, you can get antivirus, find my phone, etc. However, the paid version offers some other features so that you can get more out of it. For instance, it includes Wi-Fi security, theft alerts, safe browsing, privacy advisor, lock & wipe, etc. The UI of Lookout Mobile Security is neat and clean. This is one of the reasons why people like this application over others. Download

    These are some of the best security and antivirus apps for Android. I hope this will help you to make your phone secure.

  • What Is The Best Cloud Storage For Multiple Users

    What Is The Best Cloud Storage For Multiple Users

    Although there are so many cloud storage provides, not all of them are good enough for more than one person. If you and your family want to use one single cloud storage package, you cannot install standard Google Drive on all mobiles and computers. That is the reason why you should check out these best cloud storage options for multiple users so that you can perform tasks together. These services will help you when you and your family members or team members want to upload and download files simultaneously.

    Best Cloud Storage For Multiple Users

    1] Dropbox For Business

    Transfer ownership of shared folder in Dropbox

    Dropbox is one of the best cloud storage services that has been in the market for a long time now. They offer a huge list of features, and all those things are compatible with every team member you have included in your account. This cloud storage service makes things easy for team collaboration so that people can upload, download, and manage files simultaneously without any problem. They offer a 30 days trial period, and it is recommended to use it before opting for a paid version. Talking about the price, the Standard version costs only $15/user/month, and it included 5 TB of storage, and you must have to include at least three members. On the other hand, the Advanced edition costs $25/user/month, and it offers unlimited storage, according to the official statement. Visit website

    2] Sync

    Best Cloud Storage For Multiple Users

    Sync is probably the most secure cloud storage service that you can use with multiple users. The advantage of using Sync is that there is no minimum limit on a number of users. For example, you must have to include at least three people to your Dropbox account, whereas you can start using the Sync account alone and then add more people on the go. Regarding the number, it is possible to add up to 100 people to your account, and they can transfer any amount of data between them. However, the total storage has a limitation, and that depends on the account. If you purchase the Standard version, it will cost you only $5/user/month, and it will provide 1 TB storage. The Plus version costs $8/user/month for 4 TB storage and the Advanced version costs $15/user/month for 10 TB storage. Check website

    3] SpiderOak

    Best Cloud Storage For Multiple Users

    SpiderOak is a very popular data backup service based in the USA (if you know what it means). It offers quite expensive plans, but the advantage of this SpiderOak is that you can back up an unlimited number of devices as long as you have the minimum free storage. Regarding the price, it offers 150 GB of storage for $6/month, 400 GB storage for $11/month, 2 TB storage for $14/month and 5 TB storage for $29/month. No matter which plans you choose, you can install it on an unlimited number of devices and back your data up. Feature and UI-wise, SpiderOak won’t disappoint you for sure. Check website

    4] pCloud

    Best Cloud Storage For Multiple Users

    pCloud is known as secure cloud storage and many other good reasons. The second reason is that you can use this cloud storage on multiple computers, or multiple people can use it at the same time. Although many people hesitate to buy pCloud storage because of peculiar pricing, you might like it after knowing the feature list. It is a convenient tool for team collaboration, and it works without compromising the basic security function. The file management system of pCloud is pretty good since it doesn’t make things complex. Regarding the price, it offers two types of pricing, i.e. annual and lifetime. You can get 500 GB storage for $3.99/month or 2 TB storage for $7.99/month (billed annually). On the other hand, if you opt for the lifetime pricing, it would be cheaper as the 500 GB variant costs only $175, and the 2 TB variant costs $350 only. Check website

    5] Box For Business

    Best Cloud Storage For Multiple Users

    Box is another handy cloud storage service that you can use when you want to allow multiple users to access one account. They have pretty good pricing and the features so that users get attracted quickly. The good news is that you can try any account for free so that you can know if it suits your needs or not. Talking about the features, it doesn’t have any limitations on the maximum number of users, but you must have to include at least three people to your account. Apart from that, you can get the app for your computer as well as mobile, check the version history of a file, get SSL support, manage all the users, etc. Unlike some other services, it has a limitation on the size of a single file upload. In other words, you cannot upload a single file that is more than 5 GB. Regarding the price, it starts from $5/user/month, and you can choose one that can fulfill your requirements. Visit website

    6] Google Drive Enterprise

    Google Drive

    Although users get the same user interface, this version is not the same as the regular Google Drive. You need to have a business email (you@yourcompany.com) to use the Google Drive Enterprise version. As usual, you can use all Google Drive features and online editing tools such as Google Docs, Sheets, Slides, etc. If you are willing to opt for this service, you should use the pricing calculator to know the estimated monthly bill. For your information, you need to pay $64/month, if you add ten users and 20 GB for each person. Check the pricing before signing up.

    These are some of the best cloud storage services for multiple users. I hope you will like them.

  • How To Enable Two-step Authentication In Firefox Account

    How To Enable Two-step Authentication In Firefox Account

    Firefox is one of the best browsers in terms of security and user experience. Google Chrome is another similar browser, and it depends on personal preference, whether you should install Chrome or Firefox. Like Google Chrome, you can synchronise your browsing history, bookmarks, etc. in Firefox as well. For that, you have to get a Mozilla Firefox account and sign into that on multiple devices. However, if you are worried about your information, you can check out this tutorial. Here is how to enable two-factor authentication in a Firefox account.

    Feature-wise, Mozilla Firefox is one of the best browsers that offer countless options so that users can perform various tasks effortlessly. For example, this is possible to use different experimental features, install add-ons, etc. On the other hand, the browser security of Firefox is pretty good as well that help you protect your information securely.

    If you want to synchronise your browsing history, cookies, bookmarks, saved passwords, etc. across multiple devices, you need to get a Firefox account. Otherwise, the synchronisation process won’t work for obvious reasons. The best thing about this account is that you can turn on two-factor authentication. The 2-step verification is a handy security functionality that lets you protect your account from being attacked. If you enable it, you need to verify your login by entering an OTP sent to you on your email or mobile number.

    This is very easy to enable two-step verification in Firefox account, and you can do that from the website as well as the Firefox browser. No matter which method you follow, you will end up visiting the Firefox website. For more information, this is recommended to follow the following step by step guide.

    Enable Two-step Authentication In Firefox Account From The Web

    To enable two-step authentication in Firefox account from the website, you need to follow these steps-

    1. Visit the official website of Firefox: https://accounts.firefox.com/settings
    2. Sign in to your Firefox account.
    3. Click the corresponding Show button
    4. Verify your email address
    5. Install Google Authentication on mobile
    6. Scan the QR code and enter secret code
    7. Get two-factor authentication enabled in your Firefox account

    Before getting started, you should know that you must have to verify your email address associated with your Firefox account. Also, you need the Google Authenticator application on your mobile. You can install it on Android and iOS mobile.

    To get started, visit the Firefox website. You can do that by entering this URL in the address bar of your browser: https://accounts.firefox.com/settings

    Head to that website and sign in to your account with valid credentials. If you have already verified your email account, you do not have to perform these steps. However, if you didn’t do it earlier, you need to click the “Show” button next to the Two-step Authentication label.

    It will ask you to verify your email address. In other words, you will get an email, and you need to follow the instructions to get it done.

    Enable Two-step Authentication In Firefox Account From The Web

    Next, visit the same account settings page and reload it. You should get a turn on message. Click on it, and scan the QR code using your mobile via Google Authenticator app. If you have installed something else, you need to use that to scan the code accordingly.

    Your authenticator app will show you a code that you need to enter in the Firefox account settings page. After that, the two-factor authentication will be turned on automatically.

    Enable Two-step Authentication In Firefox Account From Firefox Browser

    To enable two-step authentication in Firefox account from Firefox browser, follow these steps-

    1. Open Firefox Options
    2. Go to Sync tab
    3. Click the Manage account option
    4. Verify your email address and turn on two-factor authentication

    At first, you need to open the Options page in your Firefox browser. Click the Menu button, where you can find the “Options.” After that, click the Sync option from your left-hand side.

    If you have already signed into your Firefox account, you can find an option called Manage account, and you need to click on it.

    Enable Two-step Authentication In Firefox Account From Browser

    If you haven’t done that yet, you need to enter your Firefox account details first. After that, you can find the Manage account option. Now, you can follow the same steps as mentioned above to turn on two-step authentication in your Firefox account.

    After enabling two-step authentication, you have to enter the OTP every time you go to log into your Firefox account.

  • How to Make A New Gmail Account On Android And iOS

    How to Make A New Gmail Account On Android And iOS

    Although you can use an iPhone or iPad with a Gmail account, this is almost impossible to get a fully functional Android mobile without a Gmail ID. If you have got a new Android or iOS mobile and you do not have a Gmail account, you should follow this tutorial. Here is how to make a new Gmail account on Android and iOS device for free.

    Undoubtedly, Gmail is the best email service in the market. No matter whether you want to use it for personal purpose or business, you can have a Gmail account on your mobile or computer to connect your people. There are several things about Gmail that help it stand out in the competitive crowd. Some of the best features of Gmail are spam protection, two-factor authentication, app compatibility, user interface, etc. If you have not got a Gmail account till date, this is probably the best time to opt for it instead of Outlook or something else.

    As Android is a part of Google, it requires a Gmail ID to make the device complete. Without having a Gmail account, you cannot open the Google Play Store to install apps, synchronise notes, contacts, calendars, etc. Although it is possible to get substitutes to them, those apps make things easier for a regular mobile user. On the other hand, if you have an iOS device and you want to opt for Gmail instead of something else, you can check out this tutorial. This following step by step guide will be helpful when you want to create a Gmail account on mobile, but you do not have access to a computer.

    Making a Gmail account is very easy and meaningless to mention that Gmail is free to use. You can spend money to grab more storage on Google Drive, but that is not mandatory for all. Also, the steps are precisely the same for Web, Android, and iOS. Therefore, if you know the process to create a new Gmail ID on your computer, you can perform the same steps to get it done on your mobile. For your information, we have attached screenshots of an iOS mobile, but you can perform the same thing on your Android phone.

    How to Make A New Gmail Account On Android And iOS

    To make a new Gmail account on Android and iOS mobile, follow these steps-

    1. Open a browser and go to mail.google.com website.
    2. Click on the Create account button.
    3. Fill out the form with the required information
    4. Start using a new Gmail account

    To know more, you need to keep reading.

    At first, you have to open a browser on your mobile and make sure that you are not signed in to your existing Gmail account. If yes, you need to sign out from that account first and then perform these steps. To verify that, you can try to open your Gmail account. If it is opening your Inbox, you need to sign out from that account. Then, visit the website called mail.google.com.

    On this website, you can find a button called “Create account.” This option will let you create the account for you. After clicking this button, it will ask you whether you are creating an account for yourself or your business. If you choose the business, you have to get a domain. However, if you want to get a @gmail.com email ID, you need to select the first option called “For myself.”

    How to Make A New Gmail Account On Android And iOS

    Then, it will show you a form where you have to enter some required information. For example, you have to enter your name, username, password, etc.

    How to Make A New Gmail Account On Android And iOS

    Once you enter them, you will have to verify a recovery method. For example, you can use your phone number or another email ID. This will be used if you forget your password or something like that.

    Security Notes For Gmail:

    • Always use two-factor authentication in your Gmail account. It will let you add an extra layer of security so that others cannot use your account by guessing the password.
    • Always use a strong password. Do not use your name, birthday, your pet’s name, school name, location, etc. Try to use a password generator to generate a strong password.

    That’s it! Now you can start using your Gmail ID for your work.