How to Boot into Safe Mode in Windows 10
Safe Mode is one of the easiest ways to solve different problems related to software crashes, computer hang/lag, driver problem, hardware diagnoses, service management, etc. If you are using Windows computer and want to boot into Safe Mode in Windows 10/8/7, here are some easy steps to get that done. Before going forward, you should know the benefits of Safe Mode in Windows computer.
What is Safe Mode?
Safe Mode is such a state when your system can detect a problem related to different crashes, driver issues, startup problems, and so on. In other words, your system starts with the minimum driver. In most of the cases, the system doesn’t even start with any driver. and hence, you can troubleshoot Windows problems using Safe Mode. If you are getting any problems that are somehow related to the core Windows program, you can certainly fix that issue with Safe Mode.
Different types of Safe Mode
There are mainly three types of Safe Mode available on Windows 7 and later versions. Those are-
- Minimal Safe Mode: This is probably the best thing your computer can offer to you if you want to solve a various problem. From driver related issues to font problem to display problem, you can troubleshoot any issue by booting the computer into this mode. If you enable this option, your computer will start with minimum driver support and that’s why you can fix such detect and fix such issues within moments.
- Safe Mode with Networking: If you need to solve network related issues on a Windows computer, you can choose this option of Safe Mode. You will have internet connection related drivers and all the other related to networking.
- Safe Mode with Command Prompt: If you want to perform various command line tasks, you should boot into Safe Mode with Command Prompt. In this case, you can find Command Prompt after booting up your computer.
You need to choose one of these three variations in the following steps.
Boot into Safe Mode in Windows 10
There are two different methods you can try to boot into Safe Mode in Windows 10. Both the options do not require any third-party software and you can execute them with the help of inbuilt tool of Windows 10. Although the first method can be performed by Windows 7/8/8.1 users but the second method cannot be performed by them since that is specifically for Windows 10 users.
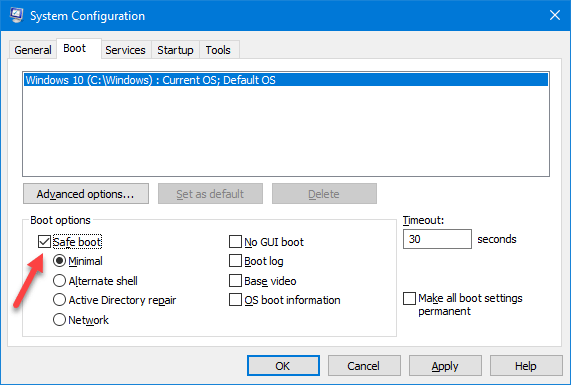
Method #1 – Using System Configuration Window
- Press Win + R, type msconfig and hit Enter button.
- Go to Boot tab.
- Make a tick in the checkbox that says Safe boot and select Minimal.
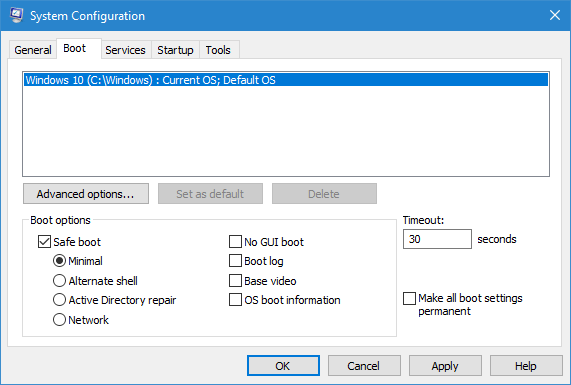
- Hit the Apply button and restart your computer to boot into Safe Mode.
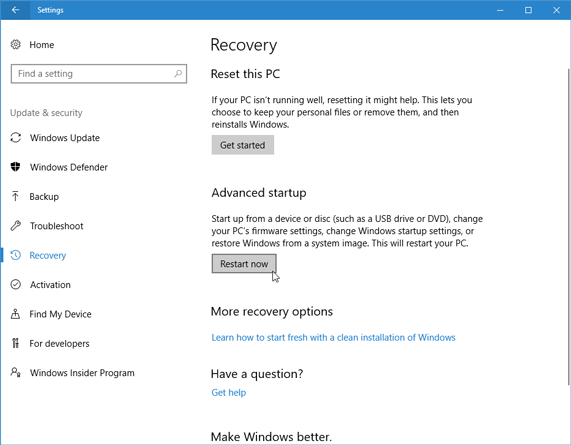
Method #2 – Using Recovery
- Press Win + I to open Settings Panel.
- Go to Update & security > Recovery.
- Click on Restart now button under Advanced startup.
- You should find a Continue button on your screen when your computer will boot up.
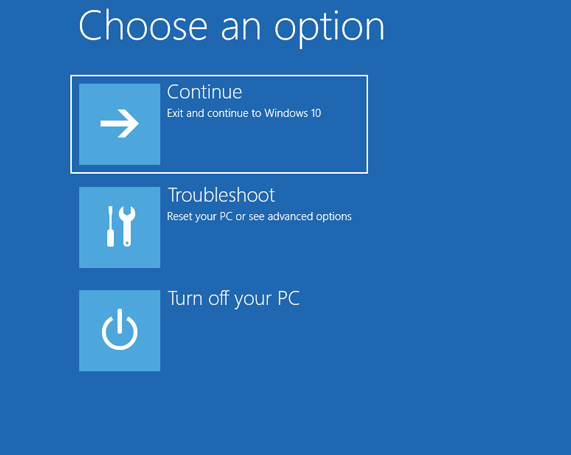
- Select Advanced options.
- Select Startup Settings.
- Click on Restart button to choose one of the Safe Mode types.

- On the next screen, you should find various types of Safe Mode. You need to choose one. To choose press the corresponding digit.
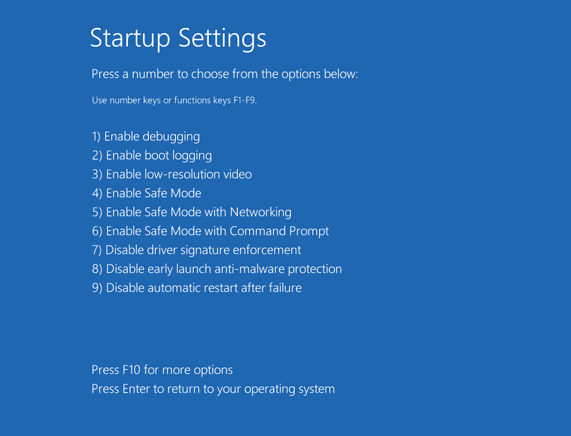
- After that, your computer will start into Safe Mode with that selected settings.
You can perform this method only when you can start your computer. If you cannot boot your computer, you need to press the Shift + F8 buttons right after getting the beep sound. If you are using Windows 7, you do not need to press the Shift button.
How to disable Safe Mode in Windows?
If you are in Safe Mode and you want to go back to the normal startup, you need to follow these steps-
- Press Win + R, type msconfig, and press the Enter button.
- In the Boot tab, remove the tick from the checkbox that says Safe boot and click on Apply.
- Now restart your computer.
That’s it! Hope this solution would be helpful for you to boot into Safe Mode in Windows 10/8/7.