Everything You Need to Know About WiFi Sense in Windows 10
We all know about WiFi and how it works to connect our mobiles, tablets and PCs to access the internet. A WiFi router is enough to spread the internet connection around the router. On the other hand, a laptop can also be a virtual WiFi router that can help you to do the same thing what a WiFi router does.
However, in Windows 10, a feature has arrived with WiFi. If your PC/Laptop supports WiFi, you can get the option right in the brand new Settings panel of Windows 10. This new feature is called WiFi Sense.
What is WiFi Sense?
![]()
The working process of WiFi Sense is very simple to understand. If you turn on WiFi Sense in Windows 10, your Skype, Outlook and Facebook friends can access to your WiFi hotspots to which you were connected before. Your Skype, Outlook and Facebook friends do not need any WiFi password to connect to that WiFi hotspot.
Is that cool?
That means, if you were connected to your home WiFi router and enabled WiFi Sense in Windows 10, your friends can easily access your WiFi router without having password that generally requires to connect with the router.
Advantage of Using WiFi Sense in Windows 10
This is really useful for them who do not want to tell the password to someone, who has come to his/her home for a small span of time. Simply connect with the guest on Skype or Outlook or Facebook and then give him/her to access their WiFi. As simple as that.
Disadvantage of Using WiFi Sense in Windows 10
This is probably the worst feature of Windows 10 since it can be vulnerable within a few months. Attackers always try to get unauthorized access to popular companies’ web servers and Microsoft is one of them. If you turn on WiFi Sense in Windows 10, your WiFi passwords and some other credentials will be stored into Microsoft server, what can be breached any time by any attacker. Hence, you will get into trouble for sure.
On the other hand, why will someone want to share his WiFi with someone without his or her permission? WiFi Sense is doing exactly same with you. It is giving your friends and all the people, who are connected with your on Skype, Outlook or Facebook, the access to use your WiFi without your knowledge. When your connected people will use your WiFi, it will not ask you to approve because Windows 10 has no such option.
Now, it is up to you. If you want to keep turning it on, leave it as it is. But, if you want to turn it off, you can follow the subsequent steps.
Turn Off WiFi Sense in Windows 10
The procedure is very simple. In fact, there are different methods to turn of WiFi Sense in Windows 10. The most user-friendly method is mentioned below.
At first, press “Win + I” to open new System settings panel. Therefore, go to Network & Internet“, “WiFi”. After that, click on “Manage Wi-Fi Settings”. You will get a window like this,

Just toggle both buttons those say,
- Connect to suggested open hotspots
- Connect to networks shared by my contacts
It will let you disable WiFi Sense and you as well as your contacts will not be able to get the shared WiFi password to access the network.
Turn Off WiFi Sense using DoNotSpy
DoNotSpy is a wonderful software for Windows 10 to deal with the privacy leaks. However, you can use DoNotSpy to turn off WiFi Sense of Windows 10. To do so, download and install DoNotSpy in your PC. Following that, open the software, scroll down and fine out “Disable WiFi Sense”. Then just make a tick on the corresponding checkbox and hit the “Apply” button.

That’s it.
Disable WiFi Sense using Registry Editor
This tricks works smoothly on Windows 10 Pro and Enterprise version. You can use Registry Editor to disable WiFi Sense. Although, it you have to do some complex things but they are not much time consuming.
At first, press “Win + R”, type regedit and hit enter. Therefore, navigate through the following path,
HKEY_LOCAL_MACHINE >> SOFTWARE >> Microsoft >> WcmSvc >> wifinetworkmanager >>config
Right click on the right hand side, select “New”, and create a new “DWORD (32-bit) Value”.
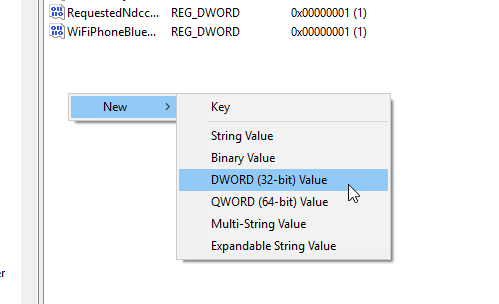
Name it “AutoConnectAllowedOEM” and set the value to 0.
That’s it! Now, your WiFi Sense is disabled.
Hope these methods will help you a lot.