How to Connect Two Computers Without a Router Or Wireless Connection
Suppose you have multiple computers at your workplace – one of them is a desktop running Windows XP while the other one is a laptop running Windows7. You want to connect both computers to a home network for sharing files, documents as well as the internet connection without having to go through complicated network setups.
Connecting two computers is easily achieved using either a router or a network hub but if you have a simple ADSL modem with multiple LAN ports, it would be very easy to connect multiple computers across a small home network.
Note: Before modifying your Windows network or modem settings, make sure you know what you are doing and would be able to revert back if something fails. Also check whether you have the necessary drivers installed.
How to Create a Small Home Network Using an Ethernet cable
You will need two things – a pair of Ethernet cables and a modem with more than one LAN ports.

Modem With multiple LAN ports and an Ethernet cable
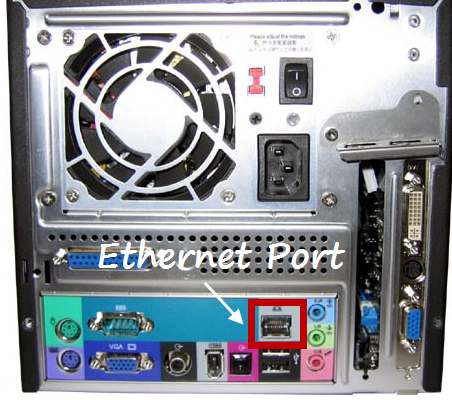
Connect one side the ethernet cable in the network LAN port of your computer and the other side to the LAN part of the modem. Take another ethernet LAN cable and repeat the same procedure for the second computer as well. Thus, you have two computers connected to the modem and the setup will look like the following :

Connect Two computers Via LAN and ethernet cable
Setting Up the Internet Connections In Both Computers
Once both the computers are connected to the modem, you have to setup a new connection for connecting to the internet. There are basically two ways to achieve this:
- Configure the modem to automatically connect to the internet.
- Choose one of the computers as host and the other one as client and share the internet connection between them.
I would prefer configuring the modem to automatically connect to the internet because of two reasons. First, I need not switch on the host computer every time I want to browse the web on the client computer. Configuring the modem would allow any computer to browse the internet independently.
Second, sharing the internet between two computers involves complicated network settings which is unnecessary and when you format your system you have to configure wireless connection and other settings all over again. But if you choose to automatically connect to the internet via modem, the settings are stored in your modem only and thus will work on any computer the modem is connected to.
Setting up the Modem to Automatically Connect to the Internet
1. Start any one computer, open the browser and type 192.168.1.1 in the address bar to log into the administration panel of your modem.

Configure Modem to Automatically Connect to the internet
The default username and password combination is (admin/admin) or (admin/password). If you can’t login to your modem, please check with the vendor’s website for the default username and password or try rebooting the modem.
2. Click the WAN (Wide Area network) link and select PPP over Ethernet (PPPoE). Next, enter the username and password provided by your ISP in the PPP username and password fields.
Remember to choose the authentication method as “Auto”

Modem Settings For automatically Connecting to the internet
3. Click “Enable WAN service” and then choose “Obtain IP address automatically”. Click Save and you are done. You have to reboot the router for the changes to take effect.
Once the settings are in place, you will see that the both the computers are automatically connected to the internet. There is no need to setup a connection for connecting to a broadband network connection anymore.
Please note that the internet connection has not been shared and it works independently whether or not both computers are connected in a network.
Setting Up the Home Network and Sharing Files Between Both Computers
Assigning Workgroup in Windows XP:
1. Start the computer running Windows XP and right click “My Computer” from the start menu. Choose properties and switch to the “Computer Name” tab.

Change Workgroup settings in Windows XP
2. Click “Change” and enter a unique name in the Workgroup text field (e.g Home, Office, My Network etc).
Workgroup settings in Windows XP
3. Now you have to turn on file sharing in Windows XP. To do that, open Network connections from control panel and click “Create a new connection”. Choose “Set up a home or small office network
4. Choose the connection method as “Other” and enter the Workgroup name in the next window. This Workgroup name should match exactly with the Workgroup name mentioned earlier (check screenshot)
5. In the next window, select the radio button “Turn on File sharing” and click “next”.
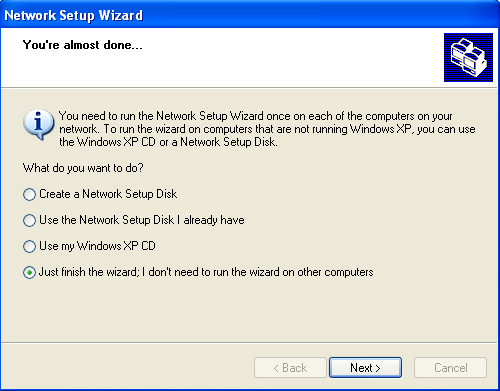
6. Finish the wizard and choose ” Just finish the wizard, i don’t need to run the wizard on other computers.”
You are done setting up a home network connection in Windows XP.
Assigning Workgroup in Windows 7:
1. Open Control panel and type “Workgroup” in the search box. Click “Change Workgroup name”, as shown below:
Change Workgroup settings in Windows7 to connect to a home network
2. In the “Computer Name” tab, click “Change” and assign the same workgroup name which you assigned to the other computer running Windows XP.
3. Open Network and sharing center and click “Choose homegroup and sharing options”
4. In the next window, choose the libraries which you want to share in your network. This includes sharing My pictures, My documents, music, videos and printers. Next, click “Change Advanced sharing settings”.
5. Now you have to turn on Network discovery and file sharing in Windows7. Select the radio button “Turn on Network discovery” and “Turn on file and printer sharing”.
Also remember to select the checkbox “Turn on sharing so anyone with network access can read and write files in the public folders”. This will allow you to copy or move files from your other computers to this computer directly via the public folder.
6. Reboot both the computers and the setup is complete.
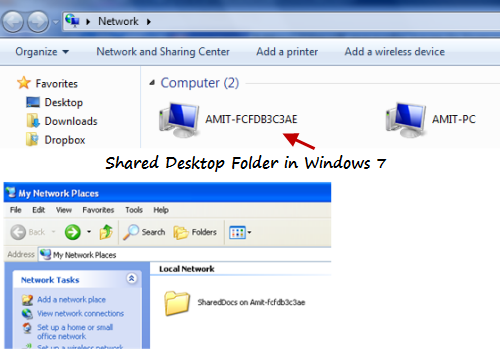
Now both the computers are connected in a small home network and you can move files as easily as a simple copy and paste. To copy files, all you have to do is go to “Network” or “My Network places” and paste the files in the public folder of the other computer.
Sharing Keyboard and Mouse Between Computers Connected in a Network
Wouldn’t it be a great idea to share keyboard and mouse between two computers connected in a network ? You can use a single keyboard and mouse to control both the computers, can share windows clipboard data and do a lot more.
Do you have multiple computers at your workplace? Do you prefer a LAN connection or use a router? Please share your ideas in the comments section.
Tip: How to Secure your Wireless connection from bandwidth theft.