Share Keyboard and Mouse among Two Computers Connected Via LAN
I use two computers at my desk – an HP 520 notebook running Windows vista along with an Intel P4 desktop on Windows XP. Both the computers are connected via LAN using an Ethernet cable and I share internet connection between them using an ADSL router.
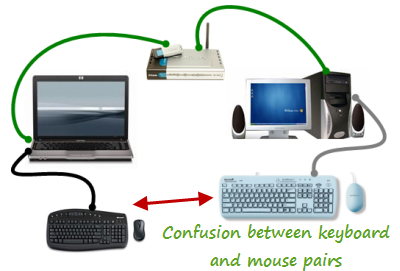
The problem comes when I get confused between the keyboard and mouse pairs. Sometimes, I move the mouse of my desktop computer thinking that I am moving the mouse of my laptop. Another disadvantage of the above setup is “Desk clutter” – caused by wires, cables and peripheral devices.
With InputDirector, you can remove the extra keyboard and mouse if both the computers are connected across a network (LAN or WAN). You can operate both the computers using a single mouse and keyboard as described below:
How to Share Keyboard and Mouse across Computers connected in a Network
Let’s assume you have two computers at your workplace – computer1 is the host or “Master” while computer 2 is the client or “slave”. Both the systems are connected through a Local area network connection and you can share files, documents etc. Following are the steps involved to share mouse and keyboard across multiple computers:
1. Install Input Director on both computers.
2. Open InputDirector in the “Host computer”. The computer whose mouse and keyboard you will use to operate both the computers is the “Host Computer”. The other computer is called as “Slave system”.
3. Go to “Global Preferences” and select the option “On Start, Input Director is Enabled as Master”. Also, select the checkbox “Share Clipboard”. This will allow you to quickly copy files across the two systems.
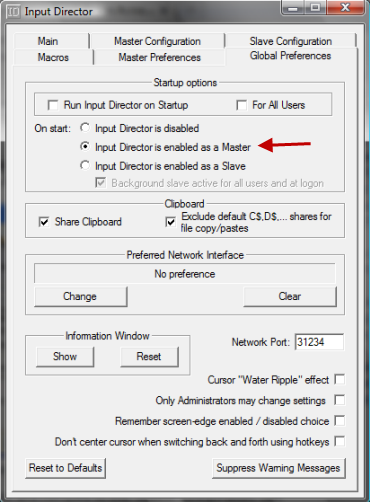
Master Configuration
4. On the Slave System, right click “My computer” from the start menu and select “properties”. Switch to the “Computer Name” tab and note the name of the Slave system.

Find Computer name of Slave System
5. On the “Host” system, open Input Director and navigate to the “Master configuration” tab. Click “Add” and add the name of the “Slave” system.

Add Slave System in Master computer
6. On the Slave System, open Input Director and navigate to the “Slave configuration” tab. Enter the name of the Master computer and select the option “Allow any computer to take control”.
Slave computer settings
7. Hit “Ok” and you will see a system tray notification saying “The Slave system is now available”.
This means that you are ready to share the keyboard and mouse of your master computer with the slave computer.
Sharing the mouse: Just move the mouse of master computer around the edge of the screen and it would appear in the monitor of the slave system. You can then operate the slave system with the mouse of the master system and do all kinds of work – even shut down the slave system. Move the mouse to the edge of the slave screen, and the cursor returns to the master computer.
Sharing the keyboard: To share the keyboard, first move the mouse in the monitor of the slave system. Then start typing in the master computer’s keyboard and the words would appear in any application window of the slave computer.
Watch the following video demo to learn how Input Director works:
The application also lets you share clipboard data. Suppose you want to copy a file from the slave computer to the master computer without using “My Network Places”. Copy the file in the slave computer, move the mouse to the master computer and hit “Paste”. Done!