How To Check Last Login Details On Windows And Mac
If more than one person uses your computer, and you are the administrator of that PC, you should know the recent activities on your computer. No matter if you are using a computer or mobile platform, each operating system logs every action. Although mobile devices do not show anything related to log, you can find and check the last login details on Windows and Mac with the help of this tutorial. In this article, you can find the in-built method to know how to get the last login information and activity details.
Why should you check the last activity details?
Let’s assume that you are using a computer, but you often get some suspicious activities on your computer. At such moments, you should know what is happening and try to fix it as soon as possible.
This is very easy to check as there is no need to install any software or so. Microsoft and Apple included some functionalities and commands that you can use to know when a user logged in last time.
How To Check Last Login Details On Windows 10
There are mainly two ways to check the last login details on Windows 10. The first method can be used to check the exact time, and the second method helps you know the full activity. Also, the first trick is Command Prompt related, and the second method is Event Viewer related.
To get started, open up Command Prompt on your Windows computer. Following that, enter this command-
net user yourusername | findstr /B /C:"Last logon"
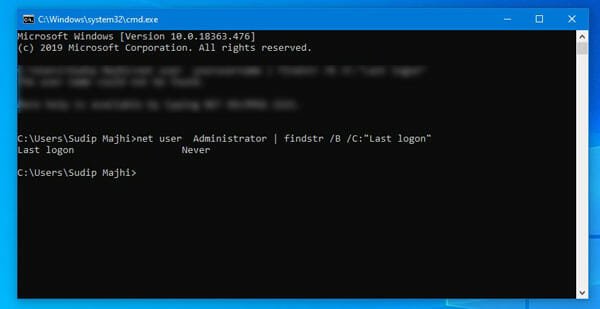
If you want to check the last login time of your user account, you need to replace “yourusername” with your actual username. However, if you want to check the last login details of another user account, you need to enter that username, respectively.
Also, you can check the last login time of your administrator account. If you enabled it earlier, you could find the date and time. However, if you didn’t enable it, you can find a result called NEVER.
To get information about the last activities on your computer, you can use the Event Viewer. Event Viewer is an in-built tool, and it does what it says. To use this in-built tool, you need to follow these steps.
At first, open up the Event Viewer on your computer. There are two ways to open it. First, you can press Win+R and type eventvwr.msc and hit the Enter button. Second, you can search for Event Viewer in the Taskbar search box and click the respective result.

After opening it, navigate to Windows Logs > Security. Now, you can find some keywords called Audit Success.
You need to check them one by one. If you double-click on any of these entries, you can find the user account details or username that performed the task.
This is also possible to copy the whole information so that you can share it with someone else.
In case you cannot find the Audit Success or Audit Failure message on your screen, you need to enable it from the Local Group Policy Editor. Although it is enabled in almost all the Windows 10 computers, you need to enable it manually if you turned it off in the past. To do that, open up the Local Group Policy Editor first. For that, press Win+R, type gpedit.msc and hit the Enter button. Following that, navigate to this path-
Computer Configuration > Windows Settings > Security Settings > Local Policies > Audit Policy
In the Audit Policy folder, you can find several policies. You need to double click on the “Audit login event” policy.
Following that, make a tick in the Success and Failure checkboxes and save your change.
From now on, you will be able to check the Audit Success message in the Event Viewer.
Like Windows 10, you can get the same details on your Mac computer as well, and that good news is that you do not need to install a third-party app for that. To get the last login details on Mac, follow the following steps.
How To Check Last Login Details On Mac
There are two ways to get this information. First, you can use the Console to check the failures and errors. Second, you can open various log files to get the information in your favorite text editor.
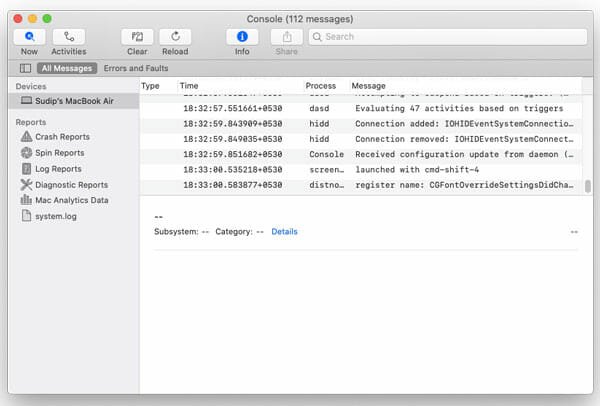
To use the Console, you need to open it. You can open the Utilities folder and double-click on the Console. App option. Alternatively, you can press Cmd+Space to launch the Spotlight search, and search for “console” to open it accordingly.
By default, it shows “All Messages” whereas you need to opt for Errors and Faults. Here you can find all the failed login attempts and some other information.
On the other hand, you can open different log files on your computer to get more specific information. Paths of different log files are as follows-
System Log Folder: /var/log
System Log: /var/log/system.log
System Application Logs: /Library/Logs
System Reports: /Library/Logs/DiagnosticReports
Mac Analytics Data: /var/log/DiagnosticMessages
User Application Logs: ~/Library/Logs
User Reports: ~/Library/Logs/DiagnosticReports
You can either navigate to that path, or you can open them directly using Terminal. To use the second procedure, you need to launch Terminal and enter a command like this-
Open /var/log
That’s all! Now, you can find the respective log files and open them with a text editor. You can use TextEdit or any third-party editor that you installed earlier.
That’s all! I hope these simple steps will be helpful for you.