How To Enable Or Disable Guest User Login On macOS Mojave
Last year Apple launched macOS Mojave for Mac computers, and it is indeed an excellent operating system that can be used by any person in the world. Irrespective of the job, you can utilize this platform for getting maximum benefits. Although it comes with so many features, not all of them available by default. That said, you need to turn some features on if you need them and off if you do not want to use them. For example, the guest user login. By default, it is activated on macOS Mojave. However, if you do not like this feature, you can turn it off.
What is guest user login in macOS Mojave?
If you have got a MacBook and you have set it up for the first time, you might have noticed that you entered some personal details including a username, password to create an account. This user account helps you access your Mac computer. Like Windows, you can customize your user profile. If someone has the password of your user account, he/she can access your computer. However, if you do not want to share your password since your laptop has some confidential information yet you want to allow the person to access your computer, you can let him/her use the guest user account. The guest user account holders cannot find any file that is saved in your standard account.
Advantage of guest user account
There are some advantages of the guest user account on macOS Mojave. Some of them are mentioned below.
- You can allow your kid or other family members to use your computer without sharing the password or when you are away from home.
- As guest user account holders cannot find your files, you can safely share the computer with other people.
- You can test an app freely.
Disadvantage of guest user account
Not only just advantages but also the guest user account option comes with some drawbacks as well. The primary problem with the guest user account is it shows the direct option on the login screen. That means, if someone has got your Mac computer and turned it on, he/she can start using that machine without admin permission. He/she just needs to click the corresponding guest user account option to get started with your computer.
Therefore, if you do not use the guest user account functionality and you want to hide the guest user login option from the lock screen of macOS Mojave, here is what you can do. There is no need to install any third-party software since it can be done with the help of in-built options provided by Apple itself.
How To Enable Or Disable Guest User Login On macOS Mojave
As by default, the guest user option is enabled, there is no need to do anything to turn it on. In case you want to use it, you can restart your computer and click the respective guest user account option on the lock screen to boot your MacBook into that state. To disable it on your computer, you can follow the following steps.
Step 1: Open System Preferences. For that, go to Desktop >> click the Apple logo in the top menu bar >> select System Preferences.
Step 2: Go to Users & Groups.
Step 3: This window should show a lock icon. If it is showing as locked, you need to click that icon first. After that, it will ask you to enter the user account password. Do enter that to make any change on that window.
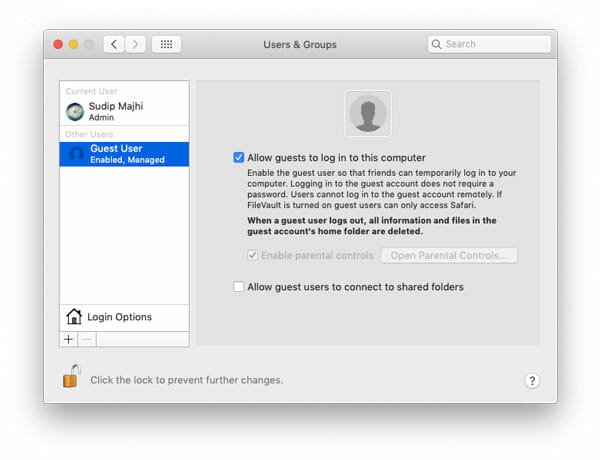
Step 4: After that, click the Guest User option.
Step 5: Allow guests to log in to this computer option should be enabled by default. You need to remove the tick from the corresponding checkbox.
That’s it! Now you should not find the Guest User option on your lock screen of macOS Mojave.
If you want to use guest user account on Mojave, one crucial thing you should keep in mind. All the files, browser history, etc. will be deleted if you logged out from the guest user account.