How To Setup And Use iCloud Email Forwarding
iCloud is deeply integrated into almost all Apple devices. If you own an iPhone or iPad or Mac computer, you can certainly get the benefit of iCloud, which is the native service of Apple. Although iCloud is meant for Apple devices only, you can use it even after being a Windows or Android user. However, if you want to forward email automatically from iCloud account, here is the step by step guide to set up and use iCloud email forwarding.
iCloud offers various services including cloud storage, email, and so on. Many people use iCloud as the primary email service. If you have used it earlier and set up a lot of accounts with your iCloud account and you do not have the option to change the email ID after adopting a new email service, you can forward those email to your new address with the help of this tutorial.
Many times we get an important email, but we do not use that mail account on our mobile or so. Also, many people want to maintain a single email address even if they have multiple email IDs. If you are one of them, who want to do that or just take a backup of your emails, you can set up email forwarding.
In case you do not know about email forwarding, you should read on. If you want to forward emails automatically from one email ID to another, you can use email forwarding functionality, which is provided by almost all the popular email service providers including iCloud (Apple). Therefore, following the following steps to get it done.
How To Setup And Use iCloud Email Forwarding
These following steps will let you forward all emails to another email ID from your iCloud Mail account.
Step 1: Go to iCloud.com and enter your Apple ID username and password to sign in.
Step 2: You should find buttons like Contacts, Calendar, photos, Notes, Reminders, Pages, etc. Along with them, you should get the Mail option as well. You have to click this button. It will open the iCloud Mail interface.
Step 3: After opening the iCloud Mail, you can see a settings gear icon on the bottom-left corner of the page. Click this button and select Preferences.
Step 4: Make sure you are in the General tab. Here you can find a label called Forwarding. You have to make a tick in the Forward my email to checkbox and enter an email ID where you want to forward your email to.

That’s it! From now onwards, you should find all the new emails in your other email inbox as well. There is another option called Delete messages after forwarding. If you select this option, it will remove the email from your iCloud Mail account after forwarding. It is useful when you want to keep a clean inbox for your iCloud Mail. However, this is not necessary when you want to keep all the email as it is.
How To Setup And Use iCloud Email Forwarding For Specific Sender
Let’s assume that you want to auto-forward email of a specific sender. It can be your work email, social site’s email, or anything else. For that, you need to follow the following steps.
Step 1: Open iCloud Mail account and go to Preferences.
Step 2: By default, you should land on the General tab. You have to switch from that to the Rules tab.
Step 3: Click the Add a Rule button.
Step 4: Select “is from” option from the “If a message” drop-down menu. Then you have to enter the email address of the sender. After that, select “Forward to” from the “Then” drop-down menu. Therefore, you have to enter the email address where you want to forward your email to.
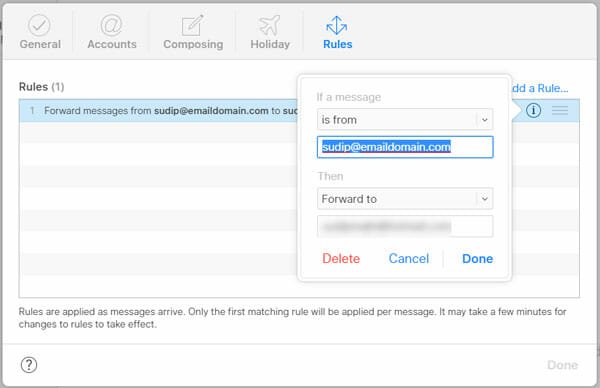
Step 5: Click the Done button.
In case you want to turn off auto email forwarding in iCloud Mail, you need to open the Preferences tab and remove the tick from “Forward my email to” checkbox. If you have set it up for a specific sender, you need to go to Rules tab >> click the “i” button of corresponding rule >> click the Delete button.
After that, you have to confirm the delete.
That’s it! This is as simple as said, and it is very useful when you want to keep only one email account, but you want to check emails from all the accounts you have.