How To Transfer iPhone Notes To Google Keep
iPhone or iOS is always the first choice of many people. However, there are many people, who use iPhone and Windows computer. If you are one of them or you have recently switched from iOS to Android, and you want to move your notes from the official Notes app for iPhone to Google Keep, here is what you can do.
Note taking apps play a vital role in every busy person’s life. It doesn’t matter whether you want to make a list for groceries or school project or business presentation; you can certainly use a note-taking app to consolidate all the essential things. The official Notes app for iOS is pretty good, and it works perfectly if you have the complete Apple ecosystem. However, Windows users may face a problem since they need to open a website to access all the notes on a computer. On the other hand, if you have decided to switch from iOS to Android, Google Keep might be a great solution. Or if you want to move from Notes to Google Keep on your iOS device, this article will be helpful since it will let you move all the iPhone notes to Google Keep. But one thing you should keep in mind that you must have an iOS device. Although there is a secondary method, it is effortless when you have an iOS device.
Method #1: Use The Official iPhone Notes App
It is easy, and it takes hardly thirty seconds to move a particular note from the Notes app to Google Keep. An important point you should know that this method will let you move one note at a time. You cannot transfer all the notes at once from one app to another. Also, you have to install the Google Keep app on your iOS device. You can visit this website to download Google Keep on your iPhone/iPad. After that, open the Notes app on your mobile and open the note that you want to move.
You should find a Share button. Tap on it and select Google Keep.

In case you cannot find it in the list, tap the More button and use the toggle option to enable it.
After using the Google Keep option, you can enter a label, and choose Google Keep account that you want to use.
At last, tap the Post button.
That’s all! Now you can find the same note in Google Keep.
The aforementioned trick is the only method to transfer notes from iOS Notes app to Google Keep. However, if you want, you can go through the following trick. It will let you synchronize all the notes with your Gmail account. Although it doesn’t allow you to sync existing notes, you can find all the new notes in your Gmail account. Following that, it is possible to save those notes in your Google Keep account.
Method #2: Use Gmail Synchronization
At first, you have to add your Gmail account in your mobile. For that, open the Settings app and go to Password & Accounts. You can find an option called Add Account.
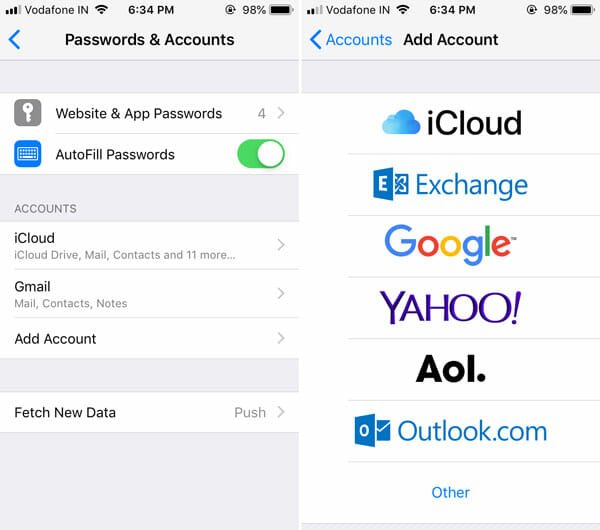
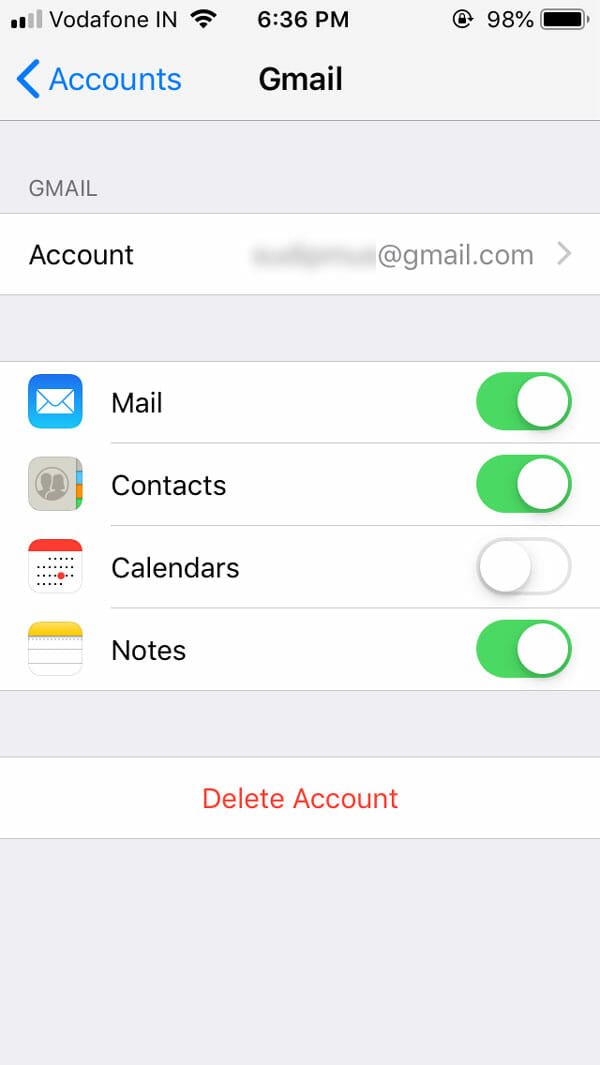
Tap on this and select Google from the following screen. After adding the account, tap the Gmail option on Passwords & Accounts window. On the next window, toggle the corresponding button to enable Notes synchronization.
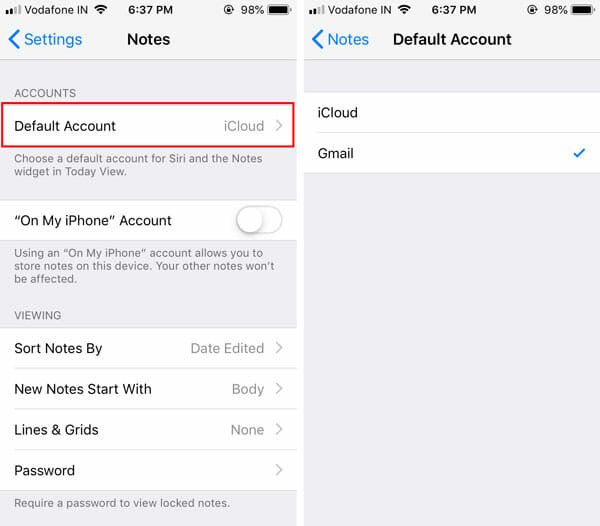
After that, open the Settings app window and go to notes option. From this window, you have to change the default account. By default, it is set to iCloud. You have to choose Gmail from the list.
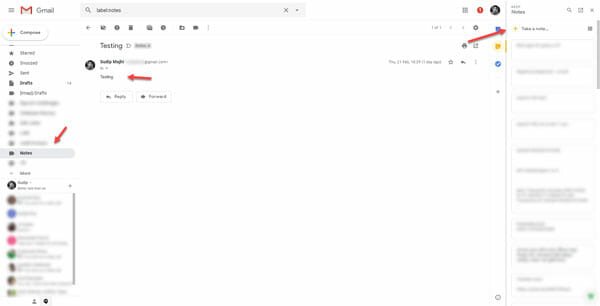
Now you can find GMAIL section in the Notes app. You can create new notes in that folder. By default, it synchronizes all the notes automatically with your Gmail account. To save them in your Google Keep account, open your Gmail account on a computer. You should find “Notes” label on your left-hand side. Click this label, and you should see all the notes here.
Open the note that you want to save in Google Keep and click the Google Keep icon on your right-hand side.
After that, follow the screen options to save the note in Google Keep.
That’s all! These are some of the best methods to transfer iPhone Notes to Google Keep. There is another way, but that is very time-consuming. You can always use the copy-paste technique to get it done.