Secure Your Apple ID With 2-Step Verification
Sure you have an Apple ID. Thats the reason why you are here. And I am very sure you want it to protect from others. Apple ID is not only used for iCloud data but also used for online purchases on the iTunes and App Store. So under no circumstances you want your credentials to be in someone else’s hands. Sure Apple have the security questions technique enabled, but how difficult can they be to be guessed? Or how much time does one need, to know the answers for them from you? Social Engineering is quite handy, you know.
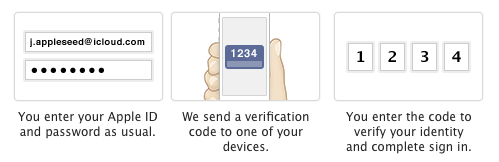
So that narrows us down to security of your account online. We always want to make sure that anytime someone logs in to our Apple ID, we make sure that, that someone is us. The best way to ensure just that is to enable 2-Step verification. This method makes sure that the person logging in to the account is the one authorised to do so. How? This mechanism uses your phone number or your authorised device to send you a verification code every time you try to log in to your account. After you enter the security code is the only way to log in. Thus making sure its you.
What Does 2-Step Verification Protect?
At this time 2-Step verification for Apple ID protects the following things:
- Signing in to My Apple ID to manage your account.
- iTunes, App Store, and iBooks purchases.
- Support from Apple regarding Apple ID.
Although we would like to see it coming for more features like iCloud and other Apple services. Keep your fingers crossed, we may see it in near future.
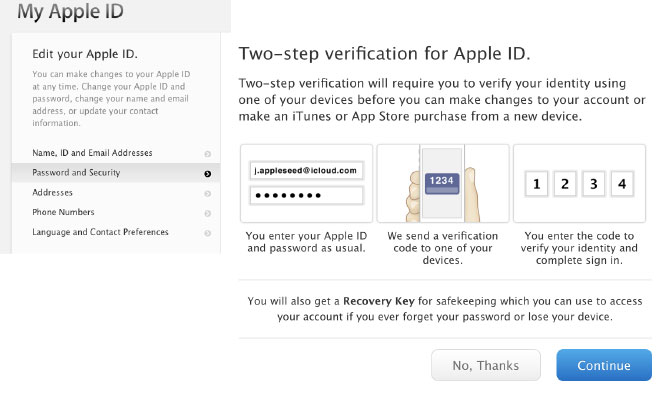
How To Enable 2-Step Verification for Apple ID
Setting up 2-Step verification for your Apple ID is not a tedious task to perform. All you need is your current Apple ID, and its password. And you are ready to begin. So lets see what steps are involved in the task:
- First thing you need is to go to appleid.apple.com and click on manage Apple ID option.
- Sign in with your Apple ID for which you want to enable the 2-Step verification.
- Click on Password & Security option on the left hand side panel.
- You will see the security questions that you have set for your account. Answer them and click on continue button below.
- Under the 2-Step verification click on the Get Started option.
- If you already have a device linked to iCloud service, click on continue to start the process, else read out the sections explaining 2-Step verification and when ready click next. Then enter your current phone number to initiate the verification process.
- Enter the 4 digit code that you will receive on your phone in a short duration.

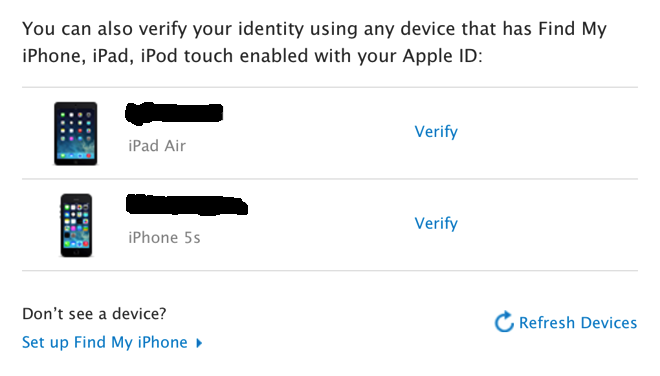
- After phone number verification is complete, you will see a list of devices you can verify. Click on Verify if you want to use any of those device for 2-Step verification, and when done click Continue.
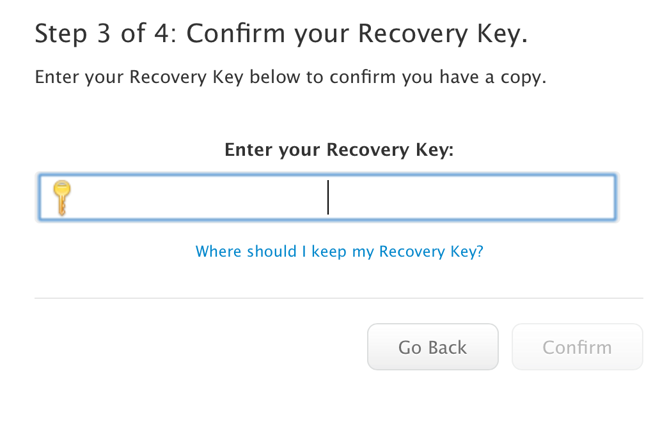
- On the following page you will see your recovery key, which you can use in case you forget your password. Print it out, or write it down in a safe place, and then click continue
- On the next screen, enter the recovery key you just received. Click confirm to continue.
- Click the checkbox that appears in the screen and then click Enable 2-Step verification. You will then see a confirmation regarding the process, click Done.
That’s it! You are done with 2-Step verification process. You can now enjoy the benefits of two step verification whenever you log in to your Apple ID. You have now made your account extra secure. Remember that now the security questions section will not appear as long as 2-Step verification is enabled for your account.
You can also disable the 2-Step verification for your account anytime by going to the Passwords & Security section and clicking on disable 2-Step verification option in the respective area. You will need either of your trusted devices, or your recovery key for the process.
Also when you have 2-Step verification enabled, you will need to have any two of these three things:
- Your Apple ID
- Your Recovery Key
- Your trusted device.
So what you think of the process? Is it secure enough? or does it need more improvement? Or what are the other areas that it needs to be implemented? Let us know in the comments section below.