Best Network Troubleshooter Tips And Tricks For Windows 10
If you are using a Windows 10 computer, but your internet is not working on your PC, you should check out these tips and tricks to troubleshoot the issue. This article will let you know some of the practical tips and tricks to fix any standard network-related problems on Windows 10.
Here are some common network issues posted by various Windows 10 users-
- WiFi is connected but no internet
- The computer is connected to the WiFi network but no internet
- The computer is not detecting any WiFi network
- The computer is connecting and disconnecting frequently
- Ethernet is connected but no internet
- Some websites are not opening on Windows 10
There are other problems, but these are some of the most common issues claimed by countless people on different public forums.
Network Troubleshooter Tips And Trick For Windows 10
All these following troubleshooting suggestions are recommended by Microsoft so that the Windows 10 users can quickly fix the issue within moments. We have added a few more for your benefits.
1] Turn On And Off Airplane Mode

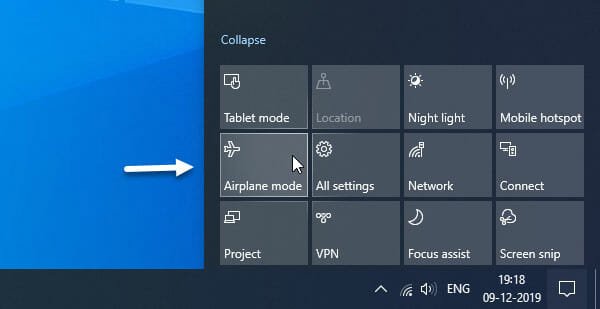
Like mobile, your Windows 10 computer has an Airplane Mode that helps you disconnect and reconnect to a network quickly. Whenever you get a slow internet issue on mobile, you might use the Airplane Mode. Likewise, you can use the same method on your Windows 10 computer. To use it, you do not need to install any third-party software, as Microsoft included the functionality in Windows 10 by default. To turn on Airplane Mode, click the Action Center icon on your Taskbar and click the Airplane Mode button. Repeat the process to disable it. After that, check if you can use the internet or not.
2] Check Ping Status
This is probably the most essential thing that you should do when you are not able to use the internet on your computer. It helps you know if the problem belongs to your WiFi router or computer. To do that, press Win+R, type ping 8.8.8.8 -t, and hit the enter button.
If you get a positive reply, your internet is working. However, if you are not getting any reply (Request Timed Out), you need to work on the router.
3] Use Troubleshooter

Microsoft included all the possible troubleshooters in Windows 10, and you can use them to fix common issues like this one. To use them, you need to know about Network Adapter and Internet Connections troubleshooters. For getting them, you need to open the Windows 10 Settings panel and go to Update & Security > Troubleshoot. After that, you can find those troubleshooters on your right-hand side. Select one of them, and click the Run the troubleshooter button.
Now you need to follow the screen instructions to get the job done.
4] Reinstall Network Driver
Network driver helps you establish a connection between the internet and your computer. If there is some issue with the network driver, you will not be able to use the internet on your computer. Your computer might not detect the connection as well because of the driver’s conflict. Therefore, this is recommended to open the Device Manager, locate your driver, and uninstall it. Following that, plugin your WiFi dongle or so and reinstall the driver. If you are using an external network device, you can find the driver in the CD/DVD given by the manufacturer. On the other hand, if you are using an Ethernet port, you can find the driver on the motherboard CD/DVD.
5] Disable Firewall
The firewall allows and blocks incoming and outgoing connections. In other words, the firewall can be responsible for your internet connection. If you recently made any changes, this is a good time to revert them or disable the firewall temporarily.
6] Temporarily Disable Antivirus
If you have newly installed antivirus or any security shield, like anti-adware, firewall software, etc., that can cause this issue. Therefore, you can turn off your malware-prevention software temporarily and check if you can use the internet on your computer or not.
7] Reset Network Adapter Driver And Port
This is very easy to reset the network adapter driver and port that helps you to connect to a network – no matter whether it is wired or wireless connection. The best thing is that you do not need to install any third-party software for this. It is possible to reset the network port and driver with the help of Command Prompt. To get started, follow the following steps-
At first, open a Command Prompt window with administrator privileges. For that, search for “cmd” in the Taskbar search box, and select Run as administrator on the right-hand side.
Then, you need to enter these following commands-
netsh winsock reset

netsh int ip reset

ipconfig /release

ipconfig /renew

ipconfig /flushdns
The last command with let you flush DNS cache on Windows 10. There is another way to reset the network on your Windows computer. You can use the user-friendly option in the Windows Settings panel. To utilize it, open the Windows Settings panel, go to Network & Internet, and make sure you are on the Status page. After that, scroll down to the bottom till you get the “Network reset” option.
Click on this option and follow the screen instructions to get it done.
8] Change Preferred DNS Server Or Primary DNS Server

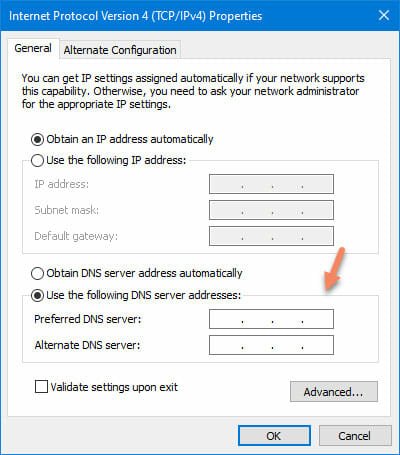
If your ISP is blocking you from using their DNS, you might get problems like this. At such a moment, you need to change the Preferred or Primary DNS Server. To get started, press Win+R, type ncpa.cpl and enter the Enter button. You should find all the networks on this screen. Right-click on the currently connected network, and select the Properties option.
Now, double-click on Internet Protocol Version 4 (TCP/IPv4). If you are using a WiFi connection, the “Obtain DNS server address automatically” option should be set as default. You need to choose the second option that says “Use the following DNS server addresses” and enter these-
Preferred DNS: 8.8.8.8

Alternate DNS: 8.8.4.4
These are Google Public DNS, and they are safe to use.
That’s all! These are some of the best troubleshooting tips and tricks to fix common network-related problems on Windows 10.