Enable And Use Hyper-V In Windows 10 To Create Virtual Machine
When it comes to making a virtual machine, VMware and Virtual Box top the list. It doesn’t matter whether you need to install Linux or another Windows OS, you can certainly do that with the help of those virtual machine software. However, if you are using Windows 10, you might not need those tools since Hyper-V can help you do that within moments. If you do not know about this in-built functionality, just keep reading to enable and use Hyper-V in Windows 10 to create a virtual machine.
What is Hyper-V?
Hyper-V is a virtualization software, which is available for Windows 8 and later version including Windows 10. It helps you virtualize your computer hardware so that you can install another operating system virtually. Previously, Hyper-V was available only for Windows Server 2008, but now you can find it on Windows 10 and other versions.
System Requirements for Hyper-V
Although Hyper-V should run on almost any Windows 10 machine, there are some special requirements you might need to check out.
- You must have Windows 10 Pro, Education, or Enterprise. If you have Windows 10 Home edition, you cannot find this tool.
- Minimum 4 GB RAM is required. Therefore, if you have 4 GB RAM on your computer, it should run, but you might not get the smooth user experience. The more RAM you can provide for the virtual machine, the better it performs.
- Second Level Address Translation or SLAT.
- Your processor must have a 64-bit architecture.
- Your CPU should support VM Monitor Mode Extension
If you have all these things included in your PC, go ahead and follow the following instructions to enable and use Hyper-V in Windows 10.
How to Enable Hyper-V in Windows 10?
As this might harm your computer and reduces the system performance, it is not enabled by default. You need to turn this feature on before searching for it using the taskbar search box. To enable Hyper-V in Windows 10, do follow the following steps.
There are three ways to enable Hyper-V in Windows 10. You can either use the PowerShell or Command Prompt or Windows Features panel.
Using PowerShell:
To enable Hyper-V using PowerShell, you need to open it with administrator privilege and enter this command-
Enable-WindowsOptionalFeature -Online -FeatureName Microsoft-Hyper-V -All
Using Command Prompt:
While using the Command Prompt, you need to take the help of the DISM tool or Deployment Image Servicing and Management tool. For that, open the Command Prompt as administrator, and enter this command-
DISM /Online /Enable-Feature /All /FeatureName:Microsoft-Hyper-V
Using the Windows Features Panel:
If you do not want to use the Windows PowerShell or Command Prompt and instead you want to get a simple option to turn it on, this method might be helpful for you. To get started, search for “Turn Windows features on or off” in the Taskbar search bar and open the corresponding tool/result. Here you should find an option called Hyper-V. Make a tick in the corresponding checkbox and click the OK button.
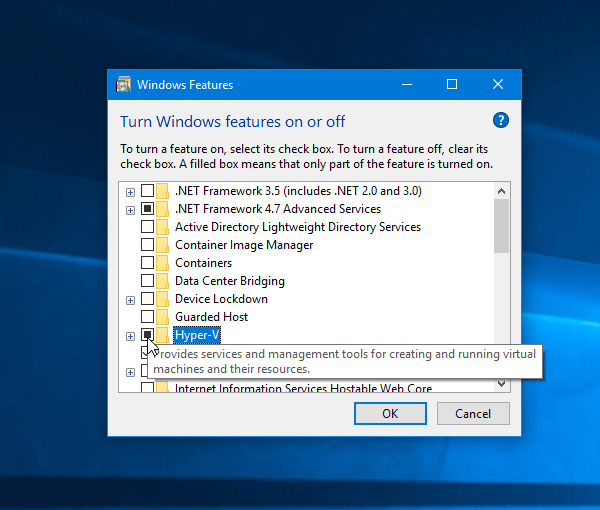
After that, you will be asked to restart your computer. Do that to enable this functionality.
How to Use Hyper-V to Install Linux or Windows as Guest OS?
It is quite straightforward, but you need to choose every option carefully. Otherwise, you may end up wasting your time. To get started, open the Hyper-V Manager. You can search for that in the Taskbar search bar. After opening the corresponding window, click New >> Virtual Machine.

In the next window, you need to choose different things such as virtual machine name, RAM, networking, etc.
Specify Name and Location: You need to give your virtual machine a name and choose a location where you want to save the files.
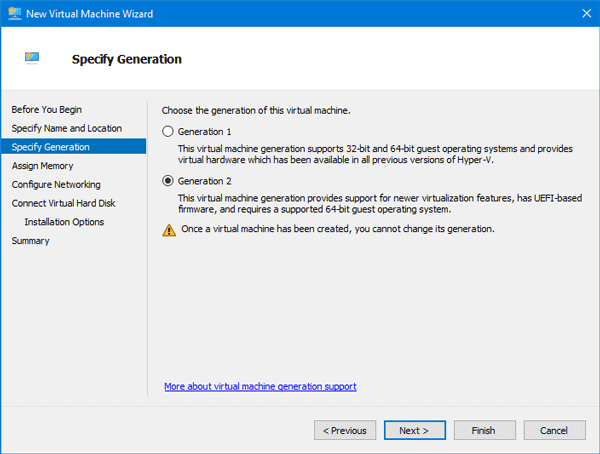
Specify Generation: It is quite important. It offers you to choose either Generation 1 or Generation 2. If you had a virtual machine in the older version of Hyper-V and you want to move those files in this newest version, you can choose Generation 1. Also, if you choose Generation 1, you can install 32-bit as well as a 64-bit operating system. On the other hand, if you choose Generation 2, you will get UEFI-based firmware but you must have to install a 64-bit operating system.
Assign Memory: From this panel, you will be able to select memory or RAM. If you have 16 GB of RAM, you can assign 8 GB to this virtual machine without any problem. Always try to keep it at 50% or lower.
Configure Networking: If you want to use the internet in the guest operating system, you must have to choose ‘Default Switch’ from the drop-down menu.
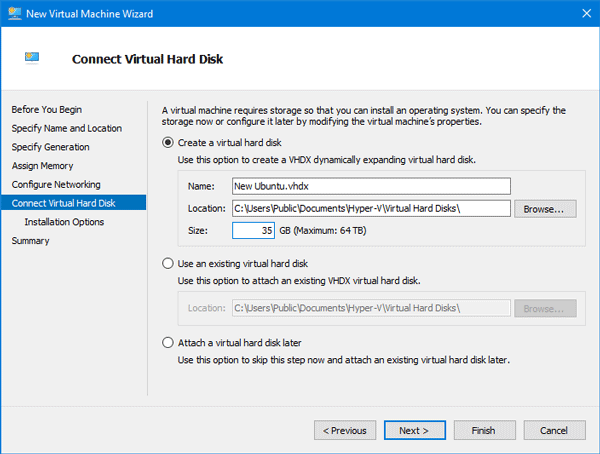
Connect Virtual Hard Disk: This window will let you choose a virtual hard disk. If you prefer Windows or any Linux distribution, you must have to assign at least 30 GB of storage so that it installs the OS smoothly and you can keep some files. If you already have a virtual hard disk, you can choose the “Use an existing virtual hard disk” option and select the path of the virtual hard disk file. However, if you do not have such a file, you can go with the first option and mention how much storage you want to assign to this virtual machine.
Installation Options: In the next step, you need to select the ISO file of OS. If you have the ISO in your computer, you can choose the second option and click the Browse button to mention the path of the ISO file. Also, if you want to install the OS from a network-based installation server, you can choose the third option.
Your setup is complete. Now you need to turn on the virtual machine so that you can complete the OS installation. For that, click the Start button on your right-hand side. It will show the installation windows, where you need to follow the screen options to install the guest OS.