How to Fit More Songs on iPhone by Converting Higher Bit Rate Songs?
As has been the case for years, Apple iPhones come with fixed memory and without the option of extendable memory slot. People who prefer quality might somehow purchase the expensive iPhones, but, there is a vast price difference between the iPhone 8 GB or 16 GB versions and 32 GB or 64 GB versions.
Many first time iPhone users making the plunge to a high-end smartphone generally opt for the low-memory versions to save some costs. For such iPhone users, the memory space fills up before they realize. Suddenly, one day when they try to add new songs or apps from iTune library to their iPhone, the full memory stops them from doing so. This is the time when people start searching for answers to queries like “How to get more music stored on iPhone?” or “How can we fit more iTunes music in iPhone?”
In this article, we shall check out some useful tips to free iPhone storage space (occupied by music or songs). In other words, we will go through valuable tips and tricks to manage more music storage on iPhones.
Different options to increase iPhone music storage space
One of the first things you must do is go through your entire list of songs on iPhone and remove the ones which you haven’t heard for last few months (which literally means you can do without them). You can do this by syncing your iTunes music library with iPhone appropriately.

Next, you can just do a random check of the file sizes for few songs stored on your iPhone. You can perform this activity by visiting your iTunes library, right-clicking on any song and checking the size under file tab. You would notice that most of your songs have a higher bit rate like 320 kbps (which is the highest) or 256 kbps assigned to them. The bit rate indicates the amount of space used up by per second of that song. It is important to note that the entire song never requires such high bit rates. Some portions of the song can work equally well on lower bit rates of 128 kbps. This can be achieved by switching to VBR i.e. Variable Bit Rate instead of CBR (Constant Bit Rate) making use of Amazon music.
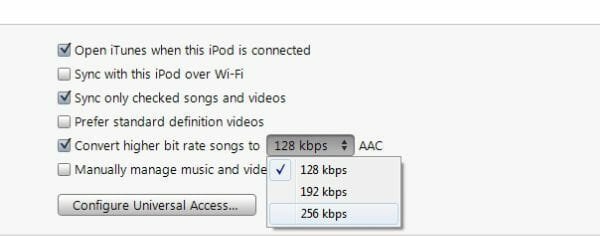
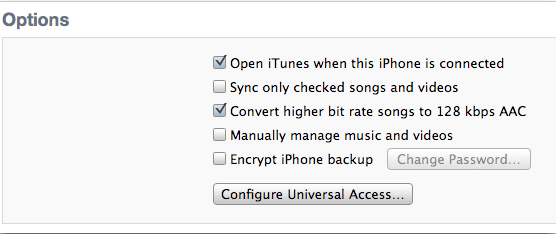
The most important tip here is to convert higher bit rate songs into 128 kpps AAC songs. There is a general belief that by doing so, the quality of the songs get degraded. However, it is hardly noticeable with the kind of earphones we use to listen to iPhone music. To carry out this conversion for all songs in your iTunes music library, you can get your iPhone connected to your computer’s iTunes. On the device panel screen, you will be able to see an in-built option to convert the music under “Summary” section.
Upon selecting this conversion option, you can choose any of the lower bit rates like 192 kbps or 128 kbps for your songs.
You can do this stuff for all songs in the library and even check out the equivalent iPhone memory space that will be freed in a visible bar (for iTunes 10 onwards). You can hit the sync button and watch the magic unfold.
The above mentioned simple tips (especially the last one to convert to lower bit rates of 128 kbps AAC) will help you to squeeze almost twice the amount of music in your iPhone. You will be surprised to see hardly any change in the songs quality and wonder why you didn’t try out these tricks earlier. So, what are you waiting for? Get more storage space created for your iPhone device. You can probably follow same tips to fit more songs on your iPad as well. Please feel free to share your opinions and experience about trying to fit more songs on iPhone in the comments section below.


