How To Auto Login In Windows 10
If you are using Windows 10 and you want to bypass the login prompt and auto-login in Windows 10 local user as well as the domain user, here are some simple methods to turn on that. If you enable auto login in Windows 10, you would not have to enter the password, PIN, or use Windows Hello to sign in to Windows 10 computer. At the same time, you should know that you may not want to enable it if multiple persons use the same computer. Otherwise, your account will be widely open to others.
There are mainly three different methods if you are using a local user account. A local user account is a standalone user account that you can create with the help of a Microsoft account or even without that. On the other hand, Domain user account mainly used by various companies, where the administrator manages all the computers on a domain basis. Based on the computer you are using, you can opt for the trick.
How To Auto Login In Windows 10 Local User?
Method 1: Using “User Accounts” panel
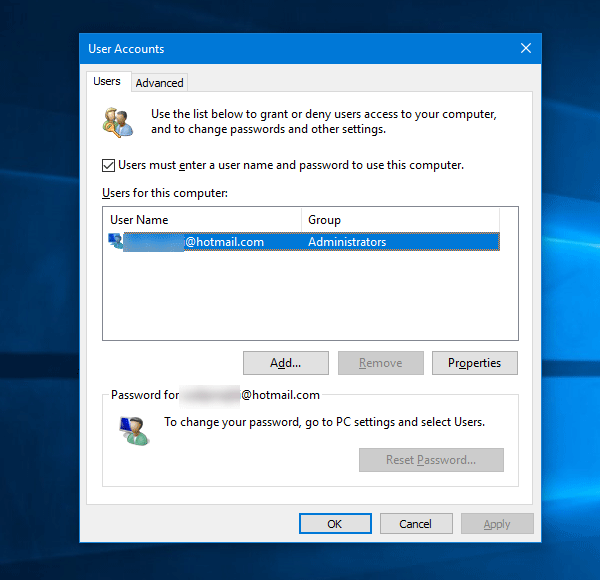
- Open User Accounts For that, you can press Win + R, type netplwiz, and hit the Enter button. Alternatively, you can enter the same in the Cortana search box.
- Select the user account that you want to log in to automatically or the account you are using currently.
- You can find a checkbox saying Users must enter a user name and password to use this computer. Remove the tick from the checkbox.
- Enter the password twice in the popup window.
Method 2: Using Registry Editor
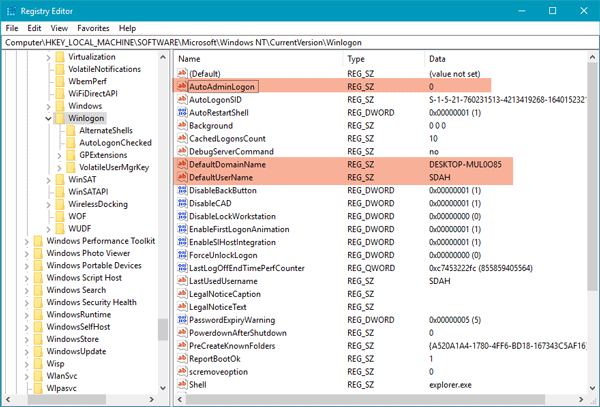
- Step 1: Open Registry Editor on your computer. For that, press Win + R, type regedit and hit the Enter button.
- Step 2: Navigate to this path: HKEY_LOCAL_MACHINE\SOFTWARE\Microsoft\Windows NT\CurrentVersion\Winlogon
- Step 3: Create a new String Value in the Winlogon For that, select Winlogon on your left-hand side, right-click on the right-hand side > New > String Value. Then name it as DefaultPassword.
- Step 4: Double-click on this String Value and enter your password as the Value Data.
- Step 5: Double-click on the AutoAdminLogon String Value and set 1 as Value Data.
That’s it! Now auto login in Windows 10 has been set.
Using Autologon Software
If you do not like to go through all those options as mentioned earlier, there is a simple solution for you. You can utilize this third-party software to enable auto login in Windows 10. It takes a couple of moments to set things up with the help of this tool.
Autologon is free software available for Windows 10. You can download this freeware from the official Microsoft website. The best part is this is portable software. In other words, you do not have to install this software on your computer.
To get started, download this tool from here and unzip the zipped folder. You should find a file called Autologon.exe. Double-click on it to open it. The username and domain fields would be filled up automatically.
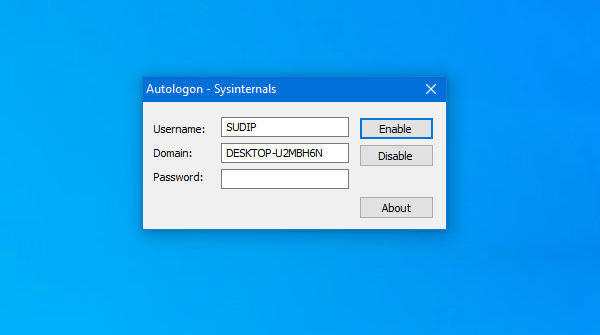
You need to enter the password of your user account and click the Enable button.
How To Auto Login In Windows 10 Domain User?
This is exactly the same as the Registry method mentioned above. In this case, the first and third methods would not work. Being said that, if you have a domain user account, you need to check these steps.
- Step 1: Open Registry Editor and navigate to this path: HKEY_LOCAL_MACHINE\SOFTWARE\Microsoft\Windows NT\CurrentVersion\Winlogon
- Step 2: Make sure the DefaultDomainName and DefaultPassword String Value/s are there in the Winlogon If not, you need to create two different String Values, name them as DefaultDomainName and DefaultPassword respectively. Following that, enter your domain name as the Value Data of DefaultDomainName and password as the Value Data of DefaultPassword.
- Step 3: Double-click on AutoAdminLogon and set the Value Data to 1 to enable auto-login.
The advantage of auto login in Windows 10
There is one advantage of enabling auto login in Windows 10. First, you do not have to enter the password multiple times if you often log out and log in to your computer. If you stay alone and there is nobody to access your computer, this functionality sound useful for you.
However, this is not always the same. In case, you leave your computer alone, someone else may access your computer. So, you should take care of that part as well.
The Disadvantage of enabling auto login in Windows 10
Although you can find tons of advantages of activating auto login in Windows 10, there is one security point you should keep in mind. As auto-login enables you to log in to the computer automatically, you should not leave the PC right after starting it. If someone is sitting right next to you, he/she can use that computer without any password since you have enabled the auto-login functionality.
How To Turn Off Auto Sign-in In Windows 10
There are multiple ways to turn off auto login in Windows 10. The basic thing is that you need to revert all the changes as you followed earlier. If you used the Registry Editor, you need to delete all the newly created values. Likewise, if you used the User Accounts panel, you need to make the tick in the corresponding checkbox. On the other hand, if you used the Autologon software, simply open it on your computer, choose the user account, and click the Disable button.
Windows 10 Auto Login Not Working
If the auto-login is not working in Windows 10, there are few things you should check.
First, you need to check whether the Users must enter a user name and password to use this computer checkbox doesn’t have a tick in the User Accounts window.
Second, you should check whether the following String Value/s are there in HKEY_LOCAL_MACHINE\SOFTWARE\Microsoft\Windows NT\CurrentVersion\Winlogon folder:
- DefaultDomainName – For Domain user account.
- DefaultUserName – For local user account.
- DefaultPassword
- AutoAdminLogon
Third, make sure you have created String Value. Do not make DWORD 32-bit Value. It won’t work.
Fourth, make sure the Value Data of AutoAdminLogon is set to 1 if you are using the Registry method.
Step 3: there is no checkbox “Users must enter a user name and password to use this computer.”
You need to go to settings/accounts/sign-in options
turn off requires windows hello sign in for Microsoft accounts.
Then when you run netplwiz the check box will appear. for you to uncheck.
Hope this helps