How to Clear DNS Cache on Android phone
How to clear DNS cache on Android phone? If you are asking the same question, here is the ultimate answer. Many people often need to flush DNS cache on Android phone to check something. For instance, you are an admin of your website, and you have moved from one server to another server. Therefore, right after change the NameServer, you need to switch from existing DNS server to another server to check whether the new nameservers are up or not, despite you can use online DNS checkers. Therefore, you can flush DNS on Android phone using these following methods.
How to clear DNS cache on Android phone
There are several ways to flush DNS cache on android mobile. However, these following methods are well documented and proven.
Clear Site Storage
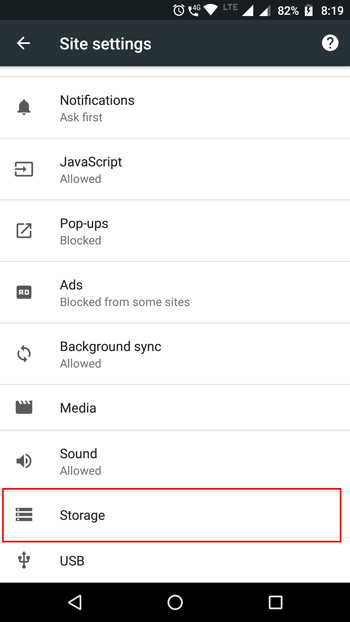
This is the most straightforward task you can do to clean DNS cache on Android mobile phone. Whenever you visit a website, it stores few things in the browser. Sometimes they are called cookies and sometimes they are known as cache. However, you can remove both of them from the browser itself. Now different browser has different methods to clear site storage or delete cache and cookies. In Google Chrome, go to Settings > Site Settings > Storage. Here you should get an option called “Clear Site Storage.” Tap on that button and select the affirmative option to clear site storage on Google Chrome. If you are using Mozilla Firefox, go to Settings > Privacy > find out “Clear Now” button under CLEAR PRIVATE DATA and tap on that. Following that, you will get an option to choose what to delete and what to not. Select what you want to delete and tap on “Clear Now” button.
Delete Cache from Android Settings

Although different ROMs or manufacturers have this option in different places, you can certainly get the same option after opening app settings. Here you can disable the app, uninstall, force stop, clear cache, and all the data. If you are using stock Android, you need to go to Settings > Apps. Here, you should find the Google Chrome or Firefox or whatever browser you are using. Alternatively, Samsung mobile users need to go to Settings > Applications > Application Manager. After opening the app settings, go to “Storage” and hit the “Clear Cache” button to clear DNS cache on Android phone.
Clear Host Cache in Google Chrome
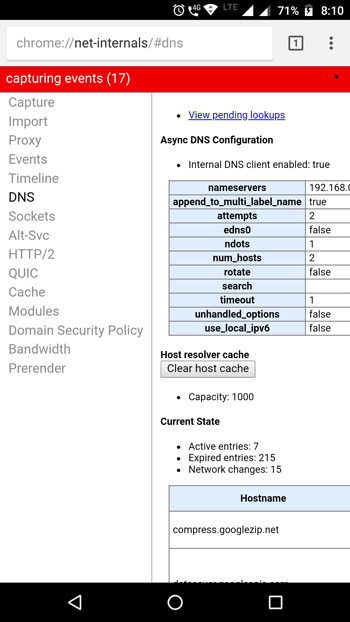
Not only the developer or beta version but also the stable version of Google Chrome comes with a dedicated “Clear Host Cache” option that removes the DNS cache on Android mobile or more specifically in Google Chrome. As Google Chrome comes with this option, you do no need to use any other third-party software to get that. Therefore, enter the following line in the URL bar;
Chrome://net-internals
You should get a page with some options on the left-hand side. Tap on “DNS.” Now you should find a button called “Clear Host Cache.” It would not take more than a second to remove DNS cache using this button. You just need to tap into that. In case, you get any popup menu, choose “Clear cache” and “Flush sockets.”
Opt for Static IP to DHCP
The main reason why you may need to opt for Static IP is you need to use Google DNS server instead of your server. This solution works when you have connected to a Wi-Fi network. If you are currently connected to any Wi-Fi network, select the network, and choose “Modify Network.” If you are using a different ROM than Stock android, you may get the same option but in a different way. In the popup menu, you can find “IP Settings.” By default, it should be DHCP. Choose Static and enter the following DNS servers;
DNS 1: 8.8.8.8

DNS 2: 8.8.4.4
Save your settings and check whether your DNS cache is removed or not.
Change DNS using DNS Changer
If the aforementioned method is not suitable for you, you may use a third-party app called DNS Changer. Root is not required and that is the plus point of this app. Hence, you can use this app on any Android mobile without rooting. After opening this app, you should find an option to enter DNS servers manually, or opt for any of the following DNS servers;
- Google DNS
- Open DNS
- Yandex DNS
- Level3 DNS
Choose any of the DNS servers as mentioned above, and hit the Start button. It would take a couple of moments to get it done. You will not re-connected to your existing network, and following that, you can browse the web freshly and without any old cache. Download
Use VPN to flush DNS cache on Android
If you use VPN, you can get rid of DNS cache on Android mobile without moments. VPN uses a third-party network or server to show all the web pages that you find on any web browser. Therefore, it would use a different DNS server, and your work would be done. Therefore, opt for a good, secure, and trustworthy VPN app such as ExpressVPN, Hotspot Shield, etc.
That’s it! Hope this little tutorial would be helpful for you to clear DNS cache on Android mobile phone.
Hey loved the post,great article and congrats on reaching top 50! i will be back to visit often.