How to Enable Metered WiFi Connection in Windows 10
In Windows 7, Microsoft included a new feature called Metered Connection. Metered connection is actually very helpful for them, who has limited data connection. No matter whether you are using WiFi or mobile broadband, you can use Metered connection to save some data.
What is Metered Connection? What will happen if you enable Metered Connection?
This is not actually Metered Connection in Windows 10 only. This feature is available from Windows 7 and in all the later versions. Generally, Windows requires a lot of bandwidth for system update, Store apps update, synchronization across multiple devices etc. In simple words, if you have a limited data connection, you will be ruined by your Windows PC since mobile service providers generally charge based on bandwidth you have used. For limited broadband connections, your connection will be stopped immediately after finishing the imposed bandwidth.
To stop this thing partially, Windows has a great feature called Metered Connection. If you enabled Metered Connection, your PC will stop doing numerous bandwidth eating processes. For instance, Windows will not download all the system updates. It will get only priority updates. If any app is downloading from the App Store, that will be stopped or paused. If you are on Windows 8, 8.1 or 10, your live tiles will not show any update. The most important thing is any files will not be synchronized automatically.
Generally, Windows 10 consumes a lot of data by downloading the system updates automatically, synchronizing files with OneDrive etc. To stop all those things, here is a different method that works perfectly.
Restriction of Metered Connection in Windows 10
Everything has some positive sides along with some negative sides. Metered Connection also comes with some disadvantages. The problem is Metered Connection can be turned on only for WiFi and Mobile broadband connection. That means, if you have limited broadband connection, you cannot get the facilities of Metered Connection in Windows 10.
Enable Metered WiFi Connection in Windows 10
If you have limited data connection and you are using that through WiFi or Mobile Broadband, here is a simple trick that will let you enable Metered Connection in Windows 10 within seconds. You do not have to install any other third party software. Just change a setting and that will do everything.
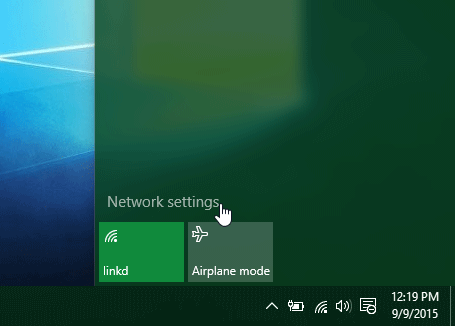
Make sure that you have already connected to the WiFi or Mobile Broadband connection that you want to set as Metered. After that, click on the Network icon (or WiFi icon) in your Taskbar and click on Network settings.
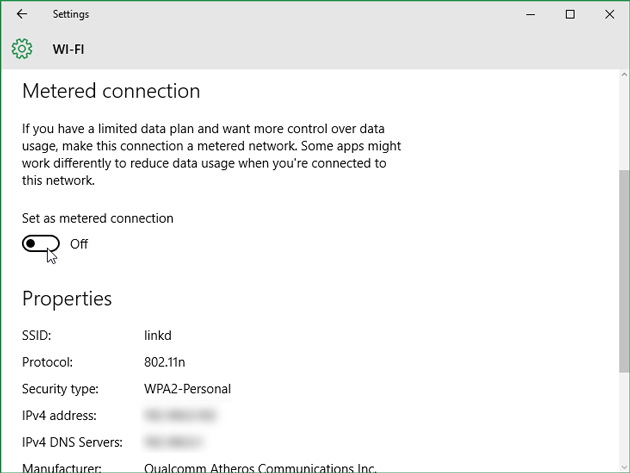
It will redirect you to the WiFi settings under Network & Internet. Then click on the Advanced options under the connection WiFi network.

Now, scroll down, toggle the button and set it as ON.
How To Set Data Limit On Windows 10?
If you give your computer to your kid frequently, you should set a data limit so that your kid cannot use internet all the times. This can be done without using any third-party tool as Windows 10 has such option built-in. You can set data limit for Ethernet as well as Wi-Fi connection. That means now matter if you are using desktop or laptop computer, you can do the same with the help of this guide.
At first, open Windows 10 Settings panel. You can press Win + I to open it directly. You can also find the Windows Settings icon in the start menu. After opening the Settings panel, go to Network & Internet. Then, select Ethernet or Wi-Fi depending upon what you are using currently. After selecting the network, you can find the Metered connection option. There is another options called ‘Set a data limit to help control data usage on this network.’ You need to open up this settings.
After that, click the Set limit button under Data limit label. A popup should appear on your screen. You need to choose everything wisely.
If you want to set monthly data limit, select ‘Monthly’ option. If you want to set one time data usage, you have to select ‘One time’ and so forth.
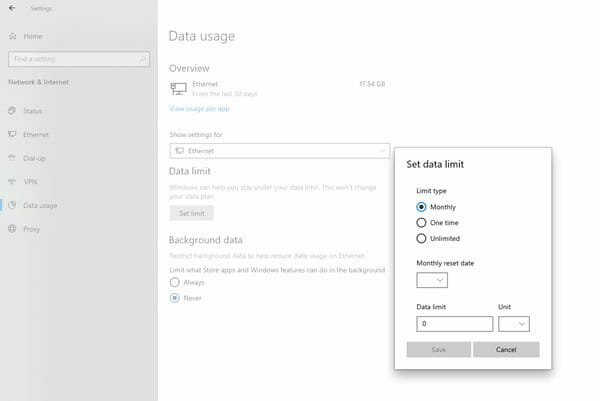
There is another option called Background data. If you want to block Store apps and Windows features to use your data in the background, you need to select Always. By default, ‘Never’ should be selected. However, you need to choose the other option to stop background data usage by Microsoft Store apps and various Windows features.
There is another Windows software that does the same job. If you do not like to use the in-built option of Windows 10, and you want to get more flexibility, you should opt for this tool. Introducing NetLimiter. It is a paid software that costs around $30 for one computer. It is possible to monitor your incoming and outgoing internet traffic, set priorities, limit internet usage, schedule internet usage, and more others.
The best thing about this software is you can set data limit for each application. The in-built option doesn’t allow you to do that. If you want to allow Google Chrome to use as much data as it wants but you do not want to allow another app to do the same, NetLimiter can do the job for you.
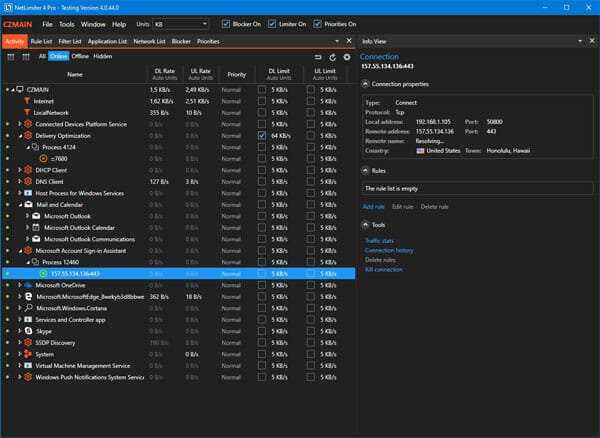
The user-interface is pretty bulky as it shows a lot of information on a single screen. You can find all the apps those are using your internet connection. If you want to set a bandwidth limit, you can simply make a tick in the corresponding checkbox under DL/UL Limit column.
Final Word
You are done. Now, your Metered connection has been turned on. You do not have to do anything. In this way, you can save a lot of data and extra bill.