How to fix 100% Disk usage issue on Windows 10
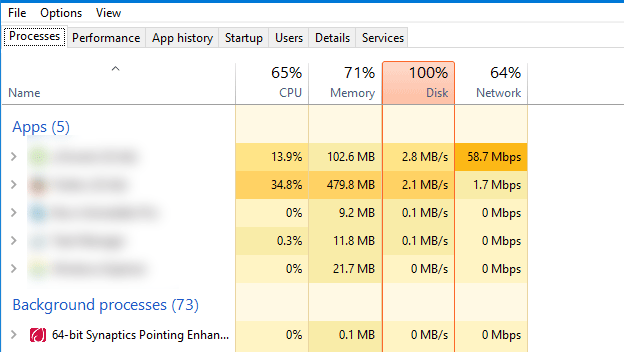
Are you getting slow computer due to a high rate of disk usage? This tutorial is the solution of 100% Disk usage issue on Windows 10 without using any third-party software. You can find the disk utilization rate in Task Manager in every Windows machine including Windows 10. This rate defines how much of your storage has been used by various running programs and processes. The more it gets used, the slower your computer will become. This is a common fact, and you should always try to as low as possible. However, if you are getting 100% disk usage issue on Windows 10, do follow these following tricks to make it lower.
How to fix 100% Disk usage issue on Windows 10
Disable SuperFetch
SuperFetch is directly related to the boot time, and it helps different programs to run smoothly while booting up the computer. However, sometimes, the problem gets fixed by disabling this feature on Windows 10. To disable SuperFetch, you can either use Command Prompt or Services menu. To use the Command Prompt, you need to open it with administrator privilege. Following that, enter this command-
net.exe stop superfetch
On the other hand, if you want to use the Services menu, do make a search for “Services” in the search box. On the next window, try to find out the option called SuperFetch. By default, it should be set to Running.

You need to click on the Stop button. Also you need to select Disabled from the Startup type drop-down menu.
Disable Windows Search
Windows Search is yet another very important feature of any Windows machine since it helps users search for files and any other things in File Explorer. However, sometimes it can create a problem like 100% disk usage. Therefore, you can disable Windows Search on Windows 10 to fix the problem. For that, you can use either Command Prompt or Services menu. First, open Command Prompt with administrator privilege and enter this command-
net.exe stop "Windows search"
You should find a success message like The Windows Search service was stopped successfully.
If you do not want to use Command Prompt and instead want to use Services menu, do open that by searching for it in the Taskbar search box. After opening the respective window, find out the option called Windows Search. Like SuperFetch, it should be running.
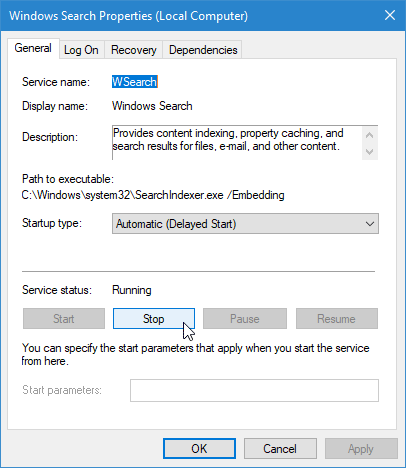
You need to click on the Stop button to make it stop. You can also select Disabled from Startup type drop-down menu.
Disable Antivirus
Sometimes antivirus doesn’t cope up with the system resources, and hence it starts using more disk space. It yields 100% disk usage problem on Windows computer. Therefore, if you are using any other antivirus or anti malware program, you should consider disabling it for a few moments to check if it solves the issue or not. If it does, you can try using another antivirus.
Check Disk
If any of the aforementioned solutions are not working for you, you should run a disk check. You do not need any third-party software since you can do that with the help of Command Prompt. You just need to enter the following command in Command Prompt-
chkdsk.exe /f /r
It may take some time to finish the scan and show the result.
Reset Virtual memory
Virtual Memory is a quite advanced technology of Windows. When many background process and software are running, and your system requires more memory, Windows can use the hard disk to store the file temporarily and move them to the RAM as fast as possible. During this migration, you PC may show 100% Disk usage problem. Therefore, do follow the subsequent steps to reset Virtual Memory on Windows 10.
1] At first, go to This PC and select Properties in the right-click context menu.
2] Click on Advanced system settings.
3] Under the Advanced tab, you can find Performance tag. Under that, you should get Settings button. Click on that.
4] Switch to Advanced tab and click on Change button under Virtual Memory section.

5] By default, the Automatically manage paging file size for all drives should be checked. You need to remove the tick from that checkbox.
6] Now select your system drive (in most the cases, this is C drive), check the Custom Size radio button, and enter Initial size and Maximum size.
7] After clicking on OK button, you need to remove everything from Temp folder. You can either go to here-
C:\Windows\Temp
Or you can type temp in the Run prompt and hit the Enter button.
8] Select everything and delete them all.
Change Settings in Google Chrome
In some cases, Google Chrome is the culprit. Apart from using a lot of RAM, Chrome can use a lot of storage as well. Therefore, you can make a simple change in Google Chrome to see whether Google Chrome is creating this problem or not. Enter chrome://settings/ in the URL bar > click on Advanced > uncheck the option that says Use a prediction service to load pages more quickly.
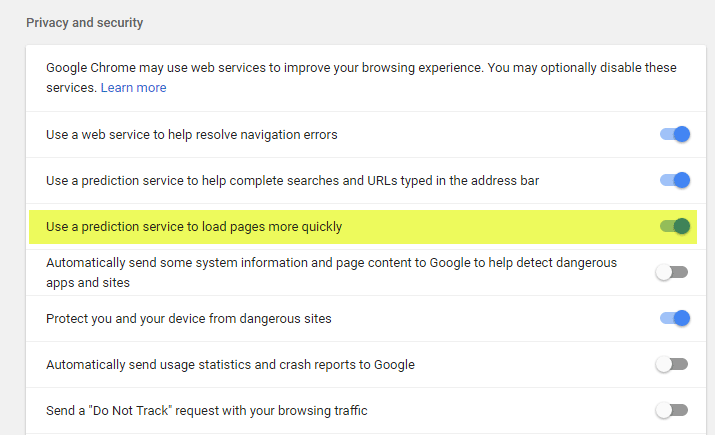
You can find that in Privacy and security section.
Final Word
There are more other ways to solve this issue. However, these above-mentioned solutions should be helpful for you. Apart from these, you can also try to update your drivers or reinstall the SATA drivers or any other storage driver that your system requires.
Using an SSD might also prevent such things from occurring daily. My drive rarely hits 100% of usage.
I agree that running Windows 10 on a HDD is a nightmare and it maxes out at 100% usage every now and then.