How To Take Screenshot On Mac: Best Screenshot Tools
If you use a MacBook or any other Mac device, you cannot find the “Print Screen” button like Windows keyboard. If you are trying to take a screenshot on Mac, you should check out this tutorial. Here is how to take a screenshot on Mac. We have covered the in-built method, all the available and hidden options, some handy screenshot tools, etc.
Although there is a big difference between Windows and Mac, you can use a Mac computer in every situation. No matter if you are a student, businessman, office employee, or anybody else, you can use a Mac computer to get your job done. Thanks to the fast and smooth performance, it is very easy to work on a mac for a long time.
How To Take Screenshot On Mac
In-built method:
Although you cannot get a dedicated key to take a screenshot, you can find some keyboard shortcuts to get the job done. There are mainly two different keyboard shortcuts if you do not count the hotkey to unveil hidden options.
Capture Entire Screen:
The keyboard shortcut to capture the entire screen is Command+Shift+3. If you press these buttons, your image will be saved on the Desktop, by default. No matter what is on your screen, you can capture that with the keyboard shortcut.
Capture Active Windows:
Let’s assume that you have a browser window or any other window that you want to capture and send it to someone via email or something. Instead of capturing the whole screen (since it can increase the file size and it is unnecessary), you can take a screenshot of the only active window or any other window that you want.
The keyboard shortcut to capture only the active window on Mac is Command+Shift+4. After pressing these keys, you need to select what you want to capture. For that, you can keep pressing the Spacebar to switch from one window to another.
Hidden Settings To Take Screenshot On Mac
There are tons of hidden options on your Mac that you can use to customize the screenshot functionality. Here are some of the options you should know about your Mac.
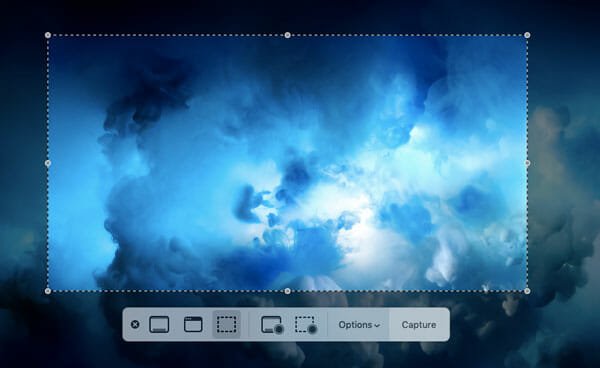
How To Capture Only A Particular Region?
Sometimes you may need to select a region irrespective of opened windows. At such times, you can press Command+Shift+5. Following that, you need to use your trackpad or mouse to choose what you want to capture.
How To Record Screen On Mac?
Apart from taking screenshots, you can record the screen as well. In other words, you do not need to install third-party software to get that job done. To get started, press Command+Shift+5 and select either “Record Entire Screen” or “Record Selected Region” button. After that, the recording will be started, and you can find a dedicated option to stop the recording.
How To Change Screenshot Save Location On Mac?
As mentioned, Mac saves all the screenshot and screen recording on the Desktop. No matter how big or small your file is, you can find that in the Desktop folder after finishing. However, you may not want to see fifty or sixty screenshots on your Desktop since it may create clutter. Therefore, you can make use of the in-built option to change screenshot save location on your Mac computer.
To change the default folder, press Command+Shift+5. Following that, you can find a button says “Options.”
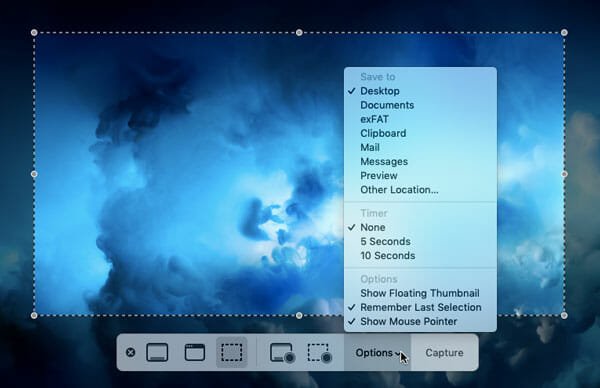
After clicking that button, you need to select where you want to save the file. You can choose any given folder, or this is possible to choose a custom location such as a USB drive, external hard drive, etc.
Some people need to edit the screenshot for social media accounts, blogs, etc. In that case, you can select “Clipboard” from the list to save the screenshot in your clipboard and paste that directly in your photo editing software.
How To Use Timer To Take Screenshot On Mac?
You can use a timer to start capturing your screen at a scheduled time. For that, press Command+Shift+5 first and expand the Options menu. Following that, select a timer according to your requirements.
How To Show Mouse Pointer In Mac Screenshot?
By default, you cannot find the mouse pointer in the screenshot, but this is possible to enable that. For that, press Cmd+Shift+5, and expand the Options button. Here you can find an option saying “Show Mouse Pointer.”
Make sure this option is checked.
What Is The Best Screen Capture Tool For Mac?
Snagit is the best screen capture software for Mac. It doesn’t matter if you want to capture only a region of your screen or the whole display, you can make use of Snagit on your screen. It comes with countless features that are equally important for any user. The best thing about this tool is that it offers a dedicated panel to edit the screenshot. From adding an arrow to make something blur, you can do everything with the help of Snagit.
Talking about price, this is quite affordable as it costs only $49.95. There is no limit of screen capture and recording time. Purchase link
If you are a regular user, who needs some screenshot to write blogs or upload on social media, you may not need dedicated third-party software. The primary reason is that most of the essential options are already included in the in-built tool. The only drawback is that you cannot find an editor to edit your screenshots. Sometimes you may need an editor to erase or highlight something. If you are in such a situation, you can opt for paid software like SnagIt.