7 Basic phpMyAdmin Tips and Tricks for WordPress Users
According to Wikipedia, phpMyAdmin is such a tool that helps users to handle the MySQL through a web browser. phpMyAdmin is written in PHP. If you are a beginner of WordPress and do not have any knowledge on this platform, you should know that your self-hosted WordPress site requires a database, where the site stores all the information. To run the MySQL database, you need phpMyAdmin, which will allow you to do all your tasks. You can change certain things, run various queries and do more. If you are a newbie and do not have any information, you can follow these basic phpMyAdmin tips and tricks those are intended for WordPress users.
1] Check MySQL Version

Sometimes, you can find some plugins those may or may not work on certain MySQL version. At such points, you need to ask the hosting provider to work on that so that you can get the compatible MySQL to run your program. However, before that, you need to check MySQL version. Otherwise, you cannot work on that issues mentioned above. There are two ways you can use to check MySQL version right from phpMyAdmin interface. First, after opening phpMyAdmin, you can find a box labeled Database server, where the version should be mentioned. Otherwise, you can find run this SQL query to get the same – select version();
2] Drop or Delete Entire Database

Let’s assume that you want to delete your entire database due to any reason. There are few ways to drop the database and all the tables at once. However, here is how to drop the entire database from phpMyAdmin. This is very easy and not much time consuming as well. Open phpMyAdmin, select the database from your left-hand side that you want to drop, go to Operations tab. Click on Drop the database (DROP) link under Remove database box. Following that, you have to select the OK button to get things done.
3] Backup Database
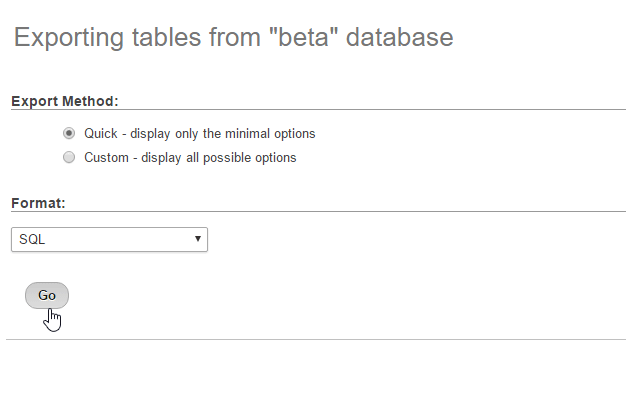
Backing up your site’s database is always put you on the safe side. Whenever your site gets into an attack, you can use the database backup to get back your site. To backup your database, you need to utilize the Export option that comes with phpMyAdmin. Therefore, open the phpMyAdmin and select the database (if you have multiple) that you want to backup. From the top menu bar, select Export button. On the next screen, select Quick from Export Method and SQL from Format drop-down menu and hit he GO button. For your information, you can also export the database in JSON, CSV, PDF, etc. To import database, just go to Import page, select your exported file and hit the Go button.
4] Move Database When MySQL Versions are Different
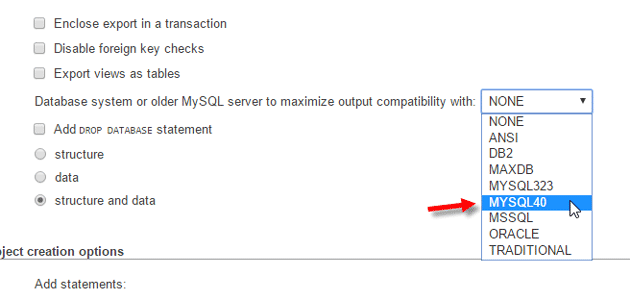
Suppose, you are migrating your site from one host to another, and they have different MySQL versions. Therefore, when you try to import the database, you might get an error, and your database would not be introduced properly. To solve this issue, you can follow these steps. At first, you need to export the database. In this case, go to Export tab, select Custom Export Method, choose MYSQL40 in Database system or older MySQL server to maximize output compatibility with a drop-down menu and hit the Go button. Now, open the new database and go to Import page. Select the exported database that you want to import, select MYSQL40 in Format-Specific options drop-down menu and hit the Go button. Thus, you can migrate database even when there are two different MySQL versions.
5] Change WordPress User’s Information
Suppose you are not able to make any change in User Profile from WordPress Dashboard. In that case, you can change WordPress User’s information right from phpMyAdmin. This is possible to username, email, user password, nickname, URL, Display name, etc. You can also check the registration date of a particular user. On the other hand, if you want to change the password, you must need a text to MD5 converter since you cannot enter regular text as your password. Your desired password should be converted to MD5. For that, open the wp_users table, where wp_ is the default database table prefix.
6] Change WordPress Settings
Not all, but some WordPress changes can be done right from phpMyAdmin. For example, you can change the site URL, homepage URL, Blog name, description, allow/block user registration, admin email, comment policy, time format, date format, ping status, default category and much more. For that, you have to go to wp_options tab, where the wp_ is the default table prefix. Also, you must know what you are doing. Otherwise, you will end up breaking down your site.
7] Show Creation Timestamp of Tables in phpMyAdmin

By default, phpMyAdmin doesn’t show the timestamp of creation. However, if you need you can certainly enable that and a new row will be visible with the timestamp of the creation of that particular table. For that, go to phpMyAdmin homepage, select Settings > Main Panel > Database structure. Here you can find a checkbox next to Show Creation timestamp. Make a tick and click on Apply. That’s it!
phpMyAdmin is a very useful element of your blog to manage the database and do certain changes accordingly. These are some of the tasks you can do with phpMyAdmin. Hope these would be helpful for you.