Best Windows 10 Settings You Should Check
In Windows 10, you can find a new control panel called Windows Settings that you can open by pressing Win + I button together. With the new feature updates, Microsoft has been adding more options in this tool. Therefore, here are some of the best Windows 10 Settings you can check to do more with your computer. With the help of these options, you can perform various tasks. From managing computer monitors to opt for Insider Program, you can do everything. All those things are possible with the help of Windows Settings that is available in Windows 10 only.
How to open Windows Settings panel?
The simplest way to open Windows 10 Settings is by pressing Win + I button together. However, here are ten more methods to open Settings in Windows 10.
Change Screen Resolution
Let’s assume that you are a software tester and you want to check something regarding screen resolution. Hence, you can follow these steps;
Open Windows Settings and go to System > Display. On your right-hand side, you should find an option called Resolution. You can choose a resolution from the drop-down menu.
However, if you have multiple monitors, you need to select the monitor first.
Change Multiple Displays Preference

If you are using more than one monitors and you want to change the way how they work, here is what you need to do.
Open Windows Settings and go to System > Display. On your right-hand side, you can find an option called Multiple displays. In the drop-down menu, you will find some four options, and they are;
- Duplicate these displays
- Extend these displays
- Show only on 1
- Show only on 2
Change Sound Output Per Apps

If you have more than one sound output (speaker, headphone, etc.) and you want to use them for various apps, you can use this option. By utilizing this functionality, you would be able to change sound output based on the app. For that, open Windows Settings and go to System > Sound. On your right-hand side, you can should App volume and device preferences option. After clicking it, you would be able to change the default output setting.
Use Storage Sense
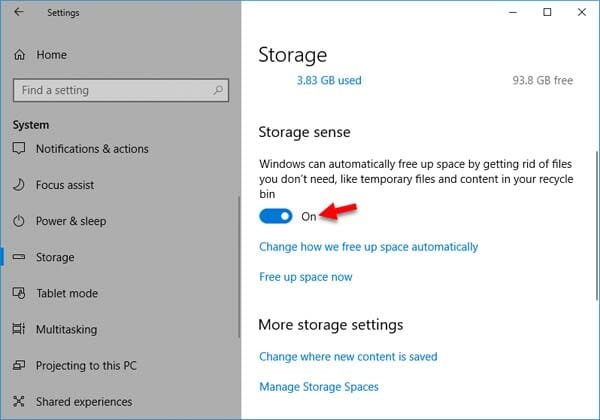
Storage Sense is a smart feature in Windows 10 that helps you free up disk space automatically. We often delete files but forget to remove them from Recycle Bin. Hence, that file stays in Recycle Bin and keeps consuming a lot of storage. To get rid of such thing, you can make use of Storage Sense, which is an inbuilt feature of Windows 10. In Windows Settings, go to System > Storage. On your right-hand side, you should get the Storage Sense option. You can turn it on by toggling the button. After that, it will start removing temporary files and cleaning up the Recycle Bin automatically.
Enable Timeline

Timeline helps you resume your app browsing. For example, you have left a browser window, and you want to re-open that. You can utilize the Timeline feature, which is available for Windows 10 v1803. To enable or disable it, go to System > Multitasking. You can find the respective option on your right-hand side.
Link Your Phone
In Windows 10, you can link your Android mobile with Windows computer. For that, you do not need to install any third-party software on your computer. After linking up, you would be able to use “continue on PC” functionality on your computer and mobile. For that, you need to use the PHONE section in Windows 10 Settings.
Open Windows Firewall in Windows 10

In Windows 10, you can open Windows Firewall from the Settings panel. Following that, you can manage your Domain network, Private network, Public network, etc. For that, open Windows Settings panel, and go to Network & Internet > Status. On your right side, you should find the option called Windows Firewall. By clicking, you would be able to open it.
Allow VPN on metered networks

If you are using a metered connection and you want to allow VPN to work over a metered connection, you can follow these steps. Open Windows Settings and go to Network & Internet > VPN. On your right side, you should find a toggle button called Allow VPN over metered networks. Make sure that option is turned on.
View data usage per app
If you want to check which app is consuming more bandwidth on your computer, these following steps would be helpful for you. Go to Network & Internet > Data usage in Windows Settings. After that, click the option that says View usage per app. You should get a window where it will show which app has consumed how much data.
Set different wallpaper on a different monitor in dual monitor setup

Let’s assume that you have a dual monitor setup and you want to use different wallpapers on different monitors. For that, you do not have to download any third-party software since Windows 10 Settings has the option to do so. For that, go to Personalization > Background. Right-click on a wallpaper and select either Set for monitor 1 or Set for monitor 2. If your desired wallpaper is not listed there, you can use the BROWSE option to open it.
Disable Transparency effect

In Windows 10 Settings, Taskbar, Action Center, and Start Menu, you can find a transparency effect. If you want to disable it, go to Personalization > Colors. On your right-hand side, you should toggle button called Transparency effects. Click it to turn it off.
Enable Hey Cortana
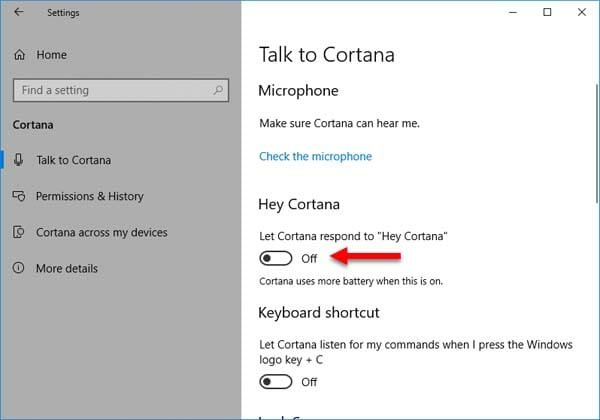
Cortana is the best inclusion in Windows 10, which is a native digital assistant of Microsoft. If you use Cortana a lot, you can enable “Hey Cortana” feature, which is a voice command that you can use to open the Cortana interface. For enabling it, go to Cortana > Talk to Cortana. On your right-hand side, you should find an option called Let Cortana respond to “Hey Cortana.” Use the toggle button to enable it.
Manage app permissions
In Windows 10, you can find some pre-installed apps like Camera, etc. If you want to allow or block particular app from using various things like Location, Camera, Microphone, etc., here is what you need to do. Open Windows 10 Settings and go to Privacy. Under the App permissions section, you can find some options such as Location, Camera, etc. You can click particular option and find out the heading called Choose apps that can use your [location/camera etc.]. Following that, you can use the toggle button to allow or block particular app from using different things.
Open Troubleshooter
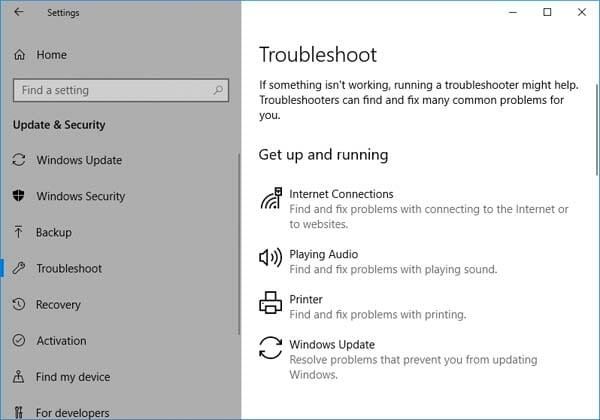
Troubleshooters help you solve various problems regarding Blue Screen, Bluetooth, Audio, Internet Connection, Windows Update and so on. In Windows 10, you can find some built-in troubleshooters in the Settings panel. To open them, go to Update & Security > Troubleshoot. Therefore, you can choose a troubleshooter and open it respectively.
Pause Windows Update for up to 35 days
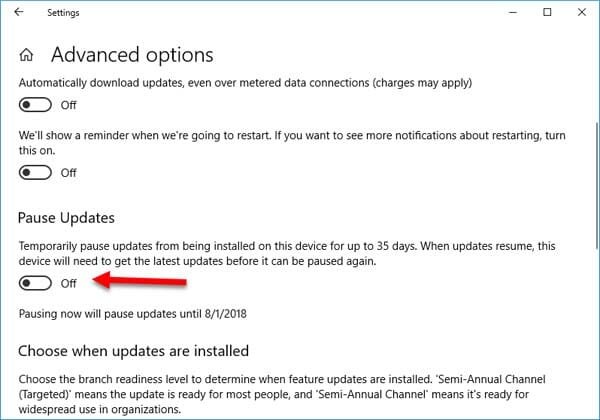
If you have a limited internet connection or you just want to pause updates from installing for up to 35 days, here is the option you need to follow. Open Update & Security > Windows Update. On your right side, you will get Advanced options. After clicking that, the next screen will come up with an option called Pause Updates. Toggle the corresponding button to turn it on.