Fix: Google Chrome Extensions Sync not Working
Is Google Chrome extension Sync not working on your device? Eventually, this problem of Google Chrome extension sync not working seems quite provoking one as frequently, there is an error telling to sync the Chrome extension and most of the people don’t know how to overcome this struggle. So, here are some suggestions to guide you on such issues.
Let’s explore the ways to fix this Google chrome extensions sync not working error. Follow these simple tricks and we hope that these will get your job done.
Create and Use A Sync Passphrase for Chrome Extensions
Usually, Chrome encrypts the synced data of your Google account with an advanced encryption method namely, Sync Passphrase. This particular Passphrase technology encrypts your personized data and stores the same in Cloud. This encryption method even blocks google to read your personal data. So, you get complete data security.
Followingly, to get an errorless chrome browser assistance throughout all your devices, you do need that particular passphrase for google chrome syncing operation between all of your devices.
So, how to enable the sync passphrase option on google chrome?
- Go to Chrome. Click on the vertical ellipsis menu button(:) on top-right.
- To open Advanced Sync Settings click on the Sync error message.
- you will see the Encryption option at the bottom. Choose to encrypt synced data using ‘sync passphrase’.
- Now, if you want to get the decrypted synced data this sync passphrase is needed.
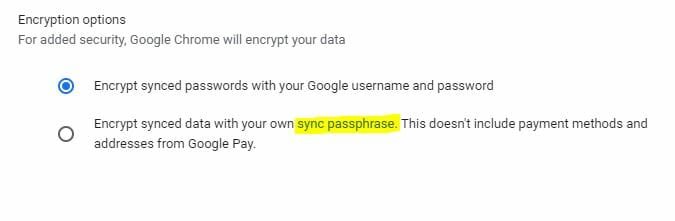
- If you forgot or change your Passphrase or made changes in your Google Account circumstance, it will break the Chrome sync. Remember the Passphrase or you can always set a new one in case you forget it.
Disconnect and Reconnect your google account with chrome
This is a spartan way to kill most of the problems along with google chrome extension sync errors.
- Go to the settings section of Google Chrome by clicking on the vertical ellipsis button.
- A box named ‘Disconnect your Google Account’ will appear, click on it.
- With some confirmation description, a box will be shown then with a ‘Disconnect account’ option in the bottom. Click on the option.
- With this process, your account will be disconnected. First, erase your entire browsed data, then close the Chrome window. Now open it again.
- One more time, go to the Settings Window, Sing into Chrome and reconnect your Google account.
- After signing in to your account, you can see chrome Sync Settings are back.
Use the Google Dashboard to reset the passphrase
Google Dashboard is a place where your entire data( visible and hidden) information could be seen. By using the Dashboard, chrome sync can be done. It will clear the previous data from the Google server by removing the Passphrase without deleting the stored data including that device from where you do this step. TO do this follow the steps:
- Log into your Google Account, click on Data from Chrome sync link and open Chrome Sync Dashboard.
- A box with Reset Sync option will appear.
- First, click on Reset Sync, then on ‘OK’ to reset the Passphrase. Start Sync again by Signing back into Chrome.
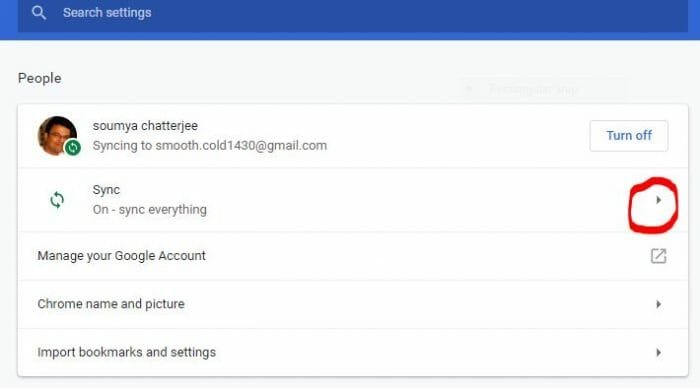
Try the ‘Sync all’ option
Go to your Account page, right under the profile picture, a ‘Sync’ option is present. Along with individual items like bookmarks, search history and so on, everything option will help you to manage sync all your extension.
Try the Developer Mode option with Chrome extensions
Make sure that your Chrome extension is not getting corrupted by some unexpected crash or shutdown. To confirm it, click on’ Menu’. Then hover your mouse pointer on the ‘More tools’. Then from the slide out window choose ‘Extensions’ option. A new tab will open containing all chrome extensions. Toggle on the ‘Developer mode’ switch on the top right corner.
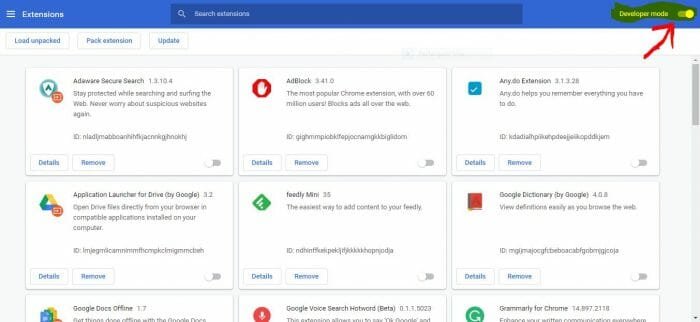
Now, if any corruption is detected, an extension of the ‘Repair’ option will appear. By clicking on it you can repair it. Also, try out the uninstalling and reinstall option of an extension to fix the sync.
Update Google Chrome Extensions
Being updated with the latest version of chrome extension, sometimes it’s possible that it is not syncing. In such a case, go to settings, then select ‘Extension’ under’ More tools’ option, then ‘Developer Mode option’ An option to Update all the extension will be seen, do it and check if it working or not.
Try the ‘Reset Sync’ option
You will find an option in the Browser bar to ‘reset sync’. Click on the option, it will start resyncing.
Creating a new browser profile can solve this google chrome extension sync not working issue
SO, how to create a new browser profile for google chrome on your device?
- Quit Google Chrome first.
- Press Windows key+ E to launch the file explorer .
- Copy this ‘%LOCALAPPDATA%/Google/Chrome/User Data/’ on the address bar of the file explorer window and hit ‘Enter’.
- Explorer takes you to a new file location. Look for the folder namely, ‘Default’ . This is where your profile data gets saved.
- Rename the ‘Deault’ folder to any name and close the window.
- Launch Google Chrome. Now, Chrome will create a new ‘Default’ folder for storing profile related data including the ‘chrome extension sync’ data. The extension will get synced again.
Hope these recommendations will help you to fix the error. After the Chore syncing you will enjoy your speedy recovery in watching videos or working online or offline. So try out each or individual of the specified ways.