Fix Start Menu Not Working on Windows 10
If you are clicking the start button, but it is not opening Start Menu on Windows 10, you can follow the following tips and tricks to troubleshoot the problem. Start Menu is an integral part of Windows 10, and if you are not able to open this after installing fresh Windows 10 or updating your Windows 10 machine, there are few things you can do. Many users have got an error message called “Start menu and Cortana aren’t working. We’ll try to fix it the next time you sign in”. Even though it is indirectly asking you to restart your computer, you might not get help by following that guide.
1. Restart Windows Explorer
As Windows Explorer is indirectly related to the Start Menu, it might solve your problem. As this is a very basic solution, you should try it first. To do that, open Task Manager in your computer. In the Processes tab, find out Windows Explorer. Select it and click the Restart button.
After that, check if the Start Menu is opening or not.
2. Change The Value Of WpnUserService In Registry
WpnUserServic is an essential service that often causes various problems. For example, you might face high CPU usage by this service, etc. The same service can create this problem as well. Therefore, you should tweak the value of this service from Registry Editor and check if you can open the Start Menu or not. Before doing anything, don’t forget to backup Registry and create a system restore point.
If you are done with those, open the Registry Editor on your Windows computer. For that, press Win + R, type regedit and hit the Enter button.
After that, navigate to this path-
HKEY_LOCAL_MACHINE\SYSTEM\CurrentControlSet\Services\WpnUserService
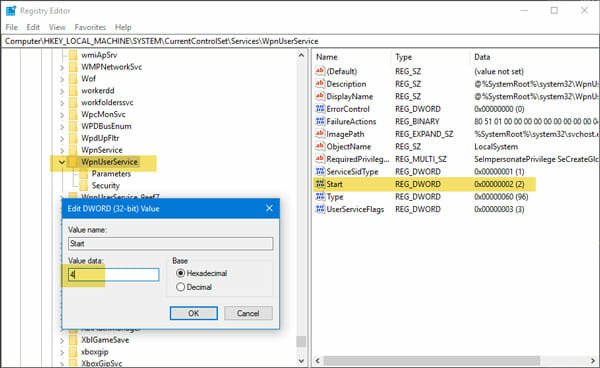
After clicking the key, you can find DWORD value named Start. Double-click on it. By default, the value should be set to 2. You have to make it 4 (four). After that, restart your computer and check if you can open the Start Menu or not.
3. Boot Into Safe Mode
If this problem started happening after installing a driver, updating a driver or using an external device, the Safe Mode could help you a lot. By booting your PC into Safe Mode, you will be able to know whether this problem is happening due to wrong or corrupted driver and software or not. This is very easy to boot Windows 10 into Safe Mode. You can follow the mentioned guide to get it done.
After checking your PC in absolute Safe Mode, boot it in Safe Mode With Networking facility.
4. Start Application Identity Service
It doesn’t matter which operating system you are using; you can always find a service that is responsible for allowing or preventing certain apps. In Windows, this service is called Application Identity. If this service has stopped due to unknown reason, the Start Menu might not work as usual. Therefore, follow these steps to verify if it is running or not.
You need to open the Services window first. For that, you can search for “services” in the taskbar search box. After that, find out Application Identity service and double-click on it to open the Properties. If the Service status is showing Stopped, you need to select Automatic from the Startup type drop-down menu and click the Start button to run the service.
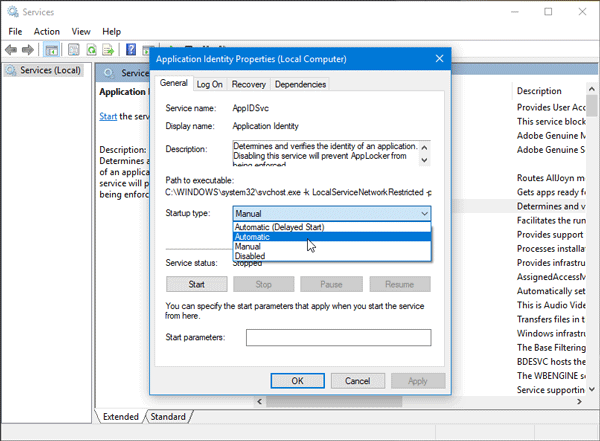
After saving the change, restart your PC and check if you can open the Start Menu or not.
5. Use System File Checker
System File Checker is an inbuilt and command-line tool available for Windows 10 and some other older versions. This tools helps you scan the whole computer, and it restores all the corrupted system files automatically. Therefore, follow the following steps to use the System File Checker tool in Windows 10.
As this is a command line tool, you need to use the Command Prompt. Therefore, open Command Prompt as administrator and enter this command-
sfc /scannow
Do not close the window. Also, your computer will restart to complete the scan. It can take up to an hour depending upon your system. In the meantime, do not turn off your computer.
6. Do Not Use Sign-in Info To Setup Device Automatically
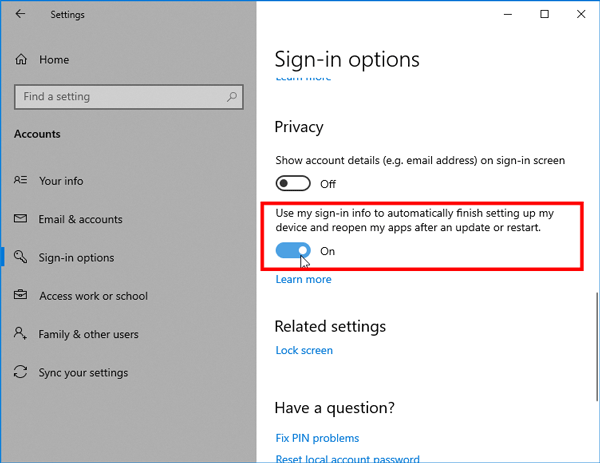
There is an option, which lets you get your PC up and running quickly after an update. However, the same option might cause this issue as well. Therefore, disable this functionality and check if you can use the Start Menu as usual or not. To turn it off, open the Windows Settings panel and go to Accounts > Sign-in options. Scroll down on your right-hand side and find out this- Use my sign-in info to automatically finish setting up my device and reopen my apps after an update or restart. By default, it should be turned on. You need to toggle the corresponding button to disable this functionality.
7. Use DISM Tool
If the SFC tool failed to scan some system files, you could use the DISM Tool or Deployment Imaging and Servicing Management Tool. This is another inbuilt and command-line tool, which can be used to scan the image and fix corrupted files. To use it, open Command Prompt with administrator privilege and enter this command-
dism /online /cleanup-image /restorehealth
When it is done, restart your computer.
8. Create Another User Account
If nothing is solving your problem, you can create another user account to use the Start Menu. This is very easy, and you can head over to Windows Settings > Accounts > Email & accounts to create a secondary account. Also, you can enable the hidden administrator account in Windows 10 and check if you can work with the Start Menu or not.
9. Use System Restore Point
If the problem has started occurring after installing an update, you can simply uninstall that. However, if you cannot find that update in the respective list, you can use a restore point.
I hope these aforementioned tips and tricks will be helpful for you.