Adding Authorship Markup On Your Website Using Special Anchors And URL Parameters
You might know that Google has recently launched an authorship markup tag which attempts to recognize original authors writing a piece of content. By using authorship markup on your blog, you can tell Google that you are the original author who has written this content. This helps cut the clutter from spammers, auto posters and scrap sites who blindly copy content from your site without any attribution as such.
Google is becoming very serious in their attempt to identify original authors and people who have trust and expertise. If Google thinks that your are a reputed person in your industry, your thumbnail image will be shown in search result pages. An example is shown below:

This is a win-win situation for both users and Google. After seeing the author thumbnail, users will consider your page as trustworthy and they are most likely to click that link and land into your page, looking for the answer they are looking for. Google wins, because their users can quickly find the best content.
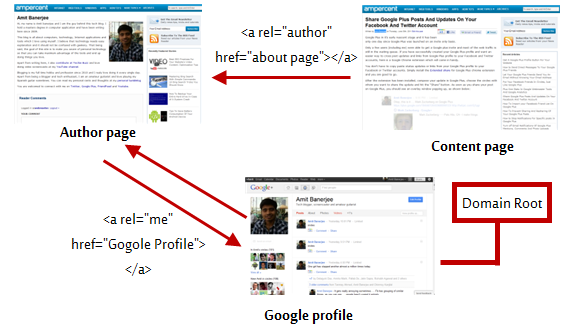
Adding authorship markup across all the pages of your site is fairly easy. I have detailed all the steps in my previous tutorial here – Adding authorship markup rel=”author” in WordPress. Here is the pictorial representation of how the rel=”author” markup tag should be implemented on your website.
When you Can’t Edit Your Website’s Template – Add Authorship markup Using URL Parameters
In order to apply the correct syntax for Authorship markup, you have to modify some parts of your site’s HTML code and add the desired rel=”author” and rel=”me” tags.
Now, how do you implement authorship markup on a site where you don’t have the permission to edit or modify the HTML template? What if your site is on a free blogging platform e.g Tumblr, Posterous, Google Sites – where you don’t have enough options to modify the HTML and add the desired author tags?
Luckily, Google has an alternative way to help you out. Here is what you have to do:
1. Open your Google Plus profile and copy your profile URL.
2. When you are publishing a new page on your site, use the following code at the bottom of your page
<a href=”Your Google Profile URL?rel=author”>+Your Google Profile Name</a>

3. This is important.
You must use the + before your Google profile name because this syntax tells Google that this anchor text points to the Google profile of the person and it is not linked accidentally or unintentionally.
4. If you don’t have enough permissions to edit the HTML source of your blog post, you can always write your name in plain text and add the rel=”author” URL parameter using the “Link” button on your site’s text editor.
5. One last step. Complete this form and let Google know that you are using URL parameters for author markup on your site.
The full markup is more bulletproof and recommended for users who can edit the HTML template of their sites. Do not use this alternative method, thinking that both of them are equally feasible. However, if you can’t implement the full markup, this is the only workaround to have authorship markup support on your site using special anchors and URL parameters.
Watch the following video where Matt Cutts and Othar Hansson talk about Authorship markup for sites who can’t edit the HTML source of their template.