Remove Scan with Windows Defender from Context Menu in Windows 10
Windows 10 launched with loads of new features and improvements. After a month of launching the stable version, Microsoft launched an update, which is known as “November Update”. If you have installed November Update in your existing Windows 10 PC, you may have got some new features and options. For instance, Microsoft has included an option called Scan with Windows Defender in the context menu. Windows Defender is a popular and in-built security shield of Windows PC. But, generally, there was no such option in the context menu earlier this update. If you have used Microsoft Security Essentials, you may have got such option.

This is actually very useful that helps users to scan a particular folder from the right click menu. In Windows 10, you will get such option but for Windows Defender. The problem is if you install any third party antivirus, Windows Defender will be turned off, but you will still get the option in the context menu. Therefore, there will be a conflict between these things. So, if you want to remove Scan with Windows Defender from context menu in Windows 10, here are some solutions. You do not have to install any third party software for that. Registry Editor can do this for you.
Method 1
This is the first and very useful method, which helps you to remove Scan with Windows Defender option from the right click menu of Windows 10. It will be done using Registry Editor, which is already installed in your PC. But, before using Registry Editor, make sure that you have made a backup of your Registry files and created a system restore point. In case, you get any problem, you can solve that within moments.
At first, open Registry Editor. To do so, just press Win + R, type regedit and hit Enter. Following that, navigate through the following path,
HKEY_CLASSES_ROOT\*\shellex\ContextMenuHandlers\
Here you can find a key called EPP under the ContentMenuHandlers. Just delete it.
After that, navigate through this path,
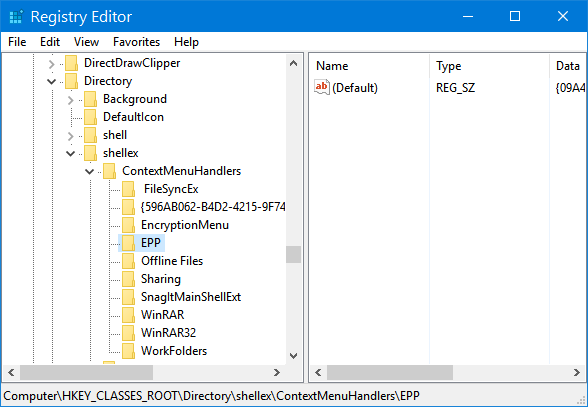
HKEY_CLASSES_ROOT\Directory\shellex\ContextMenuHandlers
Here, you can find another EPP folder. Delete it without thinking twice.
Then, go to the following place,
HKEY_CLASSES_ROOT\Drive\shellex\ContextMenuHandlers
Here, you will get another EPP key. Delete it again.
Now, you can close your Registry Editor and check the context menu. You will not find any Scan with Windows Defender option.
Method 2
Here is another Registry Editor method that will let you remove Scan with Windows Defender option from the context menu of Windows 10. However, this is faster than the aforementioned method. But, before using this, do not forget to create a backup and system restore point.
Now, open Registry Editor and navigate through the following path,
HKEY_CLASSES_ROOT\CLSID
Here you will get {09A47860-11B0-4DA5-AFA5-26D86198A780} in your left hand side. Select and delete it. Do not make any mistake in this step. Otherwise, some other options will be remove.
Method 3
This will be done using Command Prompt. This is probably the easiest method you can implement. At first, open your Command Prompt with Administrator privilege. You can press Win + X and select Command Prompt (Admin). Therefore, enter the following command,
regsvr32 /u "C:\Program Files\Windows Defender\shellext.dll"
You will get a popup. Just hit the OK button to get things done.
That’s it!
No matter, what step you have used to remove Scan with Windows Defender option from Windows 10’s context menu, but you can get it back by making use of the following command,
regsvr32 /i "C:\Program Files\Windows Defender\shellext.dll"
Hope these little tricks will help you a lot.