How to Remove Unwanted Skype Processes from Windows Task Manager
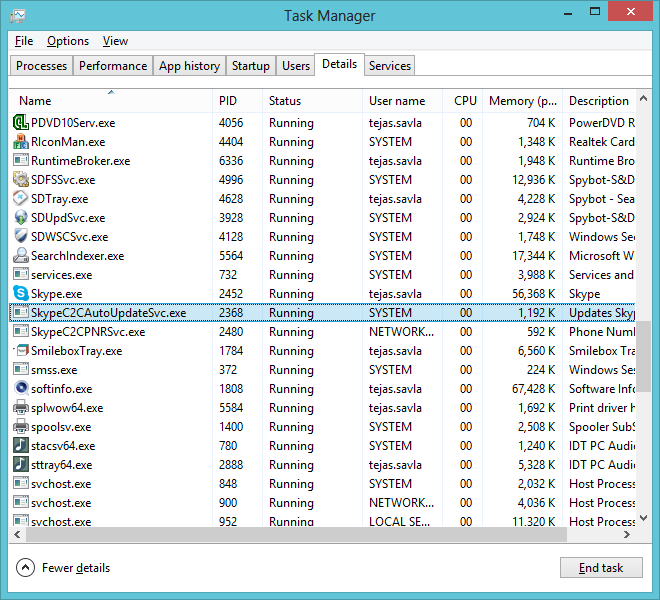
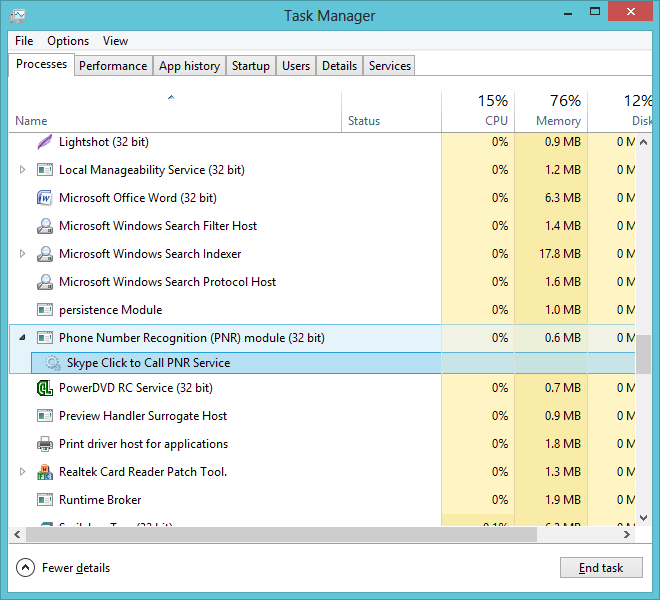
Skype call service is used globally by several people for long distance calling, conference calling, video calling, etc. using PC, laptop, tablet or smartphone. One of the default softwares installed on any PC would be Skype. However, most of us would have noticed that Skype gets started automatically during system startup. A closer look at the Task Manager would make you understand that apart from Skype.exe process, there are two more Skype processes running in background. These two processes are “SkypeC2CAutoUpdateSvc.exe” and “SkypeC2CPNRSvc.exe”, which can be seen in the Task Manager under “Processes” as well as “Details” tab.
In this article, we shall list the important tips to disable or remove SkypeC2CPNRSvc.exe and SkypeC2CAutoUpdateSvc.exe processes from Task Manager for better performance i.e. step-by-step guide to remove unwanted Skype processes.
Details about SkypeC2CAutoUpdateSvc.exe
Developed by Microsoft Corporation, this process is described as Updates Skype Click to Call. You will witness this process by its name under the “Details” tab of Task Manager, whereas by its description under the “Processes” tab (under Background processes) of Task Manager. Location of SkypeC2CAutoUpdateSvc.exe is “C:\Program Files (x86)\Skype\Toolbars\AutoUpdate\” folder. Alternatively, it may also be located at “C:\Program Files\Skype\Toolbars\AutoUpdate\”.
Details about SkypeC2CPNRSvc.exe
Developed by Microsoft Corporation, this process is described as Phone Number Recognition (PNR) module. You will find this process by its name under the “Details” tab of Task Manager, whereas you will find it by its description under the “Processes” tab (below Background processes) of Task Manager. Location of SkypeC2CPNRSvc.exe is “C:\Program Files (x86)\Skype\Toolbars\PNRSvc\” folder. Alternatively, it may also be located at “C:\Program Files\Skype\Toolbars”.
Steps to disable Skype processes SkypeC2CAutoUpdateSvc.exe and SkypeC2CPNRSvc.exe
Open “Run” command from the Start Menu for a Windows system. In the Run box, type services.msc and continue by pressing Enter key.
A service window is shown where you can spot the Skype processes.

Double click on the Skype service “Skype Click To Call PNR Service” (that provides phone number recognition services) and open the properties for service name “c2cpnrsvc”.
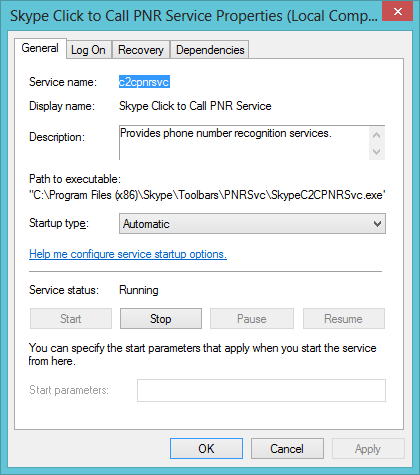
From there, click the button “stop” for this process and select the “disabled” option from the drop-down list for field Startup type. Repeat previous two steps for the other Skype service “Skype Click To Call Updater” (with service name “c2cautoupdatesvc” that downloads and installs product updates) to disable it as well.

For the “Skype Click To Call Updater” service, many people try disabling it from the system startup by simply turning off the “Skype Automatic Updates”. It doesn’t work and you will have to follow the previous step to achieve this.
I tried the above mentioned steps on my Windows 8 laptop and they worked like a charm. I no longer see those two processes running in the background for Skype. By doing this, I know that I have contributed towards the process of speeding up my laptop to a smaller extent. This is the biggest benefit of disabling any unwanted services or processes from the Task Manager of your system. Kindly be aware of the effects of the processes that you try to remove. The above listed Skype processed could be removed because they didn’t affect the OS. However, there are many background processes that you might not know much about. So, avoid tampering with them.
Please share your experience of killing or removing unwanted Skype background processes. It would be great to hear some other related tips for deactivating unwanted Skype services or processes!
How To Quit Skype On Windows 10
If you have opened Skype for the very first time and you do not know how to quit Skype, here is what you need to do. When you click the red cross icon to close quit Skype, it doesn’t stop working. It keeps working in the background so that users can get all the notifications in real time. However, if you want to quit Skype on Windows 10, follow these steps.
At first, click the System Tray icon in your Taskbar and right-click on the Skype icon. Following that, select the Quit Skype option.

Now, the Skype will stop working in your computer.
How To Uninstall Skype From Windows 10
If you uninstall Skype from Windows 10, it will eventually remove all the processes from the Task Manager. To do so, search for the Skype in the Taskbar search box, and select the Uninstall option.

Once done, it will ask for the confirmation. You can do that by clicking the Uninstall button again.
Hi,
I spent hours searching for the services to disable SKYP auto launch but no avail.
I tried everything I can think of but nothing works. It is not in the Start settings and still starts every time Win10 starts.
“SkypeC2CAutoUpdateSvc.exe” and “SkypeC2CPNRSvc.exe” are also nowhere to be find.
Can you advise how to prevent the AutoStart up?
I am at the point that I will drop Skype all together because the aggressiveness of it annoys me.