Use File History In Windows 8 To Backup And Restore Files And Folders On A Routine Basis
Not many users know that both Windows Vista and Windows 7 has a very useful “Previous versions” feature, which can be used to automatically backup files or folders on a scheduled interval and it is also possible to restore the backed up files to an earlier version using Windows built in backup/restore wizard. These earlier versions, often known as “Shadow copies”, are saved as part of system restore point and the “previous versions” of files were especially useful in restoring deleted files, files that have been modified recently or have been moved to a different location.
In this tutorial, we will learn in depth about File history feature in Windows 8 and how this feature can be used to perform a scheduled automatic backup of specific files, folders, Windows libraries to an external hard drive. After using this built in backup option, you won’t have to rely on third party file back up software and neither you would worry about creating system restore points over and over again.
What is File History In Windows 8?
Well, essentially file history in Windows 8 is exactly the same as “Previous versions” in Windows 7 but there are some cosmetic differences. First, File history won’t backup your Windows libraries by default, you will have to enable it from Windows control panel. Second, File history backs up all your important files and folders to an external hard drive but it will also store a cached copy of the changes in your current disk (if enough space is available). Should you loose or forget your removable hard drive at office, you would still be able to access an older version of a file from the local disk cache.
When you have turned on File history, the following stuff will be backed up by default:
- Your entire desktop (current user).
- Your contacts and favorites.
- All the default Windows libraries e.g My Pictures, My Documents, My Music and My Videos
Here is a view of my File history backup folder from the external hard drive:

However, you can initiate an automatic backup of any file or folder by adding it to a custom Windows library. Once you have done that, Windows will periodically backup the specified file or folder to your external hard drive, all you have to do is keep the external HD connected to Windows 8 and schedule the backup at regular intervals e.g twice a day or once every hour. The schedule has to be set one time only and is not at all manual in nature.
Setup File History In Windows 8
1. First, connect an external hard drive to your computer. The size of the removable drive doesn’t matter, as long as you are not backing up gigabytes of data but it is recommended to use a drive with at least 8 GB of storage space. Please note that you should not format this removable drive at all, as formatting the backup drive would defeat the sole purpose of using File history in the first place.
2. In WIndows 8, switch to the Metro Start screen, type control panel and click the “Control panel” icon to open Windows control panel [See screenshot refrence]. Next, type “File history” in the search box and click on “File History” as shown below:

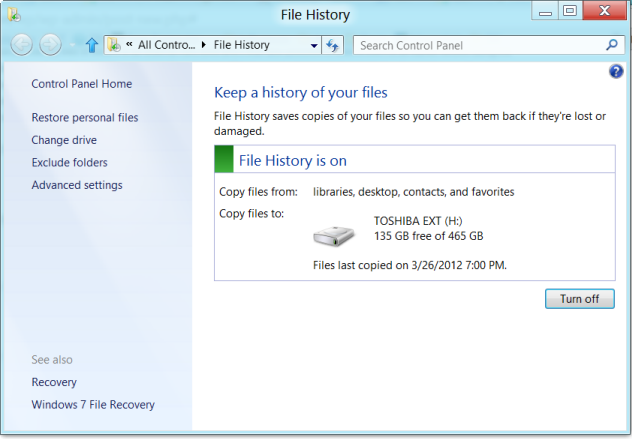
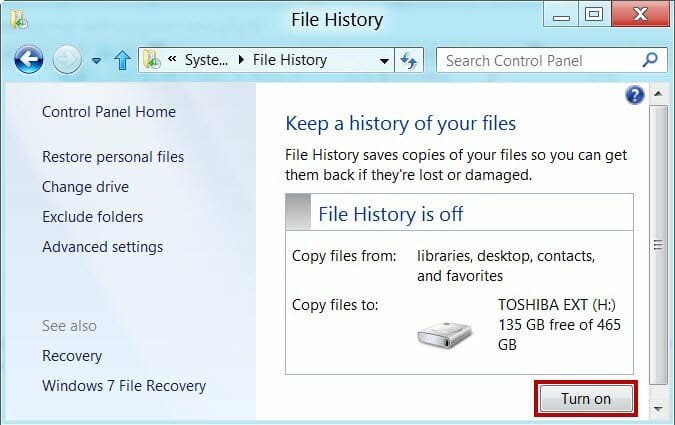
3. Windows will automatically detect the external hard drive and you would see that File history is disabled by default. Click on “Turn on”, as shown below:
4. Once File history is turned on, you will have to choose how often you want to save copies of your files and how long the saved versions should be stored on the secondary backup disc.
To do this, click “Advanced settings” on the right pane and specify the backup interval under “Save copies of files” and the expiry time under “keep saved versions”.

As an example, I have chosen the backup interval as 1 hour while the expiry time interval is set to “Forever”. You can however choose different settings for the backup interval (every 10 minutes, 3 hours, 5 hours, 6 hours or daily) and choose to keep saved versions for 1 month, 3 months, 6 months, 1 year and so forth.
5. Click “Save changes” and you are done.
Tip: When you are activating this feature for the first time, choose “10 minutes” under “Save copies of files”. This would make the setup faster, you can always change the backup interval schedule at a later point of time.
How To Backup A File or Folder In Windows 8 Using File History
Once you have enabled file history in Windows 8, sit back for 15 minutes and you should see a new folder has been created in the root directory of the removable hard drive that is being used for secondary backup (see example). This folder would contain the default backup of My pictures, desktop, My Documents, My videos and so on.
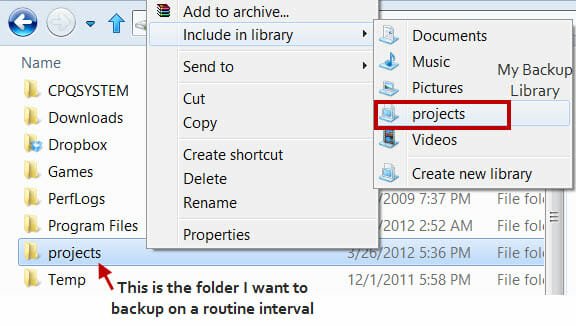
1. Right click a folder or file that you want to backup on a routine basis and choose “Include in library”. Then choose “Create new library”, give this library a suitable name e.g backup, important etc.
2. Now click “File history” in the explorer ribbon and you should see a message “File history is saving copies of your files for the first time”

Note: You will have to do it only once, Windows 8 will continue to backup this folder periodically, depending upon your File history frequency setting.
3. Wait for a few minutes until the backup is complete. Select that folder again, click on “File history” from the Windows explorer ribbon UI and you should see a complete backup log of the selected folder, an example is shown below:

Now there are two options. You can either restore the backup to its original location or you can click through the settings icon at the top right corner and restore the backup to another location on disk – this completely depends on your requirements.
File History will automatically archive your specified folders and will include the backup date and time in “Folder properties”. This ensures that you will be able to restore an older version of a file or folder from the auto created backup.
On an ending note, I would like to say that use File history to backup only selected file or folders and not your entire hard drive. While there is nothing wrong in backing up your entire hard drive and storing it in an external HD, please be advised that this will significantly reduce system performance and will surely hog down your system memory.
If you ask me, I always prefer using cloud storage providers such as Dropbox or Windows Live skydrive for automatic backup. But given that Windows 8 file history is automatic and seamless, I might use it for regular and fail safe backups, when no internet connection is available.
Try this out and let us know your thoughts and questions in the comments section.