How to Hotlink Protect Images Of Your Blog When Stored in Different Subdomain
When Mr X uses an image or file stored in your web server in his website, your image is said to be “Hotlinked”. That means, whenever someone is visiting Mr. X’s page, the image is pulled from your web server thus causing bandwidth theft. If you have a limited bandwidth quota and have to pay for extra bandwidth charges, it becomes quite necessary to implement hotlink protection for your website.
Hotlink Protection, Why remain strict It’s an open plagiarism issue. The blogger who wants to use your image should first download the image and host it on his own servers rather than using html to pull the content and the images from your site. And most importantly, if someone is using an image that you own, he/she must provide appropriate credit to your article with a backlink.
This is exactly what happened to us a week ago. Someone copied an entire article from Ampercent and hotlinked all the images. As this does not comply with the terms of this blog, we sent a humble email requesting the blogger to remove the images and the article. As there was no response within 2 days, we decided to enable hotlink protection in our blog.
Hotlink Protection Using a WordPress plugin
The WordPress automatic image hotlink protection plugin can be used to hotlink protect images of your blog but there is a small yet serious problem with the plugin. If the images of your blog posts are stored in a separate subdomain, this plugin doesn’t work. Thus, the plugin works perfectly if the images are stored in wp-content/uploads folder but not if we use a subdomain to store the images of our blog posts.
Hotlink Protection using Htaccess
The htaccess file is placed in the root directory of your blog and it can be used to prevent others from hotlinking your images. It is the best way to protect your images from hotlinking, but be careful while updating your .htaccess file. It is recomended to first backup the file and work on a copy to be on the safe side.
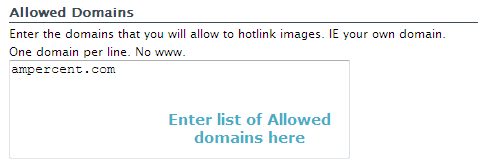
To get started, visit htaccess tools and add the domains you want to allow to use the images.
 You must enter your blog’s primary URL otherwise your own site would not show the images. The next step involves punishing those who steal images from your blog. This can be done by showing a custom image to those who hotlink your images.
Upload a custom image in any image sharing site (e.g Flickr) and copy the URL of the image. Next, paste the URL in the blocked image URL field as shown below:
It is recommended to store this image out of your domain to save bandwidth.
The last step involves specifying the file types of the images that you use in your blog posts. Enter each file type separated by a space.

Now hit the generate htaccess button and you will be shown a code for the htaccess file.

Next, open notepad and paste the generated code. Save the file as .htaccess and upload it in the root directory of your blog. If you have custom permalink structure enabled in WordPress, you may need to add all the necessary codes from your previous .htaccess file for proper functioning of your blog posts.
How to Hotlink protect images from Cpanel
If you have Cpanel access to your web hosting account, then applying hotlink protection would be quite easy. You just need to write the url’s whom you want to allow access. Follow the steps mentioned below:
1. At first, use any ftp software and back up the .htaccess file placed in the root directory of your blog. You may need this back up later if something goes wrong.
2. Log in to the C panel of your web hosting account and find “Hotlink protection” under the Security panel.

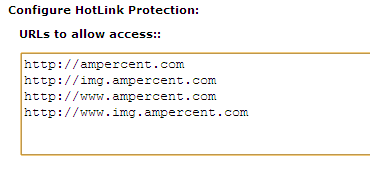
2. Allow your site to show the images by listing the main domain and all the subdomains you are using.

If you use a subdomain to store the images of your blog then you should also list the subdomain here. Otherwise your own blog as well as RSS feed won’t show the images used in the posts.
3. Next, choose the file types of your images. The images used may be in jpg, jpeg, gif, png or bmp formats. Paste all the image formats that you use, separating by a comma.
4. Choose a file that you want to show in case someone hotlinks your image from his website or blog. Put the image URL in “Redirect request to this URL” field.

The image should not be chosen from your site as the main idea here is to save bandwidth. Hence you can use any photo sharing website (e.g Flickr) and upload a sample image. Then you should use the URL of the uploaded image from Flickr in the “Redirect URL” field (see example).
5. Hit “Enable hotlink protection” when you are done.
Now any website hotlinking your images will show the sample image that you provided in step 4.
How to Test the Images of your Blog against Hotlink Protection
Now that you have enabled hotlink protection in your blog, it’s time to test and see whether things are working as they should. You can use the Hotlink tester tool to carry out a small test on the images of your blog.
Just enter the image URL which you want to test and you will be shown whether the image is protected from being hotlinked or not.
Another better option is to open a new blog at Blogger, and paste the source code of an entire article from your blog in a new blog post at the Blogger blog. If you can see the same images being shown, then something is wrong and hotlink protection isn’t working as it should. You should look back in your htaccess file and tweak it correctly.
However if no image loads in the duplicate article or if it shows the custom image you entered while enabling hotlink protection, then good news! You have successfully enabled hotlink protection in your blog.
Hotlink Protection does not allow Images to be shown in Feed Readers
After the Hotlink protection is enabled and working, your htaccess file will deny any image request from any external site. This includes Feedburner, Google reader, Bloglines, My Yahoo and all the other feed readers. Thus when you open the RSS feed of your blog in any feed reader, you see the same image that you had put in the “Redirect URL” field. In the worst case, you do not see any image at all.
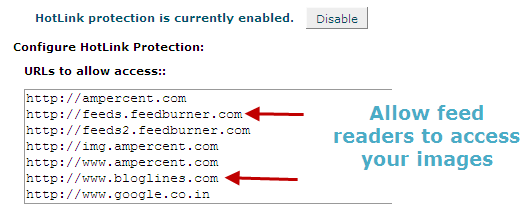
To solve this problem, login to the Cpanel of your web hosting account and navigate to “Hotlink protection” again. Add the base URL of your RSS feed in the “List of allowed sites”. If your feed is syndicated with Feedburner, just add http://feedburner.com in the allowed sites list.

You may also consider to add the base URL’s of all the feed readers to be extra safe. For example: you can add www.google.com, www.bloglines.com and so on. If you have used the htaccess method to enable hotlink protection, then you should add all the base URL’s of the feed readers in the allowed sites list.
Something Went Wrong. I can’t see the images in my Blog and Rss Feeds?
If you can’t see the images in your site after enabling hotlink protection, may be you have messed up the .htaccess file. Restore the .htaccess back up that you had taken in step 1. This will revert to the old .htaccess settings and hotlink protection will be disabled. If you still face problems, leave a comment in this article.
From the bottom of my heart – THANK YOU.
Because of your article – the very last 2 paragraphs – i was able to FINALLY fix my long term issue NO ONE KNEW how to sole. Neither my hosting company nor plug in creators.
My subscribers could not see images in my newsletters and no one knew what the problem was. I just added google .com (for gmail subscribers) and other domains and her we are – images are showing !!!
I love you.