5 Best Screen Capture Tools to Take and Share Screenshots
It is much easier to take a screenshot with the best screen capture tool than browse the entire internet for finding an appropriate image for your project. Whether you are working on a Windows operating system or a macOS, there are pre-defined shortcuts like –
- Pressing the PrtSc key on your Windows PC or laptop. This will take the screenshot and you can then paste the same into a word document or image editing application like Microsoft Paint.
- Pressing keyboard shortcuts on your macOS like [command]+[Shift]+[3] to capture the entire screen and [command]+[Shift]+[4] to capture a selected area and finding the image file on your desktop.
Yet, these methods do not give out concise results when it comes to creativity and editing, which is why online tools have been created to assist users in their creative endeavors. These tools work wonders for users as some of them not only have the capacity to capture images but also stills from videos as well!
So, here we are with 5 of the best Screen Capture tools to take and share screenshots that are available online for you to use.
1. Lightshot
Lightshot is one of the best screen capture tools that is available for both Windows and Mac users. Users can download and install the application from the official website. Mac users can also download it from the Mac App Store. Here are the steps to install and use the tool –
Step 1: Install Lightshot from the official website.

Step 2: If you are on Windows, press the ‘PrtSrc Key’ on the keyboard and then left click on the screen that you want to capture and drag your mouse down. If you are on Mac, Use Command+Shift+4 shortcut to capture an area of the screen.

Step 3: After selecting the area that needs to be captured, you can adjust it as you want and click on the upload button around the margins of the selected area.

Step 4: Once the upload is complete, you will receive a link to the cloud where the image is saved to. You can save the link for future reference or choose to open it. Clicking on the link will open the screenshot in the cloud. You can even directly share the link on social media.

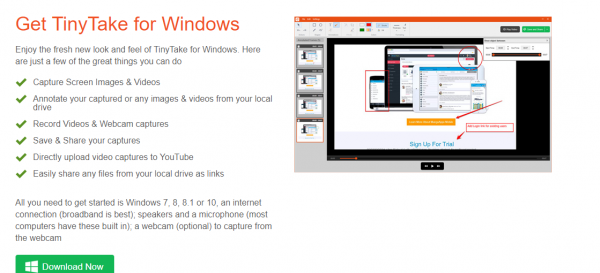
2. TinyTake
If you are looking for a screen capture tool to take and share screenshots without the risk of spyware, then TinyTake is another best screen capture tool. A product of MangoApps, this tool is compatible with both Windows and Mac PCs. The tool comes as a free version if intended for personal use.
Follow these steps to use the tool:
Step 1: Go to the official website and choose whether you want to download for Mac or Windows according to your PC.

Step 2: Once the download is complete, install the package into your system and launch it.
Step 3: After the launch, you will be asked for login credentials. Create a new Account accordingly.

Step 4: Once set up, the application keeps running in the background and can be used whenever required by utilizing the default hotkeys or by clicking on its icon on the home screen.
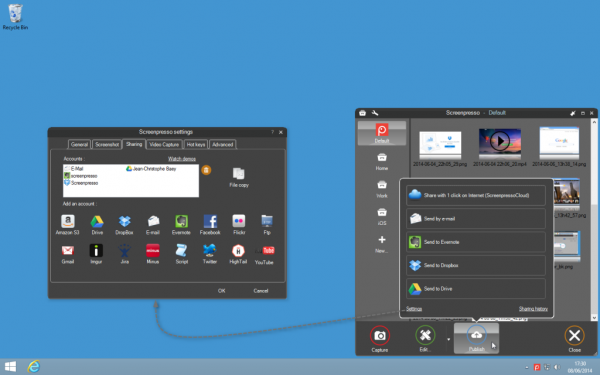
3. Screenpresso
Screenpresso is not just a capture tool. It also has the features of a built-in image editor. The tool is available for download for all versions of Windows only.
Step 1: Download Screenpresso from its official website.

Step 2: Run the downloaded software and choose the options suitable for your use.
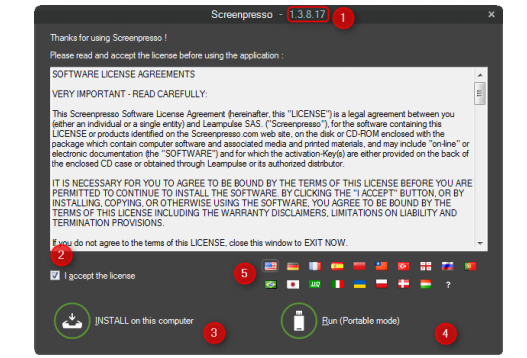
Step 3: Once the tool is installed, it will magically assist you every time you press the Print screen key on Windows or Command+Shift+4 keys of Mac.
Step 4: The mouse will convert into a crosshair and you can choose the part of the screen that you want to capture with pixel-perfect accuracy.
Step 5: You can even choose to capture the screen as a Video for demonstration or presentation purposes.
Step 6: Once the image has been captured, you can also use the built-in image editor to make the necessary changes to the image.

Step 7: Once the final image is ready, it can now be easily shared online.
4. Jing
This best screen capture tool is a product of TechSmith and its special features that separate it from the rest is as follows –
- Sharing files with Jing is easy and fast
- Upon installing the screen capture tool, if you choose to create an account on Screencast.com, you can also set up the application to upload to their YouTube or Flickr account.
- You can remove any type of branding from your images and videos by upgrading to a premium account by just paying $15 annually.
Below are the steps to install and use Jing:
Step 1: Visit this link to download Jing for your Mac or Windows.

Step 2: You can also review what the system requirements are before you go ahead and download the file.
Step 3: Once downloaded, run the file. This will open a dialog box wherein you need to select the box which says “I accept the fine print” then select “Install”.
Step 4: After installation is complete, you will see a yellow semi-circle popping out from the corner of your screen. When you hover your mouse over it, you will be presented with three options. Select the Plus sign to get your desired screenshot.

Step 5: This will initiate a crosshair as shown below. Use this to select the screen area that you want to capture.

Step 6: Once selected, you will be able to see the image options.

Step 7: Click on Capture image to capture the screenshot. Alternatively, you can also capture a video.
Step 8: The image can also be annotated on the next screen that pops up using the tool options on the left.

Step 9: Once done, you can copy the image to the clipboard from where you can easily paste it into any required document.

5. Skitch
Skitch has been exclusively designed for Mac Pcs and can be downloaded from the Mac App Store. The main feature of this best screen capture tool is to help users to quickly edit and share screenshots. To install the Skitch tool and use it, follow the steps below-
Step 1: Download and install the Skitch tool from this link.

Step 2: Click finish and launch Skitch on your Mac.
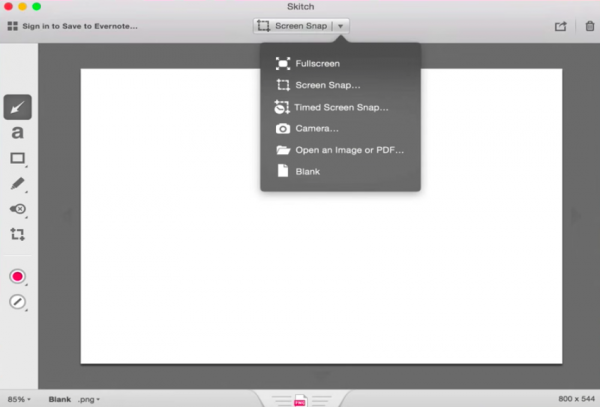
Step 3: The respective options can be used to take a fullscreen screenshot, a screen snap, or even a timed screen snap as required.
Step 4: The corresponding markup tools on the left-hand panel can then be used to edit the image accordingly.
Conclusion
With so many best screen capture tools at your disposal, there is no need to worry about using various software to edit your images. These 5 tools come with all the basic features that your image or video clip requires. If you have not used one yet, then it’s time that you give it a try. What are you waiting for?

