How To Permanently Delete Confidential Data From Your Computer Using Eraser
All of us will try to sell an old laptop or desktop computer at some point in our lives.
The danger with selling your computer however is that it often contains personal data that you would rather not have out in the public. You may think that if you delete that file with all your passwords in it its gone forever, but that’s not necessarily true. When you delete a file in Windows, it doesn’t actually remove the file from the disk.
That’s why you need Eraser.
Eraser is a free, open source utility which can be used to delete files permanently from hard drive and created for the sole purpose of protecting your information. What eraser allows you to do is completely delete specific files or delete multiple files in bulk. So you can always make sure that the specific files cannot be recovered by other file recovery tools you never want anyone to find. The process entails the overwriting of data on the disk multiple times, creating a layer so thick that it can’t be read through.
Eraser’s current version is compatible with Windows XP, Vista, and 7. They have versions for 98, ME, NT, and 2000 available as well. We have earlier discussed Filekiller: another simple utility to delete files permananelty, which overwrites the data to be deleted with a new random set of data, making the original one unreadable or unrecoverable.
Erasing Your Data With Eraser

When you open Eraser for the first time, you will see a window similar to this one. It’s a very basic interface, and that’s okay.
For this example, I am going to click the downward arrow to the right of ’Erase Schedule’ and select New Task. You can accomplish the same thing with the keyboard shortcut of Ctrl-N.

The new window will be the ‘Task Properties’ pane. Here you will have several options regarding the nature of your task. You can opt to give it a name, set when to run it (manually, immediately, upon a restart, or recurring), and you can add data to be erased. For this example, we are going to leave the setting alone, and click Add Data.
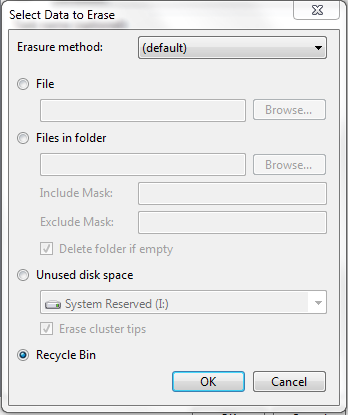
The next window is the data selection pane. Here you can choose the erasure method to use from a drop down menu, and what data to erase. You can erase a single file, a folder of files, a set of unused disk space, or your Recycle Bin. I am going to select to erase my Recycle Bin using the default erasure method.
Once you have made your choices, click OK. You will be taken back to the ‘Task properties’ pane, where you can choose to add more data. I will just select the Recycle Bin. When you are done here, press OK.
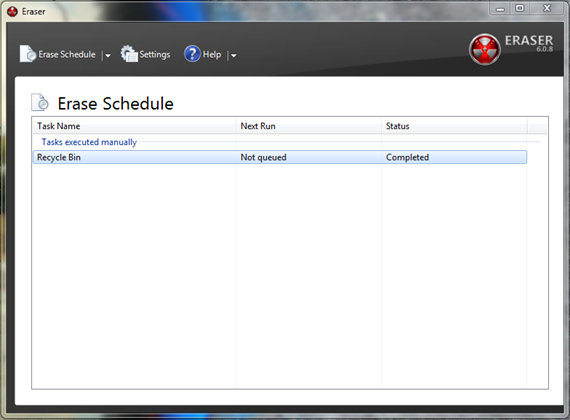
Depending upon your choices, you will need to initiate the data erasure. I needed to right click on the list entry and select Run Task. Once I did that, it ran very quickly, and displayed the word ‘Completed’ in the status section of the main window.
Permanently Protecting Your Data made Easy
As you can see, using Eraser to permanently delete confidential files, data and information from my computer was fairly easy. Be careful not to have it delete a file you want or need, however. The programs job is to make data unrecoverable, and it does it very well.
What are your thoughts on Eraser? Which programs do you use to erase data permanently from your computer’s hard drive ?Please leave any questions or thoughts in the comments below.
Related: How to automatically delete temporary internet files from your computer

