Facebook Profile Image Trick: Give An Attractive Look To Your Facebook Profile
A few days back, Facebook launched the newer Facebook profile with a polished design and some interesting features. If you haven’t switched to the newer Facebook profile yet, go to facebook.com/about/profile and hit the big green button at the right that says “Get the New Facebook Profile”.
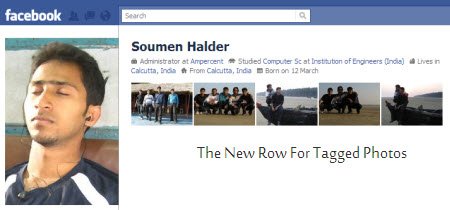
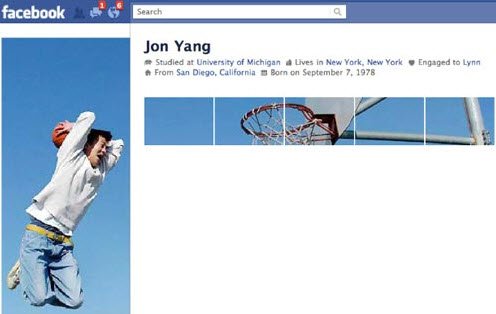
The most talked about feature in the newer design is definitely the Facebook profile photo trick with layered thumbnails. You can tag yourself in some of your photos and they appear right at the top of your Facebook profile page, as shown below:
 You can tweak the above arrangement of tagged photos and create a more attractive Facebook profile with an innovative layout.
This involves slicing one of your images into multiple thumbnails with accurate dimensions and then tagging each thumbnail in a sequence, so that the entire image (or part of it) completes itself by the arrangement of Tagged photos.
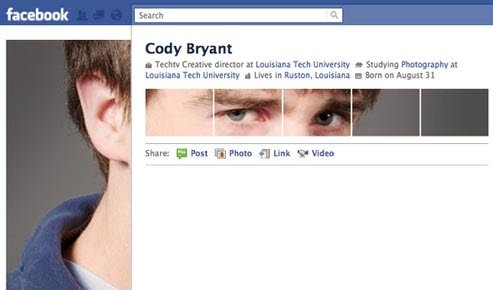
An examples of the Facebook profile photo hack is shown below:
A great list of other creative customizations can be found here
There are two different ways to implement the above trick with your Facebook profile image.
Use a PSD Template To Slice The Profile Image Using PhotoShop
If you have the knowledge or expertise of advanced Photo editing applications like Photoshop or GIMP, head over to the Digital Inspiration blog and read the step by step procedure on completing the layered Facebook profile image trick.
They also provide a PSD template, download the PSD template and import your image as a new layer. Then export all the thumbnails as well as the main profile image and upload them to a new Photo album in your Facebook account.
Next, tag all the sliced images one by one in a particular order, until you are able to complete the Facebook profile photo customization trick.
Use A Facebook App To Get The Customized Photo Slice Trick
If you are no geek and do not have the knowledge of Photoshop or other Image editing applications, use this simple Facebook app called Picscatter.
1. First ask one of your friends to send you a screenshot of your current Facebook profile. This is required to note the number of lines in your “profile bio” field.
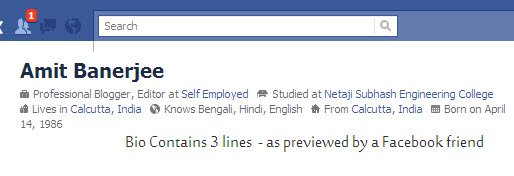
You will need to ask one of your friends because you may see added links in that Bio field (e.f Edit profile, email address) and other information due to their privacy settings. [ Thanks Debajyoti ]
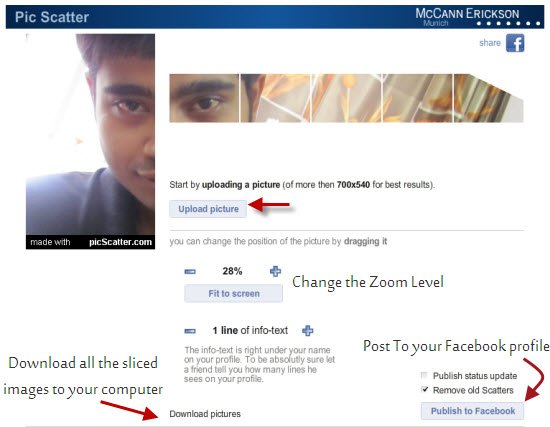
2. Go to Picscatter.com and upload an image with a minimum dimension of 700 X 450.
3. The application will automatically slice your image into multiple parts and will let you preview how your Facebook profile is going to look, once you complete the photo customization trick.
Facebook profile sliced images trick
4. You can zoom into the image using the “Zoom” tool and change the position of the image by clicking and dragging across the page. Remember to select the value of the info text to exactly the same value as your friend reports.
5. Once you are satisfied with the position of the main profile pic as well as the position of the “tagged photos”, hit the “Publish to Facebook” button.
6. The app will compile all the images into a new photo album, will save it to your Facebook profile and then auto tag them in the required sequence.
7. Next, open the same photo album, choose the main image and click “Choose This Image as Facebook Profile picture”.
8. All done, your customized Facebook profile image is live !
Note: Make sure you prevent other users from tagging you in Facebook photos or videos. In future, if any of your friend tags you in a Facebook photo or video, it will appear in the row of “Tagged photos”, which will destroy the entire beauty of your Facebook profile image and the order of tagged photos.
Some More Tips On choosing The Correct Image
It took me some time playing with the tool and I faced quite a few problems while getting the photo customization to look the way I wanted. Do take care of the following points:
1. Use an image where you are looking directly towards the camera, with eyes parallel to the ground (better)
2. Use a single image of yours, don’t use any group photo. You can certainly zoom into your own face but excessive Zooming will result in bad image quality
3. The main image is where lies all the beauty. It will be also used as a thumbnail in the news feed, comments so make sure a portion of your face appears in the main Facebook profile image.
4. Innovate, think out of the box. See this example
Here is how my Facebook profile looks, after the profile image customization is complete.

Hat tip to Abhijeet for the amazing find.
Have you tweaked your Facebook profile image and the group of tagged photos ? Leave your suggestions and thoughts in the comments section.
Upcoming: A few days back I managed to take a sneak peak in one of the upcoming features in Facebook photo album – slideshow (currently taken down by Facebook after the 5 minute outrage)

his is very good for us and very interesting.i have some special for related computer and internet
computer and internet
c programmigng
html tutorial
java script tutorial
c++
java language
csharp
python
dbms