Block Websites Using OpenDNS for Better Parental Control
Internet is a source we really have to rely on these days. However, consider the following cases,
1. The web is full of content that parents are really interested to keep their kids away from. It can be websites with pornography, drugs’ information, academic frauds etc.
2. It can be social networking sites which is a major distraction that employers really want to negate for a productive working environment.
3. Or it could simply be a malware website that any of us wish to stay away from.
So no matter who you are, web-content moderation is a necessity to be safe while browsing. And here is how we can set up a proven web-content filtering for our network (office or home) with a simple DNS hack. If you are unaware of DNS, let me explain it in brief.
What Is DNS Server and why do we need it?
Whenever you type an URL into your browser address bar and hit enter, a request is generated by your computer. Since the computer is unaware of the location of the URL you typed it asks the DNS (Domain Name System) you are using (yes you are already using it without knowing and this is provided by your ISP). DNS is a like a telephone directory which knows the IP addresses for the human readable URLs. If you type www.ampercent.com the DNS will return 66.185.16.37 to the computer and thereby a connection will be established with the server on which Ampercent is hosted. Most popular public free DNS servers are Google Public DNS and OpenDNS.
OpenDNS is one of the free DNS servers mostly used around the world. It offers fastest redirection and boasts of a really big inventory containing IP addresses for almost every URL people are looking for. In this tutorial we will use OpenDNS to block a website.
1. Go to OpenDNS signup page and create a free account. If you are already registered, login to OpenDNS.
2. Go to Dashboard. Click the button “Add a network” to start with the service. For existing customers, if you have it configured already skip this step. You can also find the option to add network under Settings.

3. If the service detects your network IP on its own, do not alter it. Just press the button “Add This Network”. If the service doesn’t, open KnowMyIP or WhatisMyIP and you will get to know your IP there. Enter this and press the button “Add This Network”.
4. You will be asked to give your recently added IP a name for identifying it later.
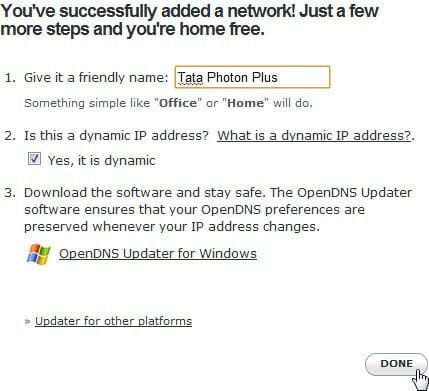
5. Once your IP is added, click the IP address to manage it.

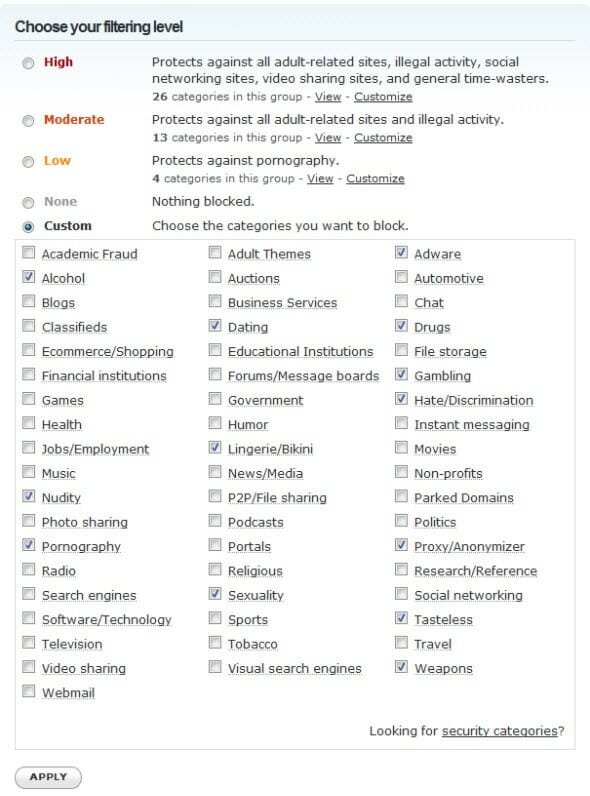
6. Now as you can see there are different levels of content filtering. You can choose from the predefined ones or you can customize any of them to meet your needs. I will be using the highest level of filtering for my IP. Once you have chosen yours, use the button “Apply” to save changes.
7. You can also choose to Always Block or Never Block a domain using the next section. After typing in the domain press the button “Add Domain”.
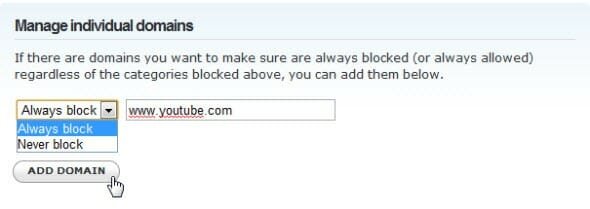
This is the best part about this technique. For all other procedures, you will have to enter the site URLs one by one. The task is quite tiring and its true that we hardly know a tiny percentage of those sites, so, the major percentage of those go unchecked. Since OpenDNS has a good categorization (based on user reviews and testing) and a large database, you can be sure about the filter.
You are all done configuring your DNS server to block the websites of your choice. In the following section we will see how to configure our PC/Router to use the OpenDNS server.
Choose OpenDNS as your DNS for your Computer
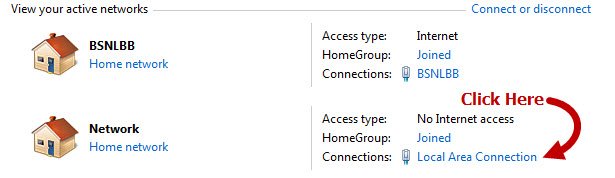
1. Open Control Panel and go to Network and Sharing Center.
2. Click the Local Area Connection link.
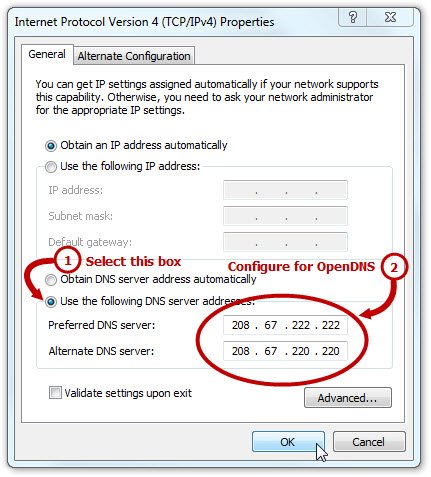
3. As the status window opens, click the Properties button at the bottom. Now in the next window, choose Internet Protocol Vesrion 4(TCP/IPv4) and select Properties.
4. Select the option to define your custom DNS server. Now enter the OpenDNS nameservers. Once done press OK.
5. Close all the previous windows. Repeat steps 2-4 for all the other networks you use to access Internet. As you can see, in my case its BSNLBB.
6. Restart your Internet connection to apply the new settings.
The above steps is demonstrated using Windows 7 OS, you can find the steps for other operating systems here. If you are worried about kid changing the settings from Control Panel, learn how you can disable Control Panel access for him/her.
Choose OpenDNS as DNS of your Router/Server
The DNS settings perform best if configured for your router or modem. You can go to the OpenDNS router setup page, choose the manufacturer of your router and proceed to the instructions. If your router manufacturer is not listed there try using the general instructions. If you own a server and wish to configure OpenDNS for it go ahead and follow the instructions here.
Check If the Web-Content Filtering is Working Perfectly
Now that you are all set, let us see if the filters are working properly. Since I have disabled social networking websites using my OpenDNS, I will try opening Facebook. If you have everything setup alright and the filter has acted properly here is what you will see on the browser.

Update Your OpenDNS Account with your Dynamic IP
What is Dynamic/Static IP?
IP addresses are provided by the ISP (Internet Service Provider). Whenever you connect to the internet, your ISP allocates an IP for you. Now if this gets changed every time you start a new internet session, it is called Dynamic IP. Whereas if it remains the same, it is referred as Static IP. Most of the ISPs allocate Dynamic IP to their users since number of IPs are limited. Unless you pay or instruct your ISP for a special (read static) IP you are provided with a dynamic one. So in case you have no idea about the type of your IP, you can treat it as a dynamic IP.
Now if you are using a dynamic IP you need to update your OpenDNS account. This is because OpenDNS web-filtering settings are valid for the network IP you have provided in your account. here is how you can update your OpenDNS account with your recent IP.
1. Download OpenDNS Updater and install it.
2. Start OpenDNS updater and enter your OpenDNS account credentials and press sign in.
3. The program will now sit in the system tray and automatically update your OpenDNS account with your network IP.
4. Double-click the icon to open the app window if you wish to manually update your IP.
All set, you can rest in peace. If you are a Windows user, you may like our other related topics how you can setup parental control in Windows 7 or block websites in XP to keep a check on your kids web habits. You can also block any website on Internet Explorer, Firefox and Google Chrome. Feel free to drop a comment if you got stuck somewhere.
That is a lot of work and does not bode well for all the portable devices running around the house. A better way is directly through your cable or DSL modem by changing the DNS settings to the IP addresses suggested above and adjusting the modem firewall settings to block specific types of traffic. This is what I did on a Q1000Z DSL modem. Most modems are basically the same. I post here so you can get the general idea.
1. Set the OpenDNS server addresses for
the router.Advanced Settings ->WAN Settings ->4. Set the
DNS type, choose the Static DNS option and enter both the OpenDNS
server IP addresses.
208.67.222.123
208.67.220.123
2. To protect against bypassing OpenDNS,
block all DNS requests. The routers firewall is very limited, but I
found the right option to block port 53 UDP which is what is required
for DNS. Advanced Settings->Firewall- Set Addressing Type
to “All Private IP Addresses”- Set Firewall Security
Level to either Low, Medium, or High. I chose Low and unchecked ports various ports as needed. At a minimum, uncheck/block the
following:a. DNS 53b. DNS QWEST 53 (or equivalent to your provider)c. IPSEC 50, 51-500 UDP
3.
Configure the router’s local IP as the primary DNS that gets sent to
the DHCP clients. This allows the clients to relay DNS requests
through the router, and on to the OpenDNS servers.Go to Advanced
Settings -> DHCP Settings ->5. Set the DNS servers allocated
with DHCP requests. Check the Custom Servers option and enter the
router’s local IP (usually 192.168.0.1) for the Primary DNS. And
enter one of the OpenDNS server IP addresses as the secondary. The
only reason this is done is that the modem requires 2 valid
addresses, though in this case the secondary will never get used.4.
Click “Apply” at the bottom and wait for the router to
restart.5. Restart client machines, or renew IP addresses and
verify that the DNS server is 192.168.0.1. Everything should work as
expected and if you try to use a different DNS manually the request
should be blocked. Only DNS requests to the router’s local IP should
succeed because it will forward those requests on to the OpenDNS
servers configured in the router.
Keep in mind that any DNS blocking can be easily circumvented by entering an IP address into the web browser address bar.
How it will be work while using proxy.. I’ve some nearly 200 proxies. Those different Ip addresses.. and some ip’s have unique port.. How open DNS will help while using proxies???
Also a great free website I found is K9 web protection. In fact its the best one yet. Its not a dns server but it blocks porn and social media very well. You just have to set the limit to high and remember it also blocks youtube so in the setup page you need to enable youtube ad other sites it may have blocked.
Those are the best site to watch new release movies online free without signing up