How To Disable Automatic App Updates In Windows 8 And Above
Windows 8 was an innovative operating system update from Microsoft which incorporated the app world in laptops. But Windows 8 and above users know that they never actually see any notification when an app updates. The windows store automatically downloads updates to all apps whenever available. If you were wondering why the calculation for your monthly data usage was off, this is probably your answer. The updates get automatically downloaded and installed in the background and therefore it is almost impossible to tell which app got updated. If you want to disable automatic app updates, you can use any of the mentioned methods.
Disable Automatic App Updates Directly From The App Store
This is the easiest method. Simply follow these steps –
1. Go to the start menu of the Windows version you have.
2. Click on the windows store to open it.
3. Open the right screen bar by dragging or pressing the ‘Windows + C’ keys together.
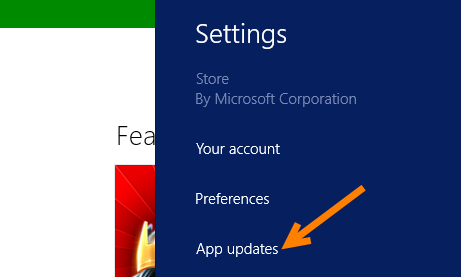
4. Then Click on the ‘Settings’ menu.
5. Now the app store settings menu will open up. Click on ‘App Updates’.
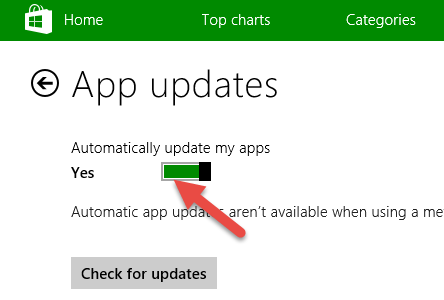
6. You will now see an option ‘Automatically update my apps’. It will probably be set to ‘Yes’. Click on it to set it to ‘No’ and disable automatic app updates.
Now you won’t have to worry about those heavy apps wasting your Internet plan. If you cannot find a way to deal with the problem through this solution, this may be due to the fact that you are not logged in with a Microsoft Live ID in the app store. If you don’t have a Microsoft Account, you can follow the next mentioned method and modify the computer registry.
Disable Automatic App Updates Through Registry Editor
To disable the updates with the help of the registry editor, follow these steps –
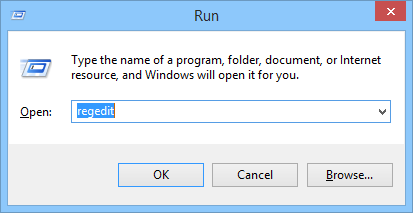
1. Open the Run menu of windows by pressing the ‘Windows + R’ key together. This will open the Run dialog box.
2. Type ‘regedit’ in the box and hit ok. This will open the Registry Editor. You can also open the editor by directly typing ‘regedit’ in the Search box.
3. When the registry editor launches, on the left hand panel under computer, go to the folder HKEY_LOCAL_MACHINE. Now go inside the SOFTWARE folder. Search for a folder named ‘Microsoft’ and expand it. Under it, expand the ‘Windows’ folder.
4. Now go to CurrentVersion —> WindowsStore —> WindowsUpdate
5. In the right hand panel, you will be able to see a file named ‘AutoDownload’ of the type ‘REG_DWORD’
6. Double click the file ‘AutoDownload’. This will open up an editor. Under the ‘Value Data’ option, enter a value of 2 and hit Ok. This will now disable automatic app updates.
Note – If anytime you want to revert the changes and enable the automatic app updates, you can simply change the value of AutoDownload back to 4.
Conclusion
You can use any of the mentioned methods. But keep in mind that now whenever you want to update any app, you have to manually check for updates by going to the Store menu settings and clicking on ‘check for updates’. If you encounter any problems while changing the settings, please let us know through the comment section.


