How to Change Screen Resolution in Windows 10?
So you want to know how to change screen resolution in Windows 10, don’t you?
The display resolution or screen resolution is responsible for the clarity of images and texts on the monitor. If you set a low resolution, you will have large objects but less clarity. On the contrary, a higher resolution renders clear objects with room to multiple items.
You might have noticed that the desktop context menu (one you get when you right-click on desktop) has no option to change screen resolution. In earlier versions of Windows, you can avail Screen resolution right from the context menu. But Windows 10 is different.
In this tutorial, I will help you change display resolution in Windows 10.
How to Change Screen Resolution in Windows 10?
You can do it in two different ways. So, I am going to explain both the ways to change screen resolution on Windows 10.
Also Read:- How to Increase Internet Speed in Windows 10?
So, are you ready to dive into the core of this post? Here you go!
Change Screen Resolution in Windows 10- Method 1
You can follow the steps given below to change your display resolution in Windows 10 computer.
Step 1: Turn your computer on. Don’t open anything! All we need is the desktop. So, be at the desktop and, right-click.
Step 2: You will get a context menu here. As I said earlier, you can’t get a direct menu to screen resolution here. The item we want is hiding. We need to pull it out.
Click on Display Settings.
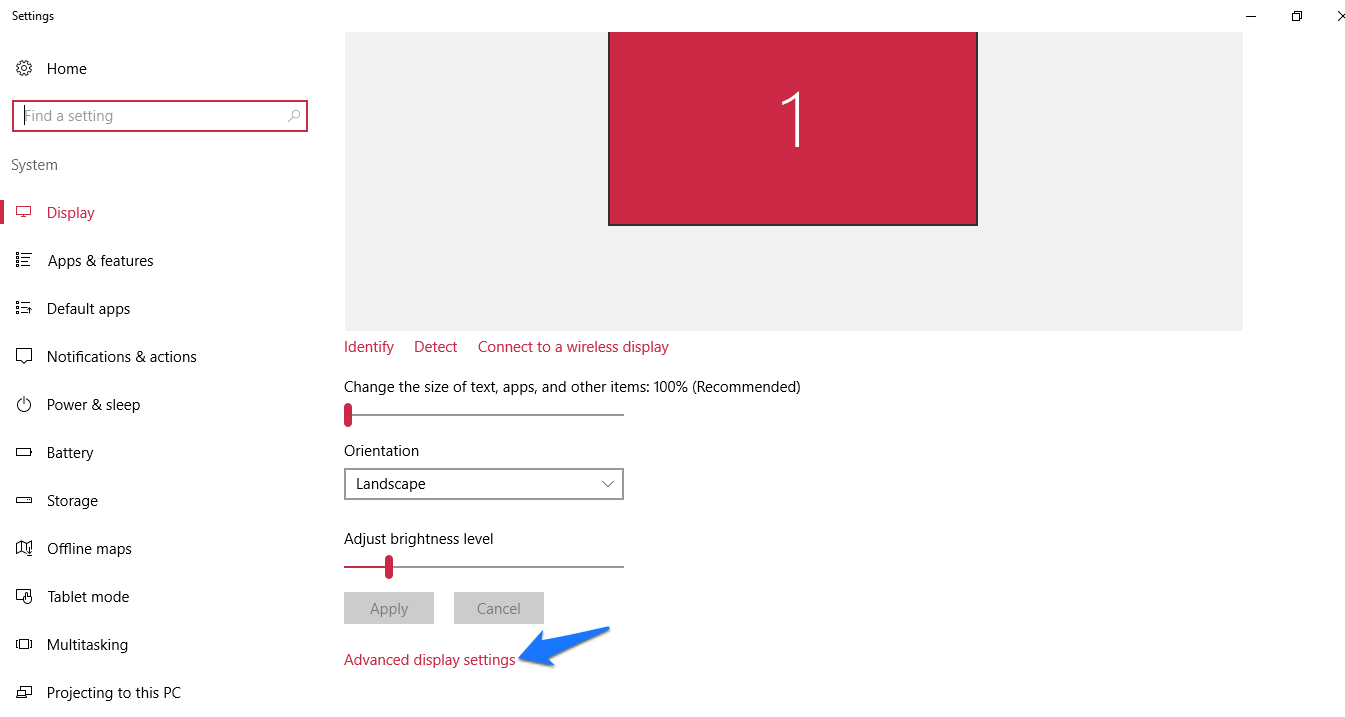
Step 3: You get a settings window. There, you can adjust the text size, orientation and brightness level as well. What we need is screen resolution. Clearly, you can’t see anything related to resolution there.

Choose Advanced display settings.
Step 4: Now you get it! The first drop-down menu you see beneath the large rectangle is what you want. You can see all the resolutions supported by your computer there.

Choose what you want and hit the Apply button there you go!
Step 5: Next you will be asked whether you want to keep the changes or not. If you are sure about it, you can press the button that says Keep changes.

I suggest you keep the recommended resolution. In all the cases, the recommended resolution is what suits your computer the most. In case you see any weirdness in the recommended resolution, you can use this method to change it.
Also Read:- Windows 10 Registry Hacks for Better Performance
Change Display Resolution in Windows 10- Method 2
If you don’t like to go with the first method, you can go with this one. You can go with this only if you have Intel or NVIDIA graphics.
For Intel Graphics
Step 1: Right click on the desktop and follow Graphics options >> Resolution.

Step 2: Hurray! You got it! You can see different resolution options there. Choose one and keep the change. That’s it.
Note:- Alternatively, you can access Graphics Properties to change the resolution from a panel.
For NVIDIA Graphics
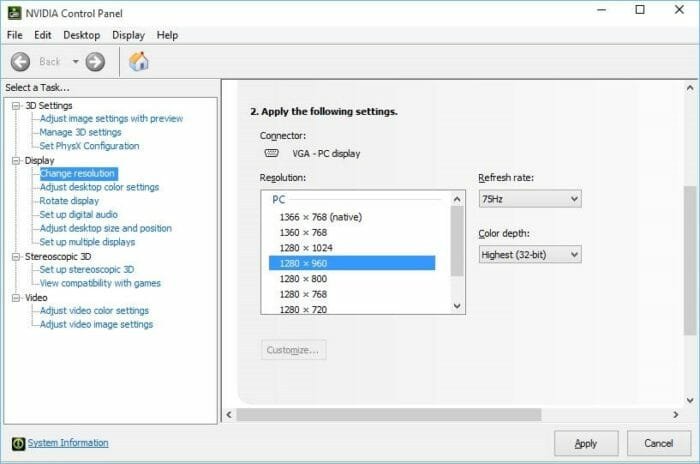
Step 1: Right-click on the desktop and choose NVIDIA Control panel.

Step 2: Follow Display >> Change resolution from the left panel. There you go! You can choose one and hit Apply.

Also Read:- 5 Best Download Managers for Windows 10
Wrapping Up
I hope you know how to change screen resolution in Windows 10 now. If you have any doubts regarding this, don’t forget to drop the same in the comment section down below. I will reach out to you at the earliest.
Do you know any other option to change display resolution on Windows 10? Just share it with us.
Moreover, I appreciate if you share this with your friends and followers on social media.

