Set up a Wi-Fi Hotspot on your Windows 8 machine – Command prompt and App Method
We have already covered on how you can set up a Wi-Fi hotspot on a Windows 7 machine. But with Windows 8, the option to set up a Wi-Fi hotspot is no more available. One of the useful networking features found on Windows 7 was quietly taken away in the newer offering. Not to worry, we have this covered. There are two ways to go about it – One that involves a little bit of digging through windows command line interface and the other a simple click through app option in the Virtual Router Plus.
Setting up a Wi-Fi Hotspot in Command Line
You can follow the complete guide on how to set up a Wi-Fi hotspot through command prompt app in Windows here. The command prompt can be found in the list of apps accessible through the Search charm. You can also search for the app by typing command prompt. (Tip: If you use an app regularly, you can add it the start apps by right clicking on the app and then select “Pin Start”). You need to run this app as an administrator, available in the same right-click menu as “Run as Administrator”.

The few commands that you need to enter for this are
To set up a Virtual Wi-Fi
netsh wlan set hostednetwork mode=allow ssid=N7110 key=password
To start the created Wi-Fi
netsh wlan start hostednetwork
To stop the Wi-Fi hotspot network
netsh wlan stop hostednetwork
To check if the Wi-Fi network was created
netsh wlan show hostednetwork
You can find a detailed info in the article mentioned above.
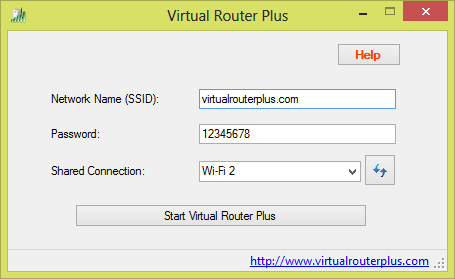
Set up a Wi-Fi hotspot through Virtual Router Plus
If you, like us, do not like to type the commands as mentioned above, then Virtual Router Plus is the app you need. Its free and setting up the Wi-Fi hotspot is a matter of few clicks.
Download the Virtual Router Plus zip file. Extract the file and put it on your desktop or among your start apps. There is no installation required. Just open the app and set up your desired Wi-Fi hotspot network by giving it a name (SSID), password if you wish to keep your Wi-Fi network out of bounds for strangers, and choose which connection (either from your ethernet/broadband connection or through USB-enabled netsetter) you want to share the internet to. Then click “Start Virtual Router Plus” and that’s it! You have your internet shared through this Wi-Fi network/hotspot!
Virtual Router Plus saves these settings, so all you have to do is open this app and click on the button to set up the Wi-Fi hotspot whenever you wish.
You can share your internet through Wi-Fi hotspot to any devices that have Wi-Fi in it. All you have to do is join this Wi-Fi network from your iPhone, Android, Laptop or any devices and enter the credentials you have given. In both the cases, make sure you set the Power settings appropriately if you want the Wi-Fi hotspot running after closing your laptop lid. Let us know your thoughts here in comments. For now, happy sharing!
Sources: Virtual Router Plus – CNET, Set up Wi-Fi hotspot through Command Prompt