How To Remove The Lock Screen On Your Windows 10 PC Or Laptop
Lock screen on the recent Windows Operating systems might annoy some users as they have to perform an extra action of swipe up or click to pass through it. Several other actions like switching through apps or using the settings were also based on gestures. This is because, when Microsoft first launched Windows 8, it was designed primarily for the touch screen devices.
However, Microsoft understood this difficulty of the users with traditional desktops or laptops and created a newer version of Windows, the Windows 10 in which a lot of touch screen based features were replaced by simple mouse and keyboard actions. While this is a welcome change, the lock screen on Windows 10 still requires the users to perform a swipe or a click away to pass through and many people might find it annoying.
You May Like: How to Remove Old Profile Pictures from Windows 10
So, if you are one among them, here is a simple method using which you can permanently disable or remove the lock screen on your Windows 10 PC or laptop. This means you can directly enter your password and log in right after your system finishes booting.
How To Remove The Lock Screen On Your Windows 10 PC Or Laptop
Method 1 :
Note: This method might not work in all versions or architectures of Windows 10. But this is the easiest method to disable the lock screen on your Windows 10 PC. However, if this doesn’t work for you, you can follow the second method below.
Step 1:
Hold down the Windows button and the ‘R’ button together on your keyboard to launch the Run Window.

Step 2:
Now just type “gpedit.msc” in the text box of the run window and then press enter to launch the Group Policy Editor.

If the editor is not opening, then it means that your Windows 10 PC does not support this feature. So, please proceed to the next method.
You May Like: How to Change Windows Store Location / Country
Step 3:
If the Group Policy Editor successfully launches for you, then you can proceed by expanding through the following locations one by one from the left side of the Group Policy Editor Window
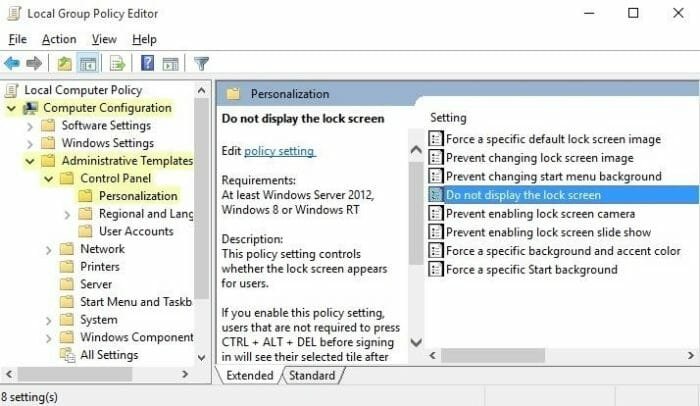
Computer Configuration->Administrative Templates->Control Panel->Personalization
Step 4:
Now select the ‘Do not display the lock screen’ option on the right side of the window and then click on enter to open it.
Step 5:
In the ‘Do not display the lock screen’ window just select the enabled option and then click on Apply and ok to save it.
Step 6:
That’s it. You have successfully disabled the lock screen on your Windows 10 PC. Just reboot like you normally do and your lock screen will be removed once the boot process is complete.
You May Like: WhySoSlow: Find Out What Makes Your PC Slow
Method 2:
Step 1:
Begin by holding down the Windows button and the ‘R’ button together on your keyboard to launch the Run Window.
Step 2:
Now type ‘regedit’ in the text box of the run window and then press enter to launch the Registry Editor window.

Step 3:
Inside the Registry Editor window, Navigate to HKEY_LOCAL_MACHINE->SOFTWARE->Policies->Microsoft->Windows

Step 4:
Right click on Windows and then select New->key.

Step 5:
A new key will now be created inside the Windows folder. Just right click on it and then select rename and rename it as personalization just for easy reference.
You May Like: How to Turn Off Windows Defender in Windows 10
Step 6:
Now right click on the right side of the window on an empty space inside the Personalization folder and then select New->DWORD (32-bit) Value.

Step 7:
Now just right click on the newly created value and then rename it as NoLockScreen. This way it would be easy to remember in the future when you want to come back again and change this setting.
Step 8:
Finally, double click on the newly created NoLockScreen value and a pop up window will be opened. Here, just change the Value data inside the text box from 0 to 1 and then hit ok to continue.

This essentially means that you have changed the value of the NoLockScreen from false to true. So, basically, your lock screen will be disabled and removed now and you no longer have to pass through the lock screen from the next time you boot Windows 10.
That’s it. You have now successfully disabled the lock screen on your Windows 10 PC or laptop with no additional software installed. If you have any doubts regarding this process, feel free to comment below.