Stream Music Between Any Two Computers Using Windows Media Player Remote Media Sharing
So you have quite a few gigabytes of music albums and songs stored in your home computer and you want to listen to all those songs from the office computer. You hate carrying USB drives and copy pasting the files over and over again on multiple computers.
Windows media player has a cool remote media streaming option (Windows7 only) which will allow you to stream songs from one computer to another. All you need is a Windows 7 online ID provider e.g a Windows live account.
Alternative: If you use Dropbox, check out our earlier guide on using Dropbox and Google Chrome for streaming music between multiple computers.
Setting up Remote Media Streaming in Windows Media Player
1. Run Windows Media player, click “Stream” and choose “Allow internet access to home media”
2. This will open a new window, click “Link an Online ID”
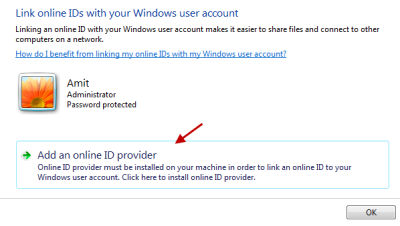
3. In the next window, choose “Add an online ID provider”
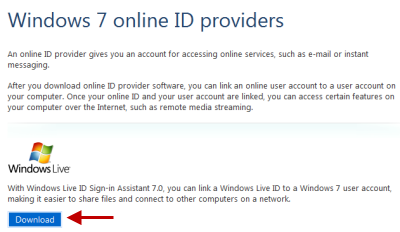
 4. This will open a webpage with a direct link to download the software required for the media streaming to work. Hit the download link to download the Windows Live idcrl setup ~ 5MB.

5. After the program is successfully installed, fall back to the Windows media player window and click “Link an Online ID”
6. Next, enter your Windows live account’s credentials and the set up part is over for this computer.
Important: Repeat the same procedure on all other computers where you would want to stream the music albums. You can configure any number of computers for sharing music libraries and streaming music among each other.
When the setup is over, open Windows media player from any computer and look in the left pane. You will notice a link to all the linked computers, as shown below:
When To use Windows Media Player Remote Media Sharing
There are quite a few situations when the remote media sharing feature is extremely useful. Implementing remote media sharing allows you to stream songs, videos and any other media directly over another computer – without the need to upload them to any third party file sharing service and download them on the host computer.
Another advantage is with custom playlists. Create a playlist on one computer, allow media sharing and simply import that playlist on another computer. No need to upload or download anything !
Streaming Songs And Playlists Between Two Computers Connected Via LAN/ WLAN
If you have multiple computers connected via a home or small office network, you can use the same feature without having to use the internet or a Windows7 online ID provider. To do this, first ensure that both computers are connected on a local area network or a wireless area network and are able to share files without any problems.
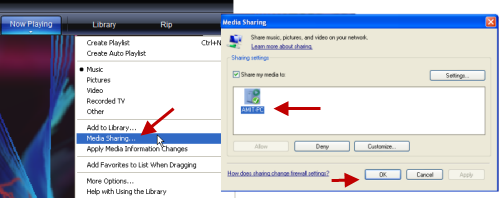
Next, open Windows media player from any computer and click the “Library” menu (Windows XP). Then select “Media sharing” and choose the other computer already connected to the home network. Repeat the same procedure for the other computer, which may be running Windows Vista or Windows7.

The advantage of this is that you can stream songs and playlists from one computer to another without having to paste them at the network folder.
Further reading: Windows Media Player guide, tips and tricks


