How to Change The Number of App Tile Rows in Windows 8 Metro Start Screen
I have been using Windows 8 since Microsoft released their Consumer Preview and lately, switched to Release Preview of this new operating system with its signature and the most debatable Metro Start Screen. Common concept is that Windows 8 Metro Start Screen is ideally suited for touch screen devices and not so enjoyable with keyboard and mouse, also lacking the charm of the good old Windows start button. Personally, after using Windows 8 Metro Start Screen, I have become a complete devotee of its user interface.
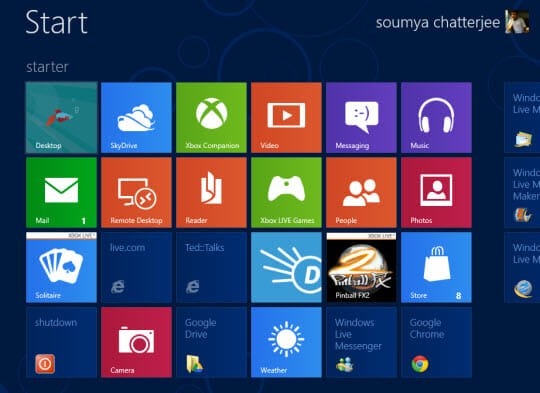
Windows 8 Metro Start Screen may not be as eternal as Windows Start Menu but still the antecedent has it’s edge over the posterior for its live App Tiles. You can get new emails, tweets, people from your social web, weather, events and much more in real-time from those live App Tiles within one screen from afar. If you have dual monitors, Windows 8 will automatically load Metro screen on one and Desktop home on the other.
Now if you are a Windows 8 Metro Start Screen user, you can find App tiles are organised within a number of rows. If you want to change the number of App Tiles rows in Windows 8 to your customized one, here I have detailed how to do that through some Registry tweaking.
Before you start, it is recommended to take a back up of your existing registry settings or create a system restore point as the following steps can permanently damage your operating System, if things go wrong. You can also look for the article that we have already covered on “how to take a back up of registry settings“.
My existing settings are set to ‘4’ rows and I’m going to make it to ‘3’, which will make the existing tiles bigger.
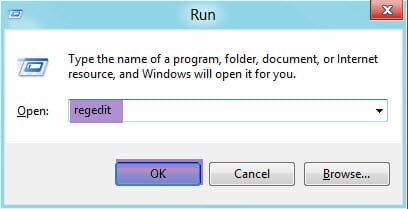
1. Log-in to Windows 8, hit ‘Windows’ Key + R and key in ‘regedit’ within the Run command box.
2. Move to HKEY_CURRENT_USER\Software\Microsoft\Windows\CurrentVersion\ImmersiveShell\Grid and look out for “Layout_MaximumRowCount” in Registry editor. If it’s not there just right click on any empty area on that window and create a new registry key.
Choose “DWORD(32-bit) Value” and click on it as shown below:
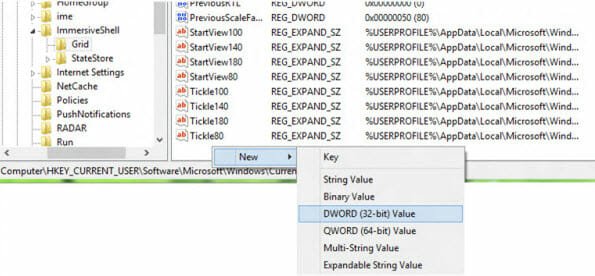
3. Rename it to “Layout_MaximumRowCount” and when the new key is created, right click on it and choose “Modify”. Luckily, if the registry key already exists you do not have to recreate it. Just spot it and right click on it to choose “Modify” and follow the next steps.
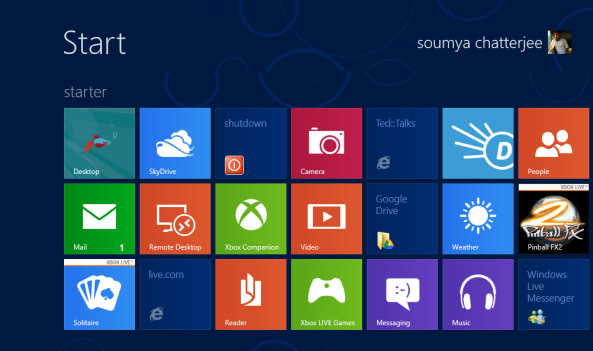
4. On the edit window key in the numeric value of number of rows, I have chosen ‘3’ to make three rows of App Tiles on the Windows 8 Metro Start Screen. You can choose to show more rows or just 2 rows, just key in the required number as shown in the following screnshot:

5. When you are done, exit Registry editor.
6. Restart your computer for the changes to take effect and enjoy the new Windows 8 Metro Start Screen as it sets the number of rows of App Tiles according to your choice.
Before choosing the number of rows you have to be careful about the resolution of your monitor as it limits the maximum number of rows of App Tiles to display on Windows 8 Metro Start Screen. Use the following table to alter your monitor resolution settings which can house corresponding number of App Tiles rows with its maximum and minimum value on Metro Start Screen.

As I had chosen the value to be ‘3’ it limits the number of rows of App Tiles on Windows 8 Metro Start Screen to ‘3’ which was previously ‘4’.
Microsoft guaranties that a minimum resolution will be required to run Windows 8 Metro Apps but still, I did not find anything that can help users to run Windows 8 Metro Apps in a lower resolution display, permanently. You have to have the minimum required Hardware to install and run Windows 8 and specially if you want to play with Metro Apps.